Showing posts with label google plus. Show all posts

Show/Hide Blogger and Google+ Comments System With Toggle

Many Blogger site owners received the new Google+ Comment System pretty negatively because it forced all commenting users to create their own Google+ account before they were able to write a comment. The Google+ Comment System on Blogger was convenient to writers, but discouraged many users from continuing to comment on blogs because they simply didn't want to use Google+. For those that did use Google+ to make a comment, Blogger would never email you and notify you that someone left a comment; you could go days or weeks without ever realizing that you never responded to a reader.

In addition to frustrating your audience, the Google+ Comment System on Blogger depended upon the URL of your blog post. By changing your URLs or moving around your blog posts internally, you run the risk of losing every one of your comments that was placed using Google+.

Previously, the only way to solve this problem was to disable the comment system through your account settings, thus giving up your ability to use their Google+ account. Now, there's an easy new way to have the best of both worlds. Allowing fans of Google+ as well as everyday blog readers to access all same features, you’ll be able to engage every visitor equally. You can respond to comments while still being able to communicate with other Google+ users outside of your site and take advantage of the Google+ Comment System on Blogger.
google plus comments, blogger

How to Integrate Blogger and Google Plus Comments

To make the installation as simple as possible, I used inline jQuery and CSS, but who wants can change this code later. Also, the most accessible place I found to add it would be just after <b:include data='post' name='post'/>. So, let's start adding it:

Step 1. Log into your Blogger account and select your blog > go to 'Template' and press the 'Edit HTML' button on the right side.


Step 2. Click anywhere inside the code area and press CTRL + F keys to open the editor's search box and search for the following code:
<b:include data='post' name='post'/>
Step 3. Just after <b:include data='post' name='post'/> add the following code:
<b:if cond='data:blog.pageType == &quot;item&quot;'>
<style>#comments, #gplus-comments-visibility {display:none;} .comments-icons {background: url(https://blogger.googleusercontent.com/img/b/R29vZ2xl/AVvXsEhKE_bh7YEax4ls07lDL2rDdmlXOxgv6AQsUfHNLPo6jxiAVOM31KYGbff9yfGW1FSzctft2iLUmjsatOZdmDSzCmv147SKTEb6G5YtrWE_vr4MB-5nG0OUFqv98gHhGSUXNRh0mBf-ilnZ/s1600/speech-bubble.png) no-repeat; font-size: 20px; font-family: &quot;Arial Narrow&quot;,Arial,sans-serif; color: #555; font-weight: bold; padding: 18px 15px 0; height: 70px; } .comments-icons a img {vertical-align: middle;}</style>
<div class='comments-icons'>
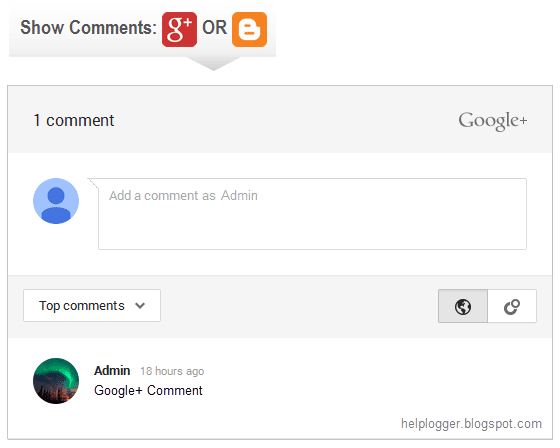
Show Comments: <a class='show-hide-comments' href='javascript:void();' onclick='$(&quot;#gplus-comments-visibility&quot;).slideToggle();$(&quot;#comments&quot;).hide();'><img class='gplus-icon' height='35' src='https://blogger.googleusercontent.com/img/b/R29vZ2xl/AVvXsEiQQ6YMGEOg5HsQvE_sO7WUhVTs1SRjksqgB2Z-2Dys76-aR_p0LLmpUFkDDqRbsTkSPg-YaMBSmLg-iD7_Eze30VhB4v_L1wP0X7RVyWhvI05f0JN7W3cgk5SUUQfdwk0fHVr3VbCio5Jm/s1600/google-plus-logo.png' width='35'/></a> OR <a class='show-hide-comments' href='javascript:void();' onclick='$(&quot;#comments&quot;).slideToggle();$(&quot;#gplus-comments-visibility&quot;).hide();'><img class='blogger-icon' height='35' src='https://blogger.googleusercontent.com/img/b/R29vZ2xl/AVvXsEiorLRPyS0BVnCqaUo8k-b7AiS7oiI322UnWWnMAzLw4k0vL8bZcsFs8tx9OB9m35FRC462vdwlnD-CtXREzj_5BHpD5X3ovYIjN-W0LIZseb1GVqOG4fVh-9U__D9KpzgCVdP1CrCbERtF/s1600/blogger-logo.png' width='35'/></a>
</div>
<div id='gplus-comments-visibility'>
<div class='g-comments' data-first_party_property='BLOGGER' data-view_type='FILTERED_POSTMOD' data-width='550' expr:data-href='data:post.url'/>
</div>      
</b:if>

Note: data-width is for setting the width of the comment box, so the number (550) indicated there can be changed according to the design of your blog.

Step 4. Press the "Save Template" button located at the top of the editor and view your blog to see if you have successfully added Google+ commenting system to Blogger.

Please note that in order to make this work, you need to make sure that you are using a version of jQuery in your site. Otherwise, add this line just above the </head> tag using the HTML template editor:
<script src='https://ajax.googleapis.com/ajax/libs/jquery/1.6.4/jquery.min.js' type='text/javascript'/>
That's it!
From now on, any reader that views your post has the option of making a comment using their Google+ account, or the native Blogger comments. Your readers will enjoy the flexibility that your site provides and you will also benefit from the inclusive services offered by Google.

How to Turn Off Auto Enhance for Blogger Photos

When you go to upload photos on Blogger, look closely for changes between the picture you uploaded on your computer and how it looks on Blogger. If you notice any darkening of the pictures themselves, especially in light-colored areas of the photo, you are seeing the results of a Blogger auto-enhancing feature.

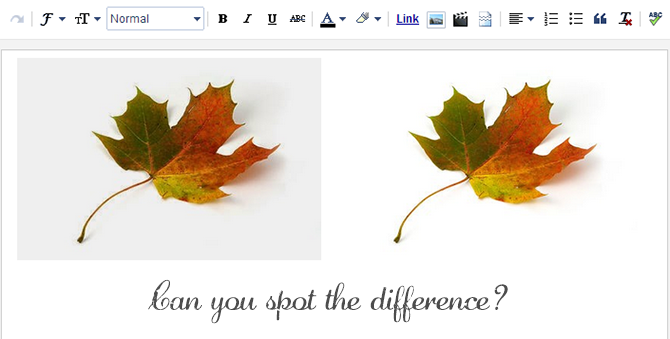
This Blogger auto-enhancing feature is packaged within the service and is intended to give your photos a more professional feel. It works by smoothing out fuzzy photos and removing any imperfections in personal photos, so that you see your best looking you. However, you may realize that not every picture that you upload needs to undergo this enhancement. In fact, it may even cause your site to look dull or outdated as it can turn white photos gray.

auto enhance on off
The first picture was auto-enhanced, while the second one was not

Turning Off Picture Auto-Enhancement on Google Plus

Fortunately, there is a way to adjust these settings so that you're able to turn them on and off at will. You may be surprised to know that the root cause of these changes actually lies with the Google uploader and your decision to link your Google+ and Blogger accounts together.

Step 1: Access Your Google Account

Blogger is just one of the many services that make up the Google network. When the company released Google+, this Blogger auto-enhancing feature came with it because adjustments were made to the Google uploading service. These same changes take place when you're adding pictures from your library in Picasa. The good thing about Google is that they allow you to make adjustments to your settings from one central location by navigating over to your Google account.

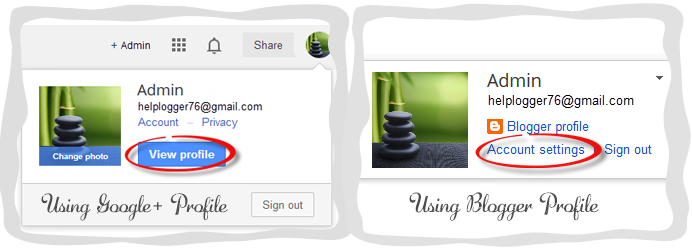
In order to turn the "Auto Enhance" feature off, go to your Blogger dashboard, and click your icon in the top right corner, then the blue "View Profile" button (if you are not using Google+, click the "Account settings" link). Now you'll be taken over to your Google+ profile or settings.

google blogger profile

Step 2: Find The Enhancement Settings

Once opening your Google account, look for the tab on the top left corner of the page that says Profile > navigate to Settings - or if you are using a Blogger profile, click the "Edit settings" link under "Google+ settings". This will bring up a list with "Photos and Videos" options including "Show geo location…" and "Allow viewers to download my photos...". Look toward the bottom of the list for the 'Auto Enhance' heading and check the "Off" option to turn this feature off.

auto enhance off

Step 3: Auto Enhance on Photos You've Already Uploaded

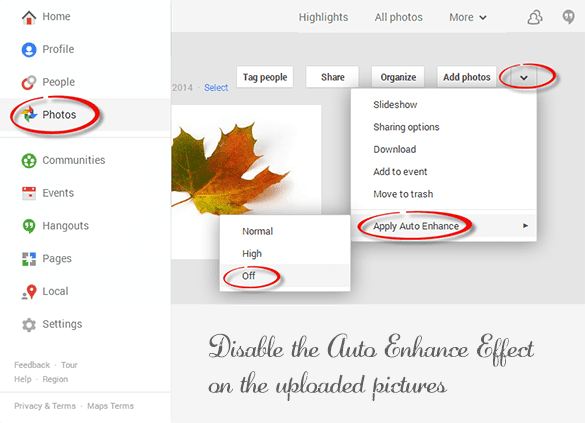
Any picture that you upload from here on out will no longer be subject to this Blogger auto-enhancement feature; however, this will not revert any pictures that have already been uploaded. If you want to make any changes to photos that were uploaded during this period, do the following: from the same panel, click on the 'Photos' tab which it will take you to the albums for each blog > click on the blog where you wish to disable the auto enhance effect and press the down arrow > go to the "Apply Auto Enhance" option and choose 'Off'.

pictures auto enhancement

Notice The Results?

Now that the auto-enhancement feature is turned off, you may start to see different results when uploading. Remember that this change will affect all of your Google services across the board such as Google+ and YouTube. You may turn this feature back on, at any time, by repeating the steps list above and re-checking the account settings box. When you're done, just turn it back off. Understanding these changes gives you the power to decide for yourself which pictures you'd like enhanced, and which you don't.

How to Share Blogger Posts or Pages to Google+

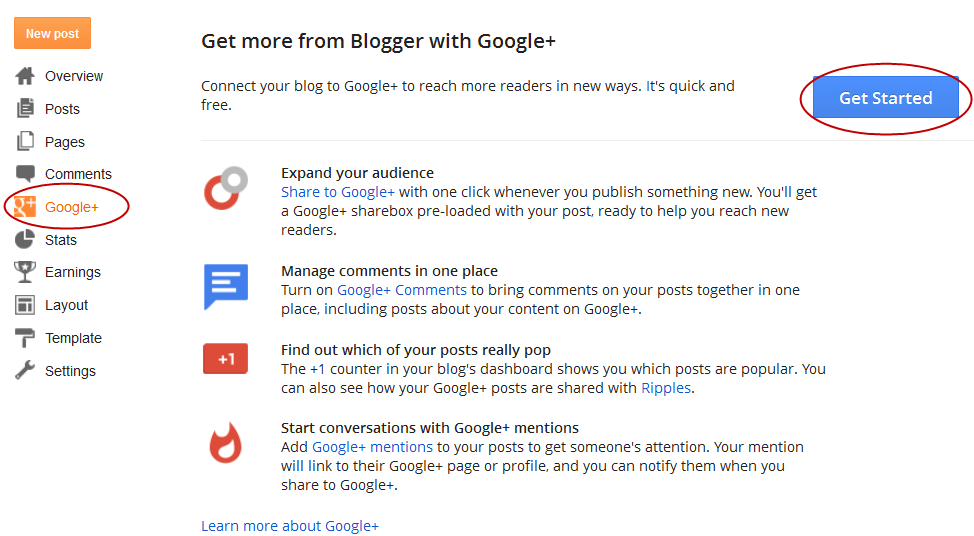
When you share Blogger posts/pages to Google+, an entirely new group of people will be able to find and follow you. Right now, if you access your Blogger dashboard, you'll notice that there's a Google+ tab which can be used to connect your blogs with your Google+ profile or page.

If your Blogger blogs haven't already been integrated with a Google+ profile, you can go anytime to the Google+ tab and click on the Get Started button:
share blogger posts or pages to google plus

get started with google+

It's important to note that once you've upgraded your blog to connect with Google+, the posts or pages published on your blog will be listed on your personal Google+ profile. However, you have the option to select whether your content will be shared on your Google+ Profile or Page and associate some blogs with a Google+ page, while keeping other blogs connected with your profile.

How to associate your blog with a Google+ page

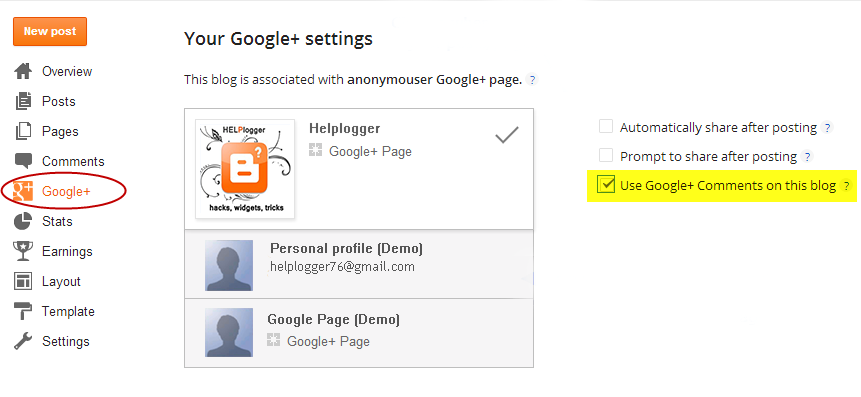
In some cases, you may want to associate a blog with the Google+ Page for your brand, business or organization, rather than your personal profile. For this, simply access your Blogger dashboard, visit the Google+ tab and there you can swap the Google+ connection from using your profile page to a Google+ page linked with your account:

share on google plus

On the right, you'll have the following options:
  • Automatically share after posting: This option is enabled by default on all blogs linked to Google+. When you publish a blog post or page, a snippet will automatically be shared publicly on your Google+ page or profile. You can disable this setting just by unchecking this box.
  • Promote to share after posting: If you don't want your post to be published automatically, then you can check this option. This option will allow you to share only some blog posts, or share to specific circles.
  • Use Google + comments on this blog: This option enables the new Google + comment system on your blog. This is also a new feature provided by Google.

How to Share Blogger posts or Pages on Google+

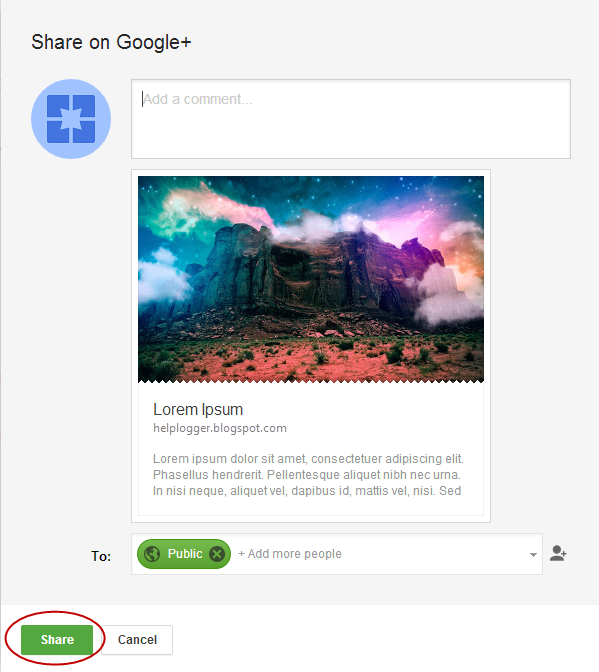
If you have the Prompt to share after posting option checked, next time you publish a blog post, you'll see a share box inviting you to share your post with your Google+ followers. Note that the default circle is set to "Public" but you can modify your circles every time you choose to share.

share post on google plus

Once you click the Share button, this post will appear on the profile or page to which you have connected your blog. Keep in mind that if you have posts scheduled to be published later, you will no longer be asked to publish to your Google+ stream. In this case, you can choose to Share your post/page at any time by clicking the Share link beneath a post or page.

share blogger posts on google+

You can also click on this option each time you want to share only certain posts, or if you want to retroactively share posts and you don't want to constantly change the setting.

As soon as you've chosen to use your Google+ profile on your blog, you can start sharing your content on Google+. If you haven't yet made the switch, click on this link to get started.

How to Enable Google Plus Comments in Blogger

How to Enable Google Plus Comments in Blogger

Long time ago, Google proudly announced their new integrated commenting system which is now available for users who have created a Google+ profile and connected it with their Blogspot blogs. This way, Blogger users will be able to use Google+ as a commenting system for their blogs, while comments from Google+ will automatically appear on their blogs.
google plus commenting system on blogger

For those who haven't yet upgraded the Blogger profile to a Google+ profile, please see this tutorial on how to associate a blog to a Google plus page. Once you have connected a blog to a Google+ profile, you'll have a new "Use Google+ Comments on this blog" setting on the Google+ tab of your blog. To enable the Google plus commenting system, just check the box next to this setting:

use google+ comments on this blog, blogger tutorial

As soon as you've enabled the feature through your Blogger Dashboard, you'll have the following features:
  1. Threaded commenting system: the threaded system will allow a reader to reply to other comments on that post, thus the conversations will become much easier, more effective and more enjoyable
  2. Public and private comments: this ensures a better privacy for your visitors which can make their comments either public or private
  3. Edit or delete comments: your visitors will be able to edit any comments that they wrote even after publishing, so they don't have to write another comment explaining the correction
  4. Google Plus One (+1) button in comments: we can up-vote any comment by clicking this button. This is a great feature which could also help you to get some traffic from Google+
  5. "Also share on Google+" check box: with this option which is right below the comment editor, we will be able to share a specific comment on Google+ and thus get more traffic!

Things to consider before adding the Google Plus Comments in Blogger

  • the Google Plus commenting system won't work for private and adult blogs
  • If you are using a third-party commenting system like Disqus, your comments might not be retained when you enable Google+ Comments
  • If you change domain name, comments will be gone. Therefore, it would be highly recommended to implement the Google Plus commenting system only after you've decided to use a custom domain name
  • If you choose to allow comments pending moderation, you will have to visit the post in order to approve, hide or delete comments before they are publicly visible
  • Only registered Google+ users can comment, this means that visitors who don't have a Google+ account will not be able to comment on your blog

How to Enable Google Plus on Custom Blogger Templates

If you are using a custom Blogger template, the comments might not show up after checking the "Use Google+ Comments on this blog" setting. In this case, we will need to apply the following trick in order to enable it on custom templates:

Step 1. From the Blogger Dashboard, go to "Template" and click on the "Edit HTML" button.

Step 2. Click anywhere inside the code area and press the Ctrl + F keys to open the Blogger search box, then type or paste the following line inside the search box and hit Enter to find it:
<div class='post-footer'>
Step 3. Just below it, paste this code:
<div class='cmt_iframe_holder' data-viewtype='FILTERED_POSTMOD' expr:href='data:blog.canonicalUrl'/>
Step 4. That's it! Click on the "Save template" button to save the changes and now we should be able to see the Google Plus comments in our Blogspot blog.

Happy commenting!