Showing posts with label Comments. Show all posts

Show/Hide Blogger and Google+ Comments System With Toggle

Many Blogger site owners received the new Google+ Comment System pretty negatively because it forced all commenting users to create their own Google+ account before they were able to write a comment. The Google+ Comment System on Blogger was convenient to writers, but discouraged many users from continuing to comment on blogs because they simply didn't want to use Google+. For those that did use Google+ to make a comment, Blogger would never email you and notify you that someone left a comment; you could go days or weeks without ever realizing that you never responded to a reader.

In addition to frustrating your audience, the Google+ Comment System on Blogger depended upon the URL of your blog post. By changing your URLs or moving around your blog posts internally, you run the risk of losing every one of your comments that was placed using Google+.

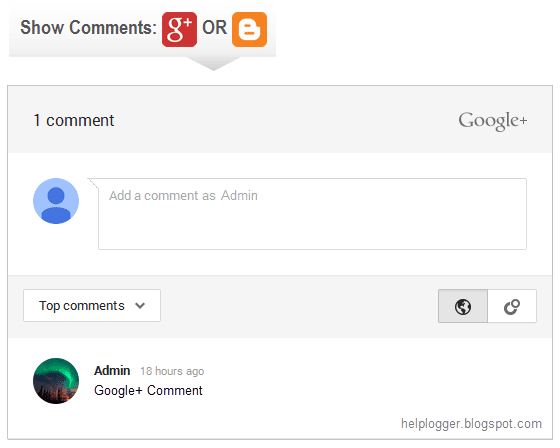
Previously, the only way to solve this problem was to disable the comment system through your account settings, thus giving up your ability to use their Google+ account. Now, there's an easy new way to have the best of both worlds. Allowing fans of Google+ as well as everyday blog readers to access all same features, you’ll be able to engage every visitor equally. You can respond to comments while still being able to communicate with other Google+ users outside of your site and take advantage of the Google+ Comment System on Blogger.
google plus comments, blogger

How to Integrate Blogger and Google Plus Comments

To make the installation as simple as possible, I used inline jQuery and CSS, but who wants can change this code later. Also, the most accessible place I found to add it would be just after <b:include data='post' name='post'/>. So, let's start adding it:

Step 1. Log into your Blogger account and select your blog > go to 'Template' and press the 'Edit HTML' button on the right side.


Step 2. Click anywhere inside the code area and press CTRL + F keys to open the editor's search box and search for the following code:
<b:include data='post' name='post'/>
Step 3. Just after <b:include data='post' name='post'/> add the following code:
<b:if cond='data:blog.pageType == &quot;item&quot;'>
<style>#comments, #gplus-comments-visibility {display:none;} .comments-icons {background: url(https://blogger.googleusercontent.com/img/b/R29vZ2xl/AVvXsEhKE_bh7YEax4ls07lDL2rDdmlXOxgv6AQsUfHNLPo6jxiAVOM31KYGbff9yfGW1FSzctft2iLUmjsatOZdmDSzCmv147SKTEb6G5YtrWE_vr4MB-5nG0OUFqv98gHhGSUXNRh0mBf-ilnZ/s1600/speech-bubble.png) no-repeat; font-size: 20px; font-family: &quot;Arial Narrow&quot;,Arial,sans-serif; color: #555; font-weight: bold; padding: 18px 15px 0; height: 70px; } .comments-icons a img {vertical-align: middle;}</style>
<div class='comments-icons'>
Show Comments: <a class='show-hide-comments' href='javascript:void();' onclick='$(&quot;#gplus-comments-visibility&quot;).slideToggle();$(&quot;#comments&quot;).hide();'><img class='gplus-icon' height='35' src='https://blogger.googleusercontent.com/img/b/R29vZ2xl/AVvXsEiQQ6YMGEOg5HsQvE_sO7WUhVTs1SRjksqgB2Z-2Dys76-aR_p0LLmpUFkDDqRbsTkSPg-YaMBSmLg-iD7_Eze30VhB4v_L1wP0X7RVyWhvI05f0JN7W3cgk5SUUQfdwk0fHVr3VbCio5Jm/s1600/google-plus-logo.png' width='35'/></a> OR <a class='show-hide-comments' href='javascript:void();' onclick='$(&quot;#comments&quot;).slideToggle();$(&quot;#gplus-comments-visibility&quot;).hide();'><img class='blogger-icon' height='35' src='https://blogger.googleusercontent.com/img/b/R29vZ2xl/AVvXsEiorLRPyS0BVnCqaUo8k-b7AiS7oiI322UnWWnMAzLw4k0vL8bZcsFs8tx9OB9m35FRC462vdwlnD-CtXREzj_5BHpD5X3ovYIjN-W0LIZseb1GVqOG4fVh-9U__D9KpzgCVdP1CrCbERtF/s1600/blogger-logo.png' width='35'/></a>
</div>
<div id='gplus-comments-visibility'>
<div class='g-comments' data-first_party_property='BLOGGER' data-view_type='FILTERED_POSTMOD' data-width='550' expr:data-href='data:post.url'/>
</div>      
</b:if>

Note: data-width is for setting the width of the comment box, so the number (550) indicated there can be changed according to the design of your blog.

Step 4. Press the "Save Template" button located at the top of the editor and view your blog to see if you have successfully added Google+ commenting system to Blogger.

Please note that in order to make this work, you need to make sure that you are using a version of jQuery in your site. Otherwise, add this line just above the </head> tag using the HTML template editor:
<script src='https://ajax.googleapis.com/ajax/libs/jquery/1.6.4/jquery.min.js' type='text/javascript'/>
That's it!
From now on, any reader that views your post has the option of making a comment using their Google+ account, or the native Blogger comments. Your readers will enjoy the flexibility that your site provides and you will also benefit from the inclusive services offered by Google.

How to Display Most Commented Posts in Blogger

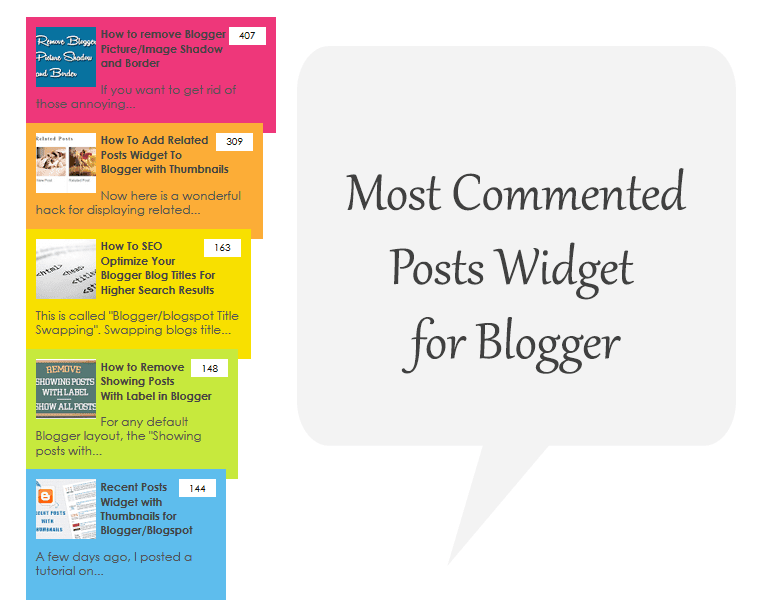
One of the best gadgets for your Blogger blog is a popular posts widget for your sidebar. This lets visitors see what your trending posts are right now and encourages them to click on them to read them. This basic widget is just a little too basic, however, for the modern day website visitor. Not only do they want to see your trending posts, but they also want to join the discussions that are happening on your blog. To do that, you'll need a most commented posts widget for Blogger.

Having a customized widget on your site is a lot easier than you might think. In order to have an effective widget, however, you're going to need a few specific things to help you out.

most commented posts widget


Here's What You're Going To Get

There are certain aspects in the design of a most commented posts widget that you should expect. That's why you'll find these specific components with this custom widget:
  • Ordered by popularity. The posts that have the most comments are the most likely to have visitors want to read the post and join in with the conversation. By ordering your posts based on the popularity of them, you'll give each visitor the chance to see what the hype really is about! This lets you have a charted graphic that gives a visitor easy recognition, but also allows you to keep it straight and aligned if you're looking for a cleaner look.
  • Graphic incorporation. Blog posts that have at least one graphic incorporated with them will receive 100% more traffic than posts that have no images at all. For every graphic that you include with a blog post, the more likely you are to get a click! The same is true with your most commented posts widget, so be sure to incorporate graphics that stand out with your design.
  • Descriptions that blend in. The internet today revolves around the value that you can provide each individual user. People don't just click on things because they look visually tempting. They click on them because they promise a level of value that another website like yours isn't able to provide. By having descriptions that blend in, you'll be able to enhance the perceived value that your site can provide. This leads to more clicks!
Related: Add Multi-Colored Popular Posts to Blogger

Add the Most Commented Posts Widget to Blogger

Step 1. Log in to your Blogger account and go to Template, press the "Edit HTML" button.

Step 2. Click anywhere inside the code area and press the CTRL + F keys to open the Blogger' search box. Type the following tag inside it and hit Enter to find it:
</Group>
Step 3. Just below </Group>, add this code:
<Group description="Most Commented" selector=".most-commented">
<Variable name="most.commented.background1" description="background color1" type="color" default="#fa4242" value="#ee377a"/>
<Variable name="most.commented.background2" description="background color2" type="color" default="#ee6107" value="#fcad37"/>
<Variable name="most.commented.background3" description="background color3" type="color" default="#f0f" value="#f8e000"/>
<Variable name="most.commented.background4" description="background color4" type="color" default="#ff0" value="#c7e93d"/>
<Variable name="most.commented.background5" description="background color5" type="color" default="#0ff" value="#5ebded"/>
</Group>

add code to blogger html
Note: if you can't find the </Group> tag, try to find the following tag instead and add the variables just below it:
<b:skin><![CDATA[

Step 4. Now search for the following tag (CTRL + F):
]]></b:skin>
Step 5. And just above it, add this CSS code:
.comment-count {
    padding: 3px 10px;
    background: #fff;
    color: #000;
    font-size: 10px;
    float: right;
}

.most-commented ul {
    padding: 0px !important;
    font-family: Century Gothic, sans-serif;
}

.most-commented ul li {
    list-style-type: none;
    padding: 10px;
    color: #555;
    margin-top: -10px;
}

.most-commented ul li a {
    color: #444;
    font-weight: bold;
    text-decoration: none;
    font-size: 11px;
}

.most-commented ul li img {
    float: left;
    margin: 0px 5px 0px 0px;
    width: 60px;
    height: 60px;
}

.most-commented:nth-child(3n+0) {
    background: $(most.commented.background1);
    width: 100%;
}

.most-commented:nth-child(4n+0) {
    background: $(most.commented.background2);
    width: 95%;
}

.most-commented:nth-child(5n+0) {
    background: $(most.commented.background3);
    width: 90%;
}

.most-commented:nth-child(6n+0) {
    background: $(most.commented.background4);
    width: 85%;
}

.most-commented:nth-child(7n+0) {
    background: $(most.commented.background5);
    width: 80%;
}
Step 6. Save the template.

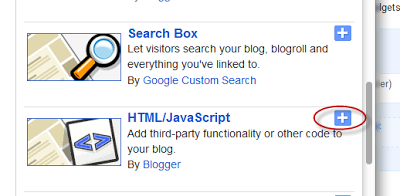
Now, let's add the Most Commented Posts widget to the Layout of our Blogger blog. Head over to the "Layout" section of your Blogger dashboard and click on the "Add a gadget" link on the right side. From the pop-up window, scroll down the list and select the "HTML/JavaScript" gadget:

blogger html javascript gadget

Copy and paste this script inside the content box:
<script type="text/javascript">
function stripTags(s,n) {
    return s.replace(/<.*?>/ig,"").split(/\s+/).slice(0,n-1).join(" ")
}
function mostcommented(feed) {
    var i;
    for (i = 0; i < feed.count ; i++) {
var postURL = "'" + feed.value.items[i].link + "'";
var postTitle = feed.value.items[i].title;
var postthumbnail = "<img src="+feed.value.items[i].postthumbnail+" />";
var postDescription = feed.value.items[i].postdescription;
var postComments = feed.value.items[i].commentcount;
var postList = '<div class="most-commented"><ul><li><div class="comment-count">' + postComments + "</div>" + postthumbnail + "<a href="+ postURL + '">' + postTitle + "</a>"  + '<p>' +stripTags(postDescription,10)+'...</p>' + '</li></ul></div>';
 document.write(postList);
     }
 }
 </script>
<script src="http://pipes.yahoo.com/pipes/pipe.run?
AddUrlHere=http://helplogger.blogspot.com
&NumberofPosts=5
&_id=2cb5eb603ed55a6264ee1484e5fdd45c
&_callback=mostcommented
&_render=json"
type="text/javascript"></script><span style="font-size: 80%; float:left;"><a href="http://helplogger.blogspot.com/2014/08/most-commented-posts-blogger-widget.html">Add this widget</a></span>
Here, change http://helplogger.blogspot.com with your blog URL. If you want to add more characters to the description, modify the "10" value in red from "postDescription,10".

If you want a more simple look (without the thumbnails and post snippets), add this script instead:
<script type="text/javascript">
function stripTags(s,n)
    {
    return s.replace(/<.*?>/ig,"").split(/\s+/).slice(0,n-1).join(" ")
}
function mostcommented(feed) {
 var i;
 for (i = 0; i < feed.count ; i++)
 {
var postURL = "'" + feed.value.items[i].link + "'";
var postTitle = feed.value.items[i].title;
var postComments = feed.value.items[i].commentcount;
var postList = '<div class="most-commented"><ul><li style="margin-bottom: 10px"><div class="comment-count">' + postComments + "</div>" + "<a href="+ postURL + '">' + postTitle + "</a>"  + '</li></ul></div>';
 document.write(postList);
 }
 }
 </script>
<script src="http://pipes.yahoo.com/pipes/pipe.run?
 AddUrlHere=http://helplogger.blogspot.com
&NumberofPosts=5
&_id=2cb5eb603ed55a6264ee1484e5fdd45c
&_callback=mostcommented
&_render=json"
type="text/javascript"></script>
<span style="font-size: 80%; float:left;"><a href="http://helplogger.blogspot.com/2014/08/most-commented-posts-blogger-widget.html">Add this widget</a></span>
.... and replace http://helplogger.blogspot.com with your address.
To add the "comments" text after the comments number, replace the line in red:
<div class="comment-count">' + postComments + "</div>"
with:
<div class="comment-count">' + postComments + " comments" + "</div>"
Once you have finished adding your own settings, press the "Save" button to enable the gadget in the sidebar of your blog. That's it!

configure html javascript gadget

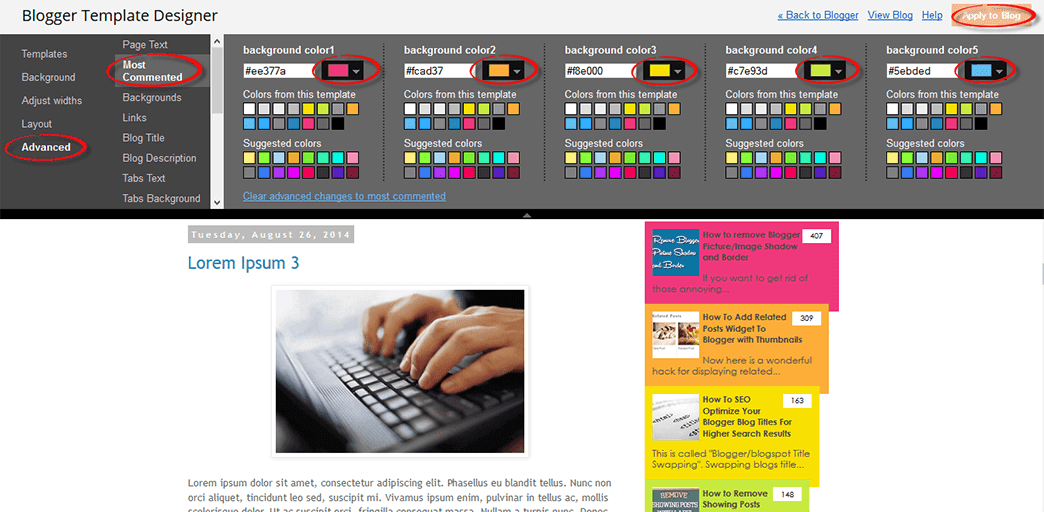
To change the background colors of the most commented posts, go to "Template" > hit the "Customize" button and navigate to "Advanced" > "Most Commented" tab. Here you can pick 5 different colors by clicking on the color boxes:

blogger template designer

Once you've selected your favorite color scheme, click the "Apply to blog" button to save the changes... and you're done.

Why Use the Most Commented Posts widget?

The basic psychology in every human is that they want to feel like they belong to a community. That's exactly what this customized widget will bring to your site. No matter what content drew a visitor to see your content, this widget will invite them to join the lively parts of your piece of the internet. This helps to build relationships, with you and with other visitors, and this relationship-building engagement is what you need to start having real value.

Take the time to install this most commented posts widget on your site and you'll see for yourself why this is one of the most useful widgets that is available right now. Enjoy ;)

How to Enable Google Plus Comments in Blogger

How to Enable Google Plus Comments in Blogger

Long time ago, Google proudly announced their new integrated commenting system which is now available for users who have created a Google+ profile and connected it with their Blogspot blogs. This way, Blogger users will be able to use Google+ as a commenting system for their blogs, while comments from Google+ will automatically appear on their blogs.
google plus commenting system on blogger

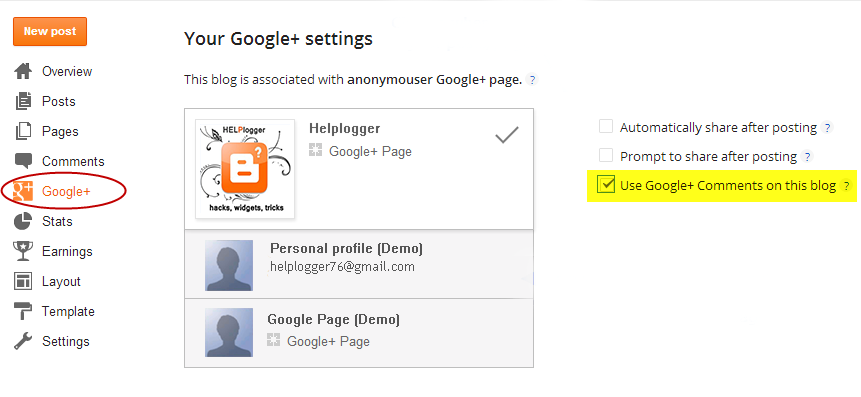
For those who haven't yet upgraded the Blogger profile to a Google+ profile, please see this tutorial on how to associate a blog to a Google plus page. Once you have connected a blog to a Google+ profile, you'll have a new "Use Google+ Comments on this blog" setting on the Google+ tab of your blog. To enable the Google plus commenting system, just check the box next to this setting:

use google+ comments on this blog, blogger tutorial

As soon as you've enabled the feature through your Blogger Dashboard, you'll have the following features:
  1. Threaded commenting system: the threaded system will allow a reader to reply to other comments on that post, thus the conversations will become much easier, more effective and more enjoyable
  2. Public and private comments: this ensures a better privacy for your visitors which can make their comments either public or private
  3. Edit or delete comments: your visitors will be able to edit any comments that they wrote even after publishing, so they don't have to write another comment explaining the correction
  4. Google Plus One (+1) button in comments: we can up-vote any comment by clicking this button. This is a great feature which could also help you to get some traffic from Google+
  5. "Also share on Google+" check box: with this option which is right below the comment editor, we will be able to share a specific comment on Google+ and thus get more traffic!

Things to consider before adding the Google Plus Comments in Blogger

  • the Google Plus commenting system won't work for private and adult blogs
  • If you are using a third-party commenting system like Disqus, your comments might not be retained when you enable Google+ Comments
  • If you change domain name, comments will be gone. Therefore, it would be highly recommended to implement the Google Plus commenting system only after you've decided to use a custom domain name
  • If you choose to allow comments pending moderation, you will have to visit the post in order to approve, hide or delete comments before they are publicly visible
  • Only registered Google+ users can comment, this means that visitors who don't have a Google+ account will not be able to comment on your blog

How to Enable Google Plus on Custom Blogger Templates

If you are using a custom Blogger template, the comments might not show up after checking the "Use Google+ Comments on this blog" setting. In this case, we will need to apply the following trick in order to enable it on custom templates:

Step 1. From the Blogger Dashboard, go to "Template" and click on the "Edit HTML" button.

Step 2. Click anywhere inside the code area and press the Ctrl + F keys to open the Blogger search box, then type or paste the following line inside the search box and hit Enter to find it:
<div class='post-footer'>
Step 3. Just below it, paste this code:
<div class='cmt_iframe_holder' data-viewtype='FILTERED_POSTMOD' expr:href='data:blog.canonicalUrl'/>
Step 4. That's it! Click on the "Save template" button to save the changes and now we should be able to see the Google Plus comments in our Blogspot blog.

Happy commenting!

Add a Cool Style to Blogger Threaded/Nested Comments

If you need a fresh style to the threaded comments of a standard Blogger template, here's a simple CSS that will help you to apply a different background, make your avatars rounded, add a border with rounded corners and a triangle which is actually an HTML entity to get that speech bubble look on your comments.

You can see a demo here.

To have this style in your comments, all you need to do is to paste the below code inside the CSS part of the template, which is between the <b:skin> and </b:skin> tags.

Styling Simple Nested Comments with CSS

Step 1. From the Blogger Dashboard, go to "Template" and press the "Edit HTML" button


Step 2. Click anywhere inside the code area and press the CTRL + F keys to open the search box:


Step 3. Paste or type the following tag inside the search box and hit Enter to find it
]]></b:skin>
Step 4. Just above ]]></b:skin> add this CSS:
.comments .comment-block {
background: #F9F9F9;
color: #555;
box-shadow: 0 4px 10px #EEEEEE;
position: relative;
margin-top: 10px;
margin-left: 60px;
padding: 10px;
border: 4px solid #EEEEEE !important;
border-radius:10px;
font: 1.190em/1.2 Cambria,Georgia,sans-serif;
}
.comment-thread li .comment-block:before {
position: absolute;
display: block;
left: -26px;
color: #EEEEEE;
content: "\25C4";
font-size: 30px;
}
.comments .avatar-image-container {
width: 60px;
height: 60px;
max-height: 60px;
margin:0px 0px 0 -28px;
padding: 0px;
border: 7px solid #EEEEEE;
border-radius:60px;
}
.comments .avatar-image-container img {
overflow:hidden;
width: 60px;
height: 60px;
max-width: 60px;
border:0 !important;
border-radius:60px;
}
.comments .comment-thread.inline-thread {
background: none;
}
.comments .continue {
border-top: 0px solid transparent;
}
.comments .comments-content .datetime {
float: right;
font-size: 11px;
}
.comments .comments-content .user a{
font-size: 15px;
color: #498EC9;
}
.comments .comments-content .datetime a:hover{
color: #777;
text-decoration: none;
}
.comments .comments-content .comment:first-child {
padding-top: 0px;
}
.comments .comments-content .comment {
margin-bottom: 0px;
padding-bottom: 0px;
}
.comments .continue a {
padding: 0px;
}
.comments .comments-content .icon.blog-author {
background-image: none;
}

How to Change Blogger Threaded Comments Background, Border and Colors

  • replace the #F9F9F9 value to change the background color of the comments;
  • #555 to change the text comments color;
  • #EEEEEE to change the color of the shadow around comments;
  • 4px solid #EEEEEE to change the border width (4px), style (solid) and color (#EEEEEE) around comments;
  • 1.190em to change the comments font size;
  • to change the arrow color, replace the #EEEEEE value from color: #EEEEEE;
  • to change the border width (7px), style (solid) and color (#EEEEEE) around avatars, modify this part: 7px solid #EEEEEE;
  • to change the avatars size and roundness, change the 60px value;
Here is a tool from that may help to pick your favorite color: Color Code Generator

Step 5. Finally, click on the "Save template" button... and you're done!

Top Commentators Widget with Avatars for Blogger

The commentators are a fundamental part of any blog, since they are the ones that give life to the blog, opening and replying to discussions which leads to more activity in the posts.
how to add top commenters widget to blogger

It is therefore very important to know which are the most active users of your blog, the users who leave more comments, and for this reason, today I present a great method to display a list with the top commentators.

The gadget will look something like this:

add top commentators widget to blogger

This Top Commentators gadget comes with user's avatar and is done with JavaScript.

How to Add the Top Commenters Gadget to Blogger


1. To add this gadget, you have to go to Layout, click on Add a Gadget link.

2. Select the HTML/JavaScript gadget and copy/paste within the empty box the following code:
<style type="text/css">
.top-commentators {
margin: 3px 0;
border-bottom: 1px dotted #ccc;
}
.avatar-top-commentators {
vertical-align:middle;
border-radius: 30px;
}
.top-commentators .commenter-link-name {
padding-left:0;
}
</style>
<script type="text/javascript">
var maxTopCommenters = 8; 
var minComments = 1;     
var numDays = 0;         
var excludeMe = true;    
var excludeUsers = ["Anonymous", "someotherusertoexclude"]; 
var maxUserNameLength = 42;
//
var txtTopLine = '<b>[#].</b> [image] [user] ([count])';
var txtNoTopCommenters = 'No top commentators at this time.';
var txtAnonymous = '';
//
var sizeAvatar = 33;
var cropAvatar = true;
//
var urlNoAvatar = "https://blogger.googleusercontent.com/img/b/R29vZ2xl/AVvXsEgOZPnVE0DN5qRLrlTqZ1IVTreLK1DXLrEjIqxezeaSibRb_lM6eZAMeUfO4a1xteJ433UaKlsj9UwYYEi4OP-oPJOWvpPK9CQpnSglRdja1JWMslSP92VrWhM34qUDlKPtUBxMn3FKtTt5/s1600/avatar_blue_m_96.png" + sizeAvatar;
var urlAnoAvatar = 'https://blogger.googleusercontent.com/img/b/R29vZ2xl/AVvXsEgon12oVLlYRF6LFSMLgIuQMiemQIjrW8l1M5oPpkcKU5IbWQqlpz-2dykXC4Dw-1Edq3szrVpb2T3ne9TPn3AWFHVFNCKmtGf_4HIJj22jO0ABynYUvbd2IUzC4etcugWqPLhwm-MYR9vN/s1600/avatar1.png' + sizeAvatar;
var urlMyProfile = '';
var urlMyAvatar = '';
if(!Array.indexOf) {
 Array.prototype.indexOf=function(obj) {
  for(var i=0;i<this.length;i++) if(this[i]==obj) return i;
  return -1;
}}
function replaceTopCmtVars(text, item, position)
{
  if(!item || !item.author) return text;
  var author = item.author;
  var authorUri = "";
  if(author.uri && author.uri.$t != "")
    authorUri = author.uri.$t;
  var avaimg = urlAnoAvatar;
  var bloggerprofile = "http://www.blogger.com/profile/";
  if(author.gd$image && author.gd$image.src && authorUri.substr(0,bloggerprofile.length) == bloggerprofile)
    avaimg = author.gd$image.src;
  else {
    var parseurl = document.createElement('a');
    if(authorUri != "") {
      parseurl.href = authorUri;
      avaimg = 'http://www.google.com/s2/favicons?domain=' + parseurl.hostname;
    }
  }
  if(urlMyProfile != "" && authorUri == urlMyProfile && urlMyAvatar != "")
    avaimg = urlMyAvatar;
  if(avaimg == "http://img2.blogblog.com/img/b16-rounded.gif" && urlNoAvatar != "")
    avaimg = urlNoAvatar;
  var newsize="s"+sizeAvatar;
  avaimg = avaimg.replace(/\/s\d\d+-c\//, "/"+newsize+"-c/");
  if(cropAvatar) newsize+="-c";
  avaimg = avaimg.replace(/\/s\d\d+(-c){0,1}\//, "/"+newsize+"/");
  var authorName = author.name.$t;
  if(authorName == 'Anonymous' && txtAnonymous != '' && avaimg == urlAnoAvatar)
    authorName = txtAnonymous;
  var imgcode = '<img class="avatar-top-commentators" height="'+sizeAvatar+'" width="'+sizeAvatar+'" title="'+authorName+'" src="'+avaimg+'" />';
  if(authorUri!="") imgcode = '<a href="'+authorUri+'">'+imgcode+'</a>';
  if(maxUserNameLength > 3 && authorName.length > maxUserNameLength)
    authorName = authorName.substr(0, maxUserNameLength-3) + "...";
  var authorcode = authorName;
  if(authorUri!="") authorcode = '<a class="commenter-link-name" href="'+authorUri+'">'+authorcode+'</a>';
  text = text.replace('[user]', authorcode);
  text = text.replace('[image]', imgcode);
  text = text.replace('[#]', position);
  text = text.replace('[count]', item.count);
  return text;
}
var topcommenters = {};
var ndxbase = 1;
function showTopCommenters(json) {
  var one_day=1000*60*60*24;
  var today = new Date();
  if(urlMyProfile == "") {
    var elements = document.getElementsByTagName("*");
    var expr = /(^| )profile-link( |$)/;
    for(var i=0 ; i<elements.length ; i++)
      if(expr.test(elements[i].className)) {
        urlMyProfile = elements[i].href;
        break;
      }
  }
  if(json && json.feed && json.feed.entry && json.feed.entry.length) for(var i = 0 ; i < json.feed.entry.length ; i++ ) {
    var entry = json.feed.entry[i];
    if(numDays > 0) {
      var datePart = entry.published.$t.match(/\d+/g);
      var cmtDate = new Date(datePart[0],datePart[1]-1,datePart[2],datePart[3],datePart[4],datePart[5]);
   
      var days = Math.ceil((today.getTime()-cmtDate.getTime())/(one_day));
      if(days > numDays) break;
    }
    var authorUri = "";
    if(entry.author[0].uri && entry.author[0].uri.$t != "")
      authorUri = entry.author[0].uri.$t;
    if(excludeMe && authorUri != "" && authorUri == urlMyProfile)
      continue;
    var authorName = entry.author[0].name.$t;
    if(excludeUsers.indexOf(authorName) != -1)
      continue;
    var hash=entry.author[0].name.$t + "-" + authorUri;
    if(topcommenters[hash])
      topcommenters[hash].count++;
    else {
      var commenter = new Object();
      commenter.author = entry.author[0];
      commenter.count = 1;
      topcommenters[hash] = commenter;
    }
  }
  if(json && json.feed && json.feed.entry && json.feed.entry.length && json.feed.entry.length == 200) {
    ndxbase += 200;
    document.write('<script type="text/javascript" src="http://'+window.location.hostname+'/feeds/comments/default?redirect=false&max-results=200&start-index='+ndxbase+'&alt=json-in-script&callback=showTopCommenters"></'+'script>');
    return;
  }
  // convert object to array of tuples
  var tuplear = [];
  for(var key in topcommenters) tuplear.push([key, topcommenters[key]]);
  tuplear.sort(function(a, b) {
    if(b[1].count-a[1].count)
        return b[1].count-a[1].count;
    return (a[1].author.name.$t.toLowerCase() < b[1].author.name.$t.toLowerCase()) ? -1 : 1;
  });
  var realcount = 0;
  for(var i = 0; i < maxTopCommenters && i < tuplear.length ; i++) {
    var item = tuplear[i][1];
    if(item.count < minComments)
        break;
    document.write('<di'+'v class="top-commentators">');
    document.write(replaceTopCmtVars(txtTopLine, item, realcount+1));
    document.write('</d'+'iv>');
    realcount++;
  }
  if(!realcount)
    document.write(txtNoTopCommenters);
}
document.write('<script type="text/javascript" src="http://'+window.location.hostname+'/feeds/comments/default?redirect=false&max-results=200&alt=json-in-script&callback=showTopCommenters"></'+'script>');
</script>
3. Now you just have to save changes and you're done!

Configuration

- To modify the number of users displayed in the gadget, look for var maxTopCommenters = 8; and change 8 with any number you want.
- To change the avatar size of the commenters, look for var sizeAvatar = 33; and change number 33 with the number of pixels you want. - To hide your name or some other username, replace the someotherusertoexclude text between the quotes (to add more, add another comma after the text in red, then type the username you want to exclude between the quotes)

Expandable Recent Comments Widget for Blogger/Blogspot

The Expandable Recent Comments widget for Blogger is a very accessible widget that can be collapsed or expanded through user interaction, so we don't have to click the author's name or post title link in order to read the content of a comment. The expanding content can be shown or hidden by clicking the plus/minus icon or by hitting the "Show all" or "Hide all" button.

recent comments widget, blogger gadgets, blogspot tricks

To add the Expandable Recent Comments widget for Blogger, please follow the next steps below:

Adding Expandable Recent Comments Widget to Blogger

1. From your Blogger dashboard, go to "Layout", then click on "Add a Gadget" link:


2. When the pop-up window appears, scroll down and select the "HTML/JavaScript" widget:


3. Copy and paste this code inside the empty box:
<style type="text/css">.row-div {margin-bottom:10px;}.comment-header {margin:10px 0;}.comment-box{margin:0px;padding:0px;font-size:0.9em;height:330px;overflow:auto;}.comments1{padding:3px;border-left:1px dashed #A6A6A6;color: #888888;font-style: italic;padding:0px 10px 10px 10px;margin-bottom:10px;}
</style>
<div style="text-align: center" class="comment-header"><input class="comment-button" id="commshowall" type="button" onclick="if (this.value == &#39;Show all&#39;) { unfold_all(this); this.value=&#39;Hide all&#39;; } else { fold_all(this); this.value=&#39;Show all&#39;; }" value="Show all" /></div>
<div class="comment-box">
<script type="text/javascript">
var tgl=false;var title_arr=new Array();var arr=0;var err="[err]";var icon_expand="https://blogger.googleusercontent.com/img/b/R29vZ2xl/AVvXsEjHoA9eVOwTlFj_OYyw8czPdqMzJ5pBvbmkcvY1ar1Yh71m7s6Zrhpr0smh9vzXpCUQSATAdbTFXmJjGlWyH2OyaVanqDeek3owFN1AFratEt5IVaJ9mxbiBUpWMd6cBi1aoKmqI9hROjvR/s1600/icon-plus.png";var icon_collapse="https://blogger.googleusercontent.com/img/b/R29vZ2xl/AVvXsEh0ZxTmrvV2aOCWS3XSFGTz70qJYlteIssXnwJNtEd0S4DTIdGYukdSYK7-RYcdXh3rf0-AW1UFXSfWJB4MBz964AmNOwUvGC2Bd5q_PtzUF1Tq4Lfw8fVgQ1FnppUCYoLa1ruN6QQEe9do/s1600/icon-minus+copy.png";var maxcomments=20;function real_posttitle(postid){for(var i=0;i<title_arr.length;i++){if(title_arr[i][0]==postid)return title_arr[i][1];}
return err;}
function showrecentposts(json){var numposts=999999;for(i=0;i<numposts;i++){var entry=json.feed.entry[i];var postid;var title;if(i==json.feed.entry.length)break;for(var k=0;k<200;k++){if(entry.link[k].rel=='self'){postid=entry.link[k].href;postid=postid.substr(postid.lastIndexOf("/")+1,100);}
if(entry.link[k].rel=='alternate'){title=entry.link[k].title;break;}}
title_arr[arr]=postid+"&#176;"+title;title_arr[arr]=title_arr[arr].split("&#176;");++arr;}}
function unfold(el){var comid=el.id.substr(8,10);if(el.src==icon_expand){el.src=icon_collapse;document.getElementById("com_id"+comid).style.display="block";}else{el.src=icon_expand;document.getElementById("com_id"+comid).style.display="none";}}
function unfold_all(el){try{for(var i=0;i<maxcomments;i++){document.getElementById("com_id"+i).style.display="block";document.getElementById("click_id"+i).src=icon_collapse;}}catch(e){;}
el.value='Show all';}
function fold_all(el){try{for(var i=0;i<maxcomments;i++){document.getElementById("com_id"+i).style.display="none";document.getElementById("click_id"+i).src=icon_expand;}}catch(e){;}
el.value='Hide all';}
function showrecentcomments(json){var numcomments=999999;var postid;var i=0;for(i=0;i<numcomments;i++){var entry=json.feed.entry[i];var alturl;var anonymous=false;if(i==json.feed.entry.length)break;for(var k=0;k<entry.link.length;k++){if(entry.link[k].rel=='self'){postid=entry.link[k].href.split("/");postid=postid[5];}
if(entry.link[k].rel=='alternate'){alturl=entry.link[k].href;break;}}
var postlink=alturl.split("#");postlink=postlink[0];var linktext=postlink.split("/");linktext=linktext[5];linktext=linktext.split(".html");linktext=linktext[0];var profilelink="";try{profilelink=entry.author[0].uri.$t;}catch(e)
{anonymous=true;};var posttitle=real_posttitle(postid);if(posttitle==err){posttitle=linktext.replace(/-/g," ");}
var commentdate=entry.published.$t;var cdyear=commentdate.substring(0,4);var cdmonth=commentdate.substring(5,7);var cdday=commentdate.substring(8,10);var ctime=commentdate.substr(11,5);var monthnames=new Array();monthnames[1]="january";monthnames[2]="february";monthnames[3]="march";monthnames[4]="april";monthnames[5]="may";monthnames[6]="june";monthnames[7]="july";monthnames[8]="august";monthnames[9]="september";monthnames[10]="october";monthnames[11]="november";monthnames[12]="december";if("content"in entry){var comment=entry.content.$t;}
else
if("summary"in entry){var comment=entry.summary.$t;}else var comment="";if(i<maxcomments){if(tgl){tgl=false;var cl="row-a";}else{tgl=true;var cl="row-b";}
document.write('<div class="'+cl+' row-div"><img id="click_id'+i);document.write('" style="cursor:pointer;" onclick="unfold(this);"');document.write('src="'+icon_expand+'" />&nbsp;');document.write('On '+cdday+' '+monthnames[parseInt(cdmonth,10)]+' '+cdyear);document.write(', at '+ctime+', ');if(anonymous==false){document.write('<a href="'+profilelink+'">'+entry.author[0].name.$t+'</a> ');}else{document.write(entry.author[0].name.$t+' ');}
document.write('commented on <a href="'+alturl+'">'+posttitle+'</a>');document.write('</div>');document.write('<div class="comments1" id="com_id'+i+'" style="display:none;">'+comment+'<\/div>');}}
document.getElementById("numcom").innerHTML=i;}
</script><script type="text/javascript"  src="http://helplogger.blogspot.com/feeds/posts/default?start-index=1&max-results=999999&alt=json-in-script&callback=showrecentposts"></script><script type="text/javascript"  src="http://helplogger.blogspot.com/feeds/comments/default?start-index=1&max-results=999999&alt=json-in-script&callback=showrecentcomments">
</script></div>

Note: Replace http://helplogger.blogspot.com with the URL address of your blog or site.

4. Save the expandable recent comments widget for Blogger / Blogspot by clicking on the 'Save' button... and you're done!

Recent Comments Widget with Hide Author Comments function For Blogger

A few days ago, Mrpolie asked if there's a way to hide the author comments in the Recent Comments widget so that we would be able to see only readers' comments and our replies to be hidden. So, in this post I'll be sharing with you the Recent Comments widget that comes with this function. If you want to show just blog readers' comments rather than yours, you have just to change "Blogger User" text with the surname under which you are posting.

recent comments widget, recent comments, blogger

The main features of this recent comments widget:

- You'll be able to hide your comments
- Change the avatar size
- Set the number of comments to display
- Set the length of comment for the widget to display

Recent Comments Widget with Hide Author Function


Step 1. From your Blogger Dashboard, go to Layout and click on Add a Gadget link


Step 2. In the pop-up window, choose the HTML/JavaScript widget


Step 3. Copy-paste the following code:

Recent Comments Widget with Round Avatars: 

Click to see the code

Recent Comments Widget With Post Titles (no avatars): 

Click to see the code

Some changes before saving it.

- to set the number of comments to be shown, change the "5" value from the orange line
- for the number of characters, change the "67" (for the 2nd widget, it is 95) value from the green line
- to hide your comments, replace the Blogger User text TWICE with your username
- to change the size of avatar, change "50" from the blue line.
- if you don't want rounded avatars, delete this line:

-webkit-border-radius: 100px;-moz-border-radius: 100px;border-radius: 100px;
Step 4. Save your widget and you're done!

Add a Different Background For Author Comments in Blogger's Threaded Comments

In this tutorial we will learn how to highlight the author comments so that they will have a different background color, border, or anything that makes them stand out from the others. To achieve this, we need to add a code in the Blogger's template and to modify the style according to our preferences.
blogger tricks, blogger comments
  

How to highlight author comments in Blogger:

Step 1. Go to Template, click on Edit HTML

blogger threaded comments, customize blogger comments

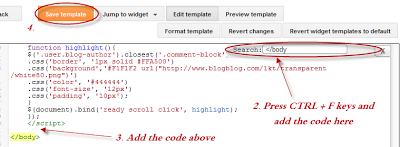
Step 2. Click anywhere inside the code area and try to find - using CTRL + F keys - this tag:
</body>
Screenshot:
blogger comments, blogger tricks

Step 3. Just above it, paste the following code:
<script src='http://code.jquery.com/jquery-latest.js'/>
<script>
$(function() {
function highlight(){
$('.user.blog-author').closest('.comment-block')
.css('border', '1px solid #FFA500')
.css('background','#F1F1F2 url("http://www.blogblog.com/1kt/transparent/white80.png")')
.css('color', '#444444')
.css('font-size', '12px')
.css('padding', '10px');
}
$(document).bind('ready scroll click', highlight);
});
</script>

Customizing the Author Comments:


Border:
The line marked in orange represents the border's style.
What it can be done:
  • 1px - you can increase the value to change the border's thickness
  • solid - change the border's style to dotted, dashed, inset, outset etc.
  • #FFA500 - this is the border's color value, change it with your own color
Background:
The line marked in blue represents the background's style. You can use a plain color or an image. By default there's a combination of both (a white transparent image with a gray plain color).
To change/add:
  • a different color: replace the #F1F1F2 value with your own (use this tool to find the hex code of your desired color)
  • an image: replace the defaul url http://www.blogblog.com/1kt/transparent/white80.png with that of your image

Font Color:
To change the font's color, replace the #444444 color value in green with your own. (you can use this tool to find the hex code of your desired color)

Font Size:
Modify the value in red by increasing/decreasing the "12" value in order to change the size of text.

Step 4. Now Save your Template.

To customize the entire style of threaded comments, please check my previous tutorial on How to Customize Comment's Background, Font Color and Border in Blogger.

How to Customize Blogger Comments By Adding a Background Color and Border

The comments are an essential part of any blog as in them readers express their opinions about a post or a blog, thus it is important to spend a little of our time to make this part looking more stylish, accessible and neat.

To put our comments in order, we should make each comment easy to identify, so that we'll know from where it begins and to where it ends, otherwise it becomes a jumble of letters and our visitors could run away. Here are some methods to make some order by separating each comment.

- Add a Separator To Blogger Comments
- Add a Divider Below Comments in Blogger
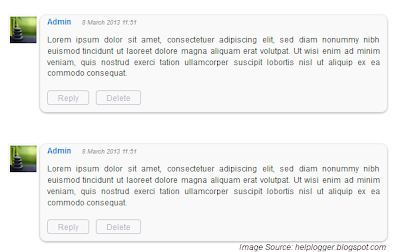
- Fully Customize Your Blogger Comments By Changing The Background Color and Border

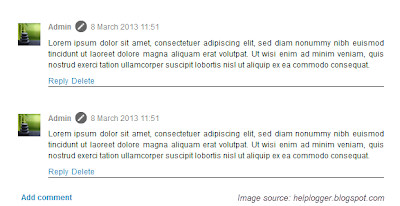
The first method is the easiest: we'll separate our comments by adding a border below each of them.

How to Add a Separator/Border To Blogger Comments


customize comments, blogger

Step 1. To add a simple separator go to Template > Edit HTML and click on the small arrow on the left of <b:skin>...</b:skin>
Step 2. Click anywhere inside the code area and search using CTRL + F keys, for the following piece of code:
]]></b:skin>

Step 3. Paste the following style just above it:

- If we are using threaded comments (with the reply option):

.comment-block {
border-bottom: 1px solid #000000;
}
.comments .continue {
  border-top: 0px solid #000;
}

- If we are using previous commenting system (with no reply option)
#comments-block .comment-footer {
border-bottom:1px solid #000000;
}

Note: To change the border's color, replace the bolded color value and to change its thickness, increase/decrease the 1 value.

Step 4. Save the Template.

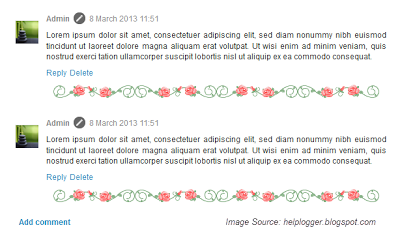
Instead of a simple border, we can also add a divider/image between our comments.

How to Add a Divider (Image) Between Each Comment in Blogger


blogger comments, blogger tricks, blogger tutorials

Step 1. Go to Template > Edit HTML and search (CTRL + F) for the following piece of code:
]]></b:skin>
Screenshot:


Step 2. Paste the following just above it:

- If we are using threaded comments (with the reply option):
.comment-block {
background-image:url(https://blogger.googleusercontent.com/img/b/R29vZ2xl/AVvXsEii5c5Xqo19opSQF8BrJhetCgI5feMy9X72cLVe_klR-wGMsCfYZqYYr43XG3djl42M-bD3KmVFIZFOOquajh-8LaHC1EMoaecOEh6_yHAksD31tG4znmM83MtJQ37Xp3Geg6VxMvrJgZ2I/s1600/74.gif);
background-repeat:no-repeat;
background-position:center bottom;
padding-bottom:30px;
margin-top: -10px;
}
.comments .continue {
border-top: 0px solid #000;
}

- If we are using previous commenting system (with no reply function)
#comments-block .comment-footer {
background-image:url(https://blogger.googleusercontent.com/img/b/R29vZ2xl/AVvXsEii5c5Xqo19opSQF8BrJhetCgI5feMy9X72cLVe_klR-wGMsCfYZqYYr43XG3djl42M-bD3KmVFIZFOOquajh-8LaHC1EMoaecOEh6_yHAksD31tG4znmM83MtJQ37Xp3Geg6VxMvrJgZ2I/s1600/74.gif);
background-repeat:no-repeat;
background-position:center bottom;
height: 50px;
}

Note: The URL that is in blue represents the image that you can change as you like, just remember that at the height must set the height of an image with 30px more, for instance, if the image's height is 50px then the value will be 80px. This is for making sure that the image won't overlap the date of comments. (for threaded comments, increase/decrease the padding 30 value)

Step 3. Save the Template.

But you can still have more styles for each comment, for example adding a background color and a border.

How to Add A Border and A Background Color To Blogger Comments


blogger tips, blogger tricks, gadgets
Step 1. Go to Template > Edit HTML and search for the following piece of code:
]]></b:skin>

Step 2. Paste the following just above it:

- If we are using threaded comments (with the reply option):
.comment-block {
background:#F9F9F9; /* Background Color */
border: 1px solid #f1f1f1; /* Border style */
margin-bottom:20px;
-webkit-box-shadow: 0 1px 2px rgba(0, 0, 0, .4);
-moz-box-shadow: 0 1px 2px rgba(0, 0, 0, .4);
box-shadow: 0 1px 2px rgba(0, 0, 0, .4);
-moz-border-radius: 10px;
-webkit-border-radius: 10px;
border-radius: 10px;
}
.comments .comment-thread.inline-thread {
background-color: #FAFAFA; /* Background color behind the replies */
border-left: 4px dotted #E6E6E6; /* Border on the left side of replies */
}
.comment-content {
padding:2px 10px 10px 10px;
color:#444444; /* Font Color in Comments */
}
.datetime a {
font-style:italic;
font-size:9px;
margin-left: 2px;
}
.comments .comments-content .user a{
color:#1982D1; /* Author's name color */
font-size: 12px; /* Author's name size */
padding-left: 10px;
font-weight:bold;
text-decoration:none;
}
.comments .comment .comment-actions a,.comments .comment .continue a{
display:inline-block;
margin:0 0 10px 10px;
padding:0 15px;
color:#B4B4B7;
text-align:center;
text-decoration:none;
background:#F8F8FB;
border:1px solid #C2C2C5;
border-radius:4px;
height:20px;
line-height:20px;
font-weight:normal;
cursor:pointer;
}
.comments .continue {
border-top: 0px solid #000;
}
.comments .comments-content .icon.blog-author {
background-image: none;
margin-left: -10px;
}
.comments .avatar-image-container{
margin: 0px 0px 0px 0px;
padding: 0px 0px 0px 0px;
width: 40px;
max-height: 40px;
border: 1px solid #F2F2F2;
padding: 1px;
}
.comments .avatar-image-container img{
margin: 0px 0px 0px 0px;
padding: 0px 0px 0px 0px;
max-width: 40px;
height: 40px;
}
Step 3. Save the Template.

- If we are using previous commenting system (with no reply function):

Step 1. Search for this line in your template:
<b:loop values='data:post.comments' var='comment'>
Step 2. Then, add the following code just below of it:
<div class='comments-new'>
Step 3. Look a little further down and you'll see the </b:loop> code and just above it, add this:
</div>
Step 4. Now find this:
]]></b:skin>
Step 5. And just above of it, add this CSS code:
.comments-new{
background:#F9F9F9; /* Background Color */
border: 1px solid #f1f1f1; /* Bprder Style */
margin-bottom:20px;
-webkit-box-shadow: 0 1px 2px rgba(0, 0, 0, .4);
-moz-box-shadow: 0 1px 2px rgba(0, 0, 0, .4);
box-shadow: 0 1px 2px rgba(0, 0, 0, .4);
-moz-border-radius: 10px;
-webkit-border-radius: 10px;
border-radius: 10px;
}
.comment-body {
color:#444444; /* Font Color in Comments */
padding:10px;
}
.comments-new a {
padding-left: 5px; /* Link color */
color: #4A9BD8;
}
.comment-timestamp a {
font-style:italic;
font-size:9px;
padding-right:10px;
padding-left:10px;
}
.comments .avatar-image-container {
overflow: visible;
}
(The rounded edges will not work in Internet Explorer with CSS)

In either case, you can change the background color, border, etc.. in parts with annotations in green.

Step 6. Save the Template.

If you need more help, leave a comment below.