Showing posts with label Widgets. Show all posts

5 Best Custom Blogger Contact Form Widgets

In the past, adding a custom contact form for Blogger was quite a complex process, and many bloggers were forced to use third party websites. However, even after Blogger launched its own contact form gadget, it was still considered as highly inadequate. This is because the official gadget would only be implemented on the footer the sidebar. Most bloggers preferred having a separate blogger contact form placed on its own page to make their blogs appear well arranged and more professional as well.

Having a well laid-out Blogger contact form is very important. This is the tool that visitors, companies, and brands can use to contact you and it is simply a must-have feature for every blogger. If you are not comfortable with sharing your main email address directly on your blog, then a custom Blogger contact form offers an effective way in which people can easily reach you.
5 Best Custom Blogger Contact Form Widgets

Why you should use a Blogger Contact Form?

If you are still stuck on third party providers, you should definitely consider switching to the official custom contact form for Blogger since it has various unique benefits, like:
  • Messages are delivered immediately - As the blog administrator, you will receive a message immediately the visitor clicks send.
  • Reliable - It is the official form developed by Blogger, which makes it more trustworthy and reliable way to initiate contact as compared to using third-party services.
  • Questions - The contact form offers a platform for your visitors to ask specific questions that they might have regarding the blog you wrote or your business in general. It can be an excellent way of capturing leads and even lead to conversions if you are selling a certain product or service.
  • Feedback - Visitors can easily comment on your blog by leaving their feedback through your contact form. This feedback can help you determine which post to do next or what areas to address based on the visitors' comments.
  • Information or service request - For those who are using the blog as a way of marketing a product or service, potential clients can use the custom contact form for Blogger to reach out and request additional information.

How to Add Blogger Contact Form Gadget

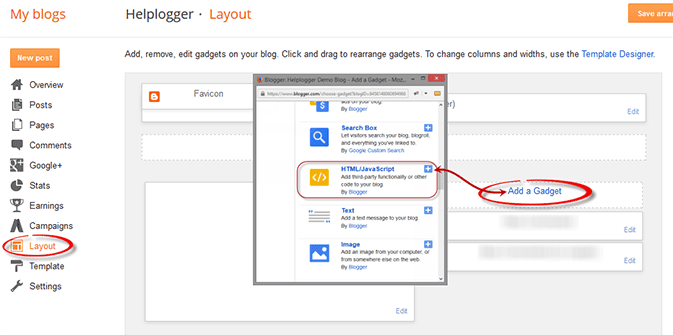
Before adding a custom Blogger contact form to a static page, we need to add the default contact form in the blog's sidebar to make it functional:

1. Log into your Blogger dashboard and go to "Layout" > click on the "Add a gadget" link on the page elements area.

2. Select "More Gadgets" below the "Basics" tab and click the "+" button to add the Contact Form Gadget.

blogger contact form

Hiding Blogger Contact Form from the Sidebar

Once the contact form has been added, next step is to hide it so that it will appear only in the static page.

1. Go to "Template" and press the "Edit HTML" button. Once the code editor opens, click anywhere inside the code area and press CTRL + F keys (or Command + F for mac) to open the search box.

2. Type or paste the following tag inside the search box and hit Enter to find it:
]]></b:skin>
3. Just above the ]]></b:skin> tag, add this CSS code:
#ContactForm1{display: none !important;}
4. Click the "Save template" button on the upper left side and view your blog. The contact form widget should be gone.

Adding Custom Blogger Contact Form in a Static Page

Finally, now that we enabled the functionality of the contact form, let's add a custom contact form in our Blogger blog...

1. Go to "Pages" and click the "New page" button. If you already have a Contact us page, just click the "Edit" link below the page title.

2. Once the Page editor opens, fill up the page title with Contact/Contact Us or any title you want to show. It is recommended doing this before anything in order to make the permalink SEO friendly.

3. Click on the HTML tab as there we will add the code to make the custom Blogger contact form work. On the right site, change the Page settings to hide ("Don't allow" or "Don't allow, hide existing") the reader comments, then click the "Done" button:

contact static page

4. Below are 5 custom Blogger contact form styles. Pick your favorite and copy the code provided, then paste the code inside the HTML box of your page editor:


Simple Contact Form

custom blogger contact form

<style type="text/css">
.contact-form-widget{margin-left:auto;margin-right:auto;width:600px;max-width:100%;padding:40px 0}.contactf-name,.contactf-email{float:left;width:48.25%}.contactf-name{margin-right:3.5%}.contact-form-name,.contact-form-email,.contact-form-email-message,.contact-form-name:hover,.contact-form-name:focus,.contact-form-email:hover,.contact-form-email:focus,.contact-form-email-message:hover,.contact-form-email-message:focus{width:100%;max-width:100%;margin:0 0 20px;padding:10px 15px;font-size:12px;letter-spacing:1px;color:#444;background:#F3F3F3;border:medium none;-webkit-box-shadow:none;-moz-box-shadow:none;box-shadow:none}.contact-form-name,.contact-form-email{height:37px}.contact-form-email-message{height:170px}.contact-form-button-submit,.contact-form-button-submit:hover{width:13%;height:30px;font:normal 12px Arial;letter-spacing:1px;color:#444;display:block;outline:none;margin-bottom:20px;text-align:center;background:#E6E6E6;border:0;cursor:pointer}.contact-form-button-submit:active{outline:none;-webkit-box-shadow:none;box-shadow:none}.contact-form-cross{border:medium none!important;box-shadow:none!important;padding:0!important;height:11px !important;width:11px !important;}
</style>

<div class="widget ContactForm" id="ContactForm22"><div class="contact-form-widget"><div class="form"><form name="contact-form"><div class="contactf-name"><input class="contact-form-name" id="ContactForm1_contact-form-name" name="name" size="30" type="text" value="NAME" onblur='if (this.value == "") {this.value = "NAME";}' onfocus='if (this.value == "NAME") {this.value = "";}'  /></div><div class="contactf-email"><input class="contact-form-email" id="ContactForm1_contact-form-email" name="email" size="30" type="text" value="EMAIL" onblur='if (this.value == "") {this.value = "EMAIL";}' onfocus='if (this.value == "EMAIL") {this.value = "";}'/></div><div style="clear:both"></div><div class="contactf-message"><textarea class="contact-form-email-message" cols="25" id="ContactForm1_contact-form-email-message" name="email-message" rows="5" value="MESSAGE" onblur='if (this.value == "") {this.value = "MESSAGE";}' onfocus='if (this.value == "MESSAGE") {this.value = "";}'></textarea></div><input class="contact-form-button contact-form-button-submit" id="ContactForm1_contact-form-submit" type="button" value="SEND" /><div class="contact-form-error-message" id="ContactForm1_contact-form-error-message"></div><div class="contact-form-success-message" id="ContactForm1_contact-form-success-message"></div></form></div></div></div>

Contact form with CSS rainbow divider

colorful contact form for Blogger

<style type="text/css">
.contact-form-widget{margin-left:auto;margin-right:auto;width:600px;max-width:100%;padding:0}hr{position:relative;height:.75em;border:0;overflow:hidden;margin:0}hr:before{content:"";display:block;position:absolute;top:0;left:0;height:.75em;width:5.1em;background:#C4DD83;box-shadow:5em 0 0 0 #F4FCC9,10em 0 0 0 #FDCD78,15em 0 0 0 #ED786F,20em 0 0 0 #D99DBF,25em 0 0 0 #C39EDC,30em 0 0 0 #679DE2,35em 0 0 0 #62C2E3,40em 0 0 0 #F4FCC9,45em 0 0 0 #FDCD78,50em 0 0 0 #ED786F,55em 0 0 0 #D99DBF,60em 0 0 0 #C39EDC}.contactf-name,.contactf-email{float:left;width:49.25%}.contactf-name{margin-right:1.5%}.contact-form-name,.contact-form-email,.contact-form-email-message,.contact-form-name:hover,.contact-form-name:focus,.contact-form-email:hover,.contact-form-email:focus,.contact-form-email-message:hover,.contact-form-email-message:focus{width:100%;max-width:100%;margin:25px 0 0;padding:10px;font-size:15px;color:#ccc;border-color:#E8E8E8;border-width:2px 2px 4px;-webkit-box-shadow:none;-moz-box-shadow:none;box-shadow:none}.contact-form-name,.contact-form-email{height:40px}.contact-form-email-message{height:100px}.contact-form-button-submit,.contact-form-button-submit:hover{margin-top:25px;width:100%;height:40px;font-size:15px;color:#fff;text-align:center;text-shadow:0 1px 2px rgba(0,0,0,0.25);background:#EE786F;border:0;border-bottom:2px solid #D4685C;outline:none;cursor:pointer;-webkit-box-shadow:inset 0 -2px #D4685C;box-shadow:inset 0 -2px #D4685C}.contact-form-button-submit:active{top:1px;outline:none;-webkit-box-shadow:none;box-shadow:none}.contact-form-cross{border:medium none !important;box-shadow:none !important;padding:0 !important;height:11px !important;width:11px !important;}
</style>
<div class="widget ContactForm" id="ContactForm22"><div class="contact-form-widget"><hr><div class="form"><form name="contact-form"><div class="contactf-name"><input class="contact-form-name" id="ContactForm1_contact-form-name" name="Name" size="30" type="text" value="Name" onblur='if (this.value == "") {this.value = "Name";}' onfocus='if (this.value == "Name") {this.value = "";}'/></div><div class="contactf-email"><input class="contact-form-email" id="ContactForm1_contact-form-email" name="E-mail address" size="30" type="text" value="E-mail address" onblur='if (this.value == "") {this.value = "E-mail address";}' onfocus='if (this.value == "E-mail address") {this.value = "";}'/></div><div style="clear:both"></div><div class="contactf-message"><textarea class="contact-form-email-message" cols="25" id="ContactForm1_contact-form-email-message" name="Type your message here..." rows="5" type="text" value="Type your message here..." onblur='if (this.value == "") {this.value = "Type your message here...";}' onfocus='if (this.value == "Type your message here...") {this.value = "";}'></textarea><input class="contact-form-button contact-form-button-submit" id="ContactForm1_contact-form-submit" type="button" value="Send Message" /><div class="contact-form-error-message" id="ContactForm1_contact-form-error-message"></div><div class="contact-form-success-message" id="ContactForm1_contact-form-success-message"></div></div></form></div></div></div>

Blogger Contact Form with CSS Ribbon

contact form with ribbon

<style type="text/css">
.widget.ContactForm{z-index:1}.contact-form-widget{margin-left:auto;margin-right:auto;width:600px;max-width:100%;padding:25px 0;background:#EBEBE3;-webkit-border-radius:2%;-moz-border-radius:2%;border-radius:2%}.contact-form-widget .form{width:91%;margin:0 auto}.ribbon{font:16px Arial;text-transform:capitalize;text-shadow:0 1px 2px rgba(0,0,0,0.25);position:relative;background:#6B5F53;color:#fff;text-align:center;padding:1em 2em;margin:0 -16px}.ribbon:before,.ribbon:after{content:"";position:absolute;display:block;bottom:-1em;border:1.5em solid #584C40;z-index:-1}.ribbon:before{left:-1.7em;border-right-width:1.2em;border-left-color:transparent}.ribbon:after{right:-1.7em;border-left-width:1.2em;border-right-color:transparent}.ribbon .ribbon-content:before,.ribbon .ribbon-content:after{content:"";position:absolute;display:block;border-style:solid;border-color:#42362A transparent transparent;bottom:-1em}.ribbon .ribbon-content:before{left:0;border-width:1em 0 0 1em}.ribbon .ribbon-content:after{right:0;border-width:1em 1em 0 0}.contactf-name,.contactf-email,.contactf-message{text-align:left;margin-top:25px;color:#a1937b;font-size:13px}.contactf-name,.contactf-email{float:left;width:100%}.contact-form-name,.contact-form-email,.contact-form-email-message,.contact-form-name:hover,.contact-form-name:focus,.contact-form-email:hover,.contact-form-email:focus,.contact-form-email-message:hover,.contact-form-email-message:focus{width:100%;max-width:100%;margin:10px 0 0;padding:10px;font-size:12px;color:#aaa;border-color:#DBD6D1;border-width:1px;box-shadow:none;-webkit-border-radius:5px;-moz-border-radius:5px;border-radius:5px}.contact-form-name,.contact-form-email{height:35px}.contact-form-email-message{height:100px}.contact-form-button-submit,.contact-form-button-submit:hover{margin-top:25px;width:100%;height:37px;font:normal 12px Arial;outline:none;letter-spacing:1px;color:#fff;text-align:center;cursor:pointer;text-shadow:1px 1px 0 #ffe8b2;color:#7c5d1b;border:1px solid #d6a437;background:#febd4b;background:-webkit-gradient(linear,0 0,0 100%,from(#fed970) to(#febd4b));background:-webkit-linear-gradient(#fed970,#febd4b);background:-moz-linear-gradient(#fed970,#febd4b);background:-ms-linear-gradient(#fed970,#febd4b);background:-o-linear-gradient(#fed970,#febd4b);background:linear-gradient(#fed970,#febd4b);-pie-background:linear-gradient(#fed970,#febd4b)}.contact-form-button-submit:active{color:#7c5d1b;border:1px solid #d6a437;background:#febd4b;background:-webkit-gradient(linear,0 0,0 100%,from(#febd4b) to(#fed970));background:-webkit-linear-gradient(#febd4b,#fed970);background:-moz-linear-gradient(#febd4b,#fed970);background:-ms-linear-gradient(#febd4b,#fed970);background:-o-linear-gradient(#febd4b,#fed970);background:linear-gradient(#febd4b,#fed970);-pie-background:linear-gradient(#febd4b,#fed970)}.contact-form-cross{border:medium none!important;box-shadow:none!important;padding:0!important;height:11px !important;width:11px !important;}
</style>
<div class="widget ContactForm" id="ContactForm22"><div class="contact-form-widget"><h2 class="ribbon"><strong class="ribbon-content">Shoot Me an Email</strong></h2><div class="form"><form name="contact-form"><div class="contactf-name">Your name:<input class="contact-form-name" id="ContactForm1_contact-form-name" name="Name" size="30" type="text" value="Name" onblur='if (this.value == "") {this.value = "Name";}' onfocus='if (this.value == "Name") {this.value = "";}'  /></div><div class="contactf-email">E-mail address *:<input class="contact-form-email" id="ContactForm1_contact-form-email" name="E-mail address" size="30" type="text" value="E-mail address" onblur='if (this.value == "") {this.value = "E-mail address";}' onfocus='if (this.value == "E-mail address") {this.value = "";}'/></div><div style="clear:both"></div><div class="contactf-message">Message *:<textarea class="contact-form-email-message" cols="25" id="ContactForm1_contact-form-email-message" name="Type your message here..." rows="5" value="" placeholder="Type your message here..." value="Type your message here..." onblur='if (this.value == "") {this.value = "Type your message here...";}' onfocus='if (this.value == "Type your message here...") {this.value = "";}'></textarea><input class="contact-form-button contact-form-button-submit" id="ContactForm1_contact-form-submit" type="button" value="SEND MESSAGE" /><div class="contact-form-error-message" id="ContactForm1_contact-form-error-message"></div><div class="contact-form-success-message" id="ContactForm1_contact-form-success-message"></div></div></form></div></div></div>

Minimal Contact Form

minimal contact form for Blogger

<style type="text/css">
.contact-form-widget{margin-left:auto;margin-right:auto;width:600px;max-width:100%;padding:25px;background:#fff}.contact-title{text-align:center;font:41px fantasy;color:#121212;margin-bottom:25px}.contactf-name,.contactf-email{float:left;width:47%}.contactf-name{margin-right:6%}.name-icon img,.email-icon img{background:transparent!important;border:medium none!important;box-shadow:none!important;padding:11px 0!important;width:16px !important;height:16px !important;}.name-icon,.email-icon{position:absolute;z-index:1}.contact-form-name,.contact-form-email,.contact-form-email-message,.contact-form-name:hover,.contact-form-name:focus,.contact-form-email:hover,.contact-form-email:focus,.contact-form-email-message:hover,.contact-form-email-message:focus{width:100%;max-width:100%;margin:0 0 25px;padding:10px 10px 10px 25px;font:bold 16px cursive;text-shadow:0 1px 2px #ddd;color:#121212;background:transparent!important;border-color:#121212;border-width:0 0 2.5px;-webkit-box-shadow:none;-moz-box-shadow:none;box-shadow:none}.contact-form-name,.contact-form-email{height:40px}.contact-form-email-message,.contact-form-email-message:hover,.contact-form-email-message:focus{padding:10px!important}.contact-form-email-message{height:150px;border-width:2.5px!important}.contact-form-button-submit,.contact-form-button-submit:hover{background:#121212!important;width:30%;height:37px;font:bold 13px "Lucida Grande";letter-spacing:2px;color:#fff;text-align:center;border:medium none;cursor:pointer;display:block;margin:0 auto;outline:none}.contact-form-cross{border:medium none!important;box-shadow:none!important;padding:0!important;width:11px !important;height:11px !important;}
</style>
<div class="widget ContactForm" id="ContactForm22"><div class="contact-form-widget"><h2 class="contact-title">Get in touch.</h2><div class="form"><form name="contact-form"><div class="contactf-name"><div class="name-icon"><img src="https://blogger.googleusercontent.com/img/b/R29vZ2xl/AVvXsEg9GrhCYmaLUqLV6IuV4FElrI1Bz9owLRhm7xKUv6vfXEBG7jjOiOuwo_7UP_x0gfr3HXFFAkk2BLWwt6vqnfu0JXEJJIlBLBcdStfagYTAzvhquOnh9MfUuVDP726Vm21Xc9ta2JaKIVtd/s1600/avatar%25281%2529.png" width="16" height="16" /></div><input class="contact-form-name" id="ContactForm1_contact-form-name" name="Name" size="30" type="text" value="Name" onblur='if (this.value == "") {this.value = "Name";}' onfocus='if (this.value == "Name") {this.value = "";}'  /></div><div class="contactf-email"><div class="email-icon"><img src="https://blogger.googleusercontent.com/img/b/R29vZ2xl/AVvXsEjbfkWvPOy0iD_5N7ywmKxaKyS6SxbzxGGp2udx2ZkUaqWgyKitVSRxEJB6lAS6jLl8-FNEmsUIQn57PQjfLiSuWp8WDlLplVXq089Yaxj0a_yALiCaHTqdZq-hvP5GezBaN-qlzeeEWKw5/s1600/envelope%25281%2529.png" width="16" height="16" /></div><input class="contact-form-email" id="ContactForm1_contact-form-email" name="E-mail address" size="30" type="text" value="E-mail address" onblur='if (this.value == "") {this.value = "E-mail address";}' onfocus='if (this.value == "E-mail address") {this.value = "";}'/></div><div style="clear:both"></div><div class="contactf-message"><textarea class="contact-form-email-message" cols="25" id="ContactForm1_contact-form-email-message" name="Type your message here..." rows="5" value="Type your message here..." onblur='if (this.value == "") {this.value = "Type your message here...";}' onfocus='if (this.value == "Type your message here...") {this.value = "";}'></textarea><input class="contact-form-button contact-form-button-submit" id="ContactForm1_contact-form-submit" type="button" value="SEND" /><div class="contact-form-error-message" id="ContactForm1_contact-form-error-message"></div><div class="contact-form-success-message" id="ContactForm1_contact-form-success-message"></div></div></form></div></div></div>

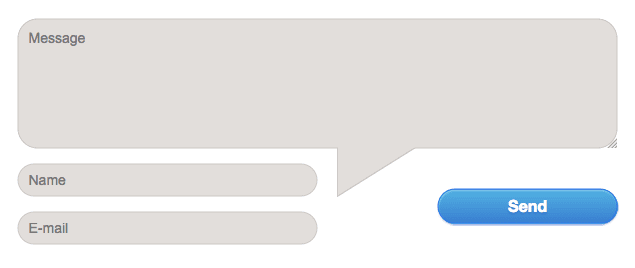
Contact form with speech bubble


<style type="text/css">
.contact-form-widget{margin-left:auto;margin-right:auto;width:600px;max-width:100%}.contactf-name,.contactf-email{float:left;width:50%}.contact-form-name,.contact-form-email,.contact-form-email-message,.contact-form-name:hover,.contact-form-name:focus,.contact-form-email:hover,.contact-form-email:focus,.contact-form-email-message:hover,.contact-form-email-message:focus{width:100%;max-width:100%;margin:0 0 15px;padding:10px;font-size:14px;color:#777;background:#E2DEDB;border:1px solid #CBC7C4;-webkit-box-shadow:none;-moz-box-shadow:none;box-shadow:none;-webkit-border-radius:20px;-moz-border-radius:20px;border-radius:20px}.contact-form-name,.contact-form-email{height:33px}.contact-form-email-message{height:130px}.contactf-message{position:relative}.contactf-message:after,.contactf-message:before{border-bottom:50px solid transparent;border-left:80px solid #E2DEDB;bottom:-32px;content:'';position:absolute;right:50%;margin-right:-100px}.contactf-message:before{border-left:80px solid #CBC7C4;bottom:-34px;right:50.3%;margin-right:-101px}.cbluebutton{margin-top:25px;width:30%;height:35px;float:right;font-size:15px;color:#fff;display:inline-block;text-align:center;background:linear-gradient(to bottom,#339ad9 0%,#224bbc 100%);box-shadow:0 1px 1px rgba(34,75,188,0.5);border:0;-webkit-border-radius:20px;-moz-border-radius:20px;border-radius:20px}.cbluebutton span .contact-form-button-submit{background:linear-gradient(to bottom,#52b1e2 0%,#397fd0 100%);font:bold 16px "Helvetica Neue",sans-serif;height:35px;width:100%;color:#FFF;text-shadow:0 1px 1px #224BBC;display:inline-block;box-shadow:0 1px 1px rgba(255,255,255,0.3) inset;cursor:pointer;outline:none;-webkit-border-radius:20px;-moz-border-radius:20px;border-radius:20px}.contact-form-button-submit:active{top:1px;outline:none;-webkit-box-shadow:none;box-shadow:none}.contact-form-cross{border:medium none!important;box-shadow:none!important;padding:0!important;width:11px !important;height:11px !important;}
</style>
<div class="widget ContactForm" id="ContactForm22"><div class="contact-form-widget"><div class="form"><form name="contact-form"><div class="contactf-message"><textarea class="contact-form-email-message" cols="25" id="ContactForm1_contact-form-email-message" name="Message" rows="5" value="Message" onblur='if (this.value == "") {this.value = "Message";}' onfocus='if (this.value == "Message") {this.value = "";}'></textarea></div><div class="cbluebutton"><span><input class="contact-form-button contact-form-button-submit" id="ContactForm1_contact-form-submit" type="button" value="Send" /></span></div><div class="contactf-name"><input class="contact-form-name" id="ContactForm1_contact-form-name" name="name" size="30" type="text" value="Name" onblur='if (this.value == "") {this.value = "Name";}' onfocus='if (this.value == "Name") {this.value = "";}'  /></div><div class="contactf-email"><input class="contact-form-email" id="ContactForm1_contact-form-email" name="email" size="30" type="text" value="E-mail" onblur='if (this.value == "") {this.value = "E-mail";}' onfocus='if (this.value == "E-mail") {this.value = "";}'/></div><div style="clear:both"></div><div class="contact-form-error-message" id="ContactForm1_contact-form-error-message"></div><div class="contact-form-success-message" id="ContactForm1_contact-form-success-message"></div></div></form></div></div>

5. After you added the code, click the "Publish" button on the upper right side. Now you should be able to see the Blogger contact form live on your static page. To ensure that everything works fine, you can send a message as a test. The message should be delivered to your inbox in a matter of seconds, just make sure that you're checking the email that you're using with your Blogger account.

Frequently Asked Questions about the Custom Contact Form for Blogger

Where do the messages go?

Once a visitor asks a question or sends feedback through the Blogger contact form, it is instantly delivered to the email associated with your Blogger account. If a blog has several administrators, then all the individual administrators will receive the comments or questions asked by the visitor.

What is the benefit of using a separate "Contact Us" page?

Even though it all comes down to your personal preferences, your blog will look more professional if it has a separate page for the custom contact form for Blogger. It gives you credibility and also offers you the chance to add a specific call to action in the new "Contact Us" page.

Is it possible to add extra fields?

Unfortunately, no. You can't add custom fields such as website, phone number or mailing address since Blogger uses special tags in order to transfer data. In any case, the default fields are well laid-out and will help you to get the basic information you need about your visitors.

I have installed the Blogger contact form, but it is not working. What could be the problem?

There are several reasons why you may be having trouble setting up your contact form. The simplest way to troubleshoot is to countercheck the email you linked to the blog and also reinstall the form again.

Ultimately, by using the custom Blogger contact form you gain from consistency in the type of information you request and also reduce spam since you will not have to display your email directly on the blog.

Automatic Featured Posts Slider Widget for Blogger

Anyone with a blog wants readers to stay rather than move on to another. It's not being selfish but after someone has read one post, you'd definitely want them to read another, right? After all, isn't it one of the tenets of SEO to make people stay longer on your blog if it has to have a fighting chance at the rankings game?

The question now is: how exactly do you entice them to read a few more of your blog posts?

First off, you don't know exactly what brought a reader to your site. Well, you sort of do, if you have Google Analytics and all that. But that's beside the point. It wouldn't be productive for you to stare at GA the entire day hoping that it will tell you that yes, someone has been perusing your blog.

The point being driven at here is that you have to offer more on your blog. It's not enough that you get traffic from search engines and other sites; you also have to add some extras that will entice visitors to stay longer.

How exactly do you do that?

The Tactics of Persuading Users to Stay

Bloggers have employed a variety of tactics to persuade readers to stay. For one, they load the sidebar with widgets for Popular Posts, for example. Of course, it would be in the interest of your readers to know which other posts on your blog are gaining traction. Maybe those pieces are of interest to them as well. As a result, you've got one surefire way of making readers stay.

Now, what if you want to highlight Featured Posts, for example? Let's say that your blog has been around for a number of years and in that span, it has produced some great content that received quite the number of shares, likes, +1s, comments on so on. Wouldn't that be the kind of post you want featured? Unless your reader was looking for that topic specifically, there's little chance that they might uncover that gem if you don't bring it to their attention.

Thankfully, it's quite possible to add a Featured Posts slider for Blogger. And if you don't know how to make one yourself, this is exactly what this post is for. Here's an awesome Featured Posts slider widget that you can use on your blog.


How to Add Featured Posts Slider Widget in Blogger

1. Go to 'Layout' > click the 'Add a gadget' link in the sidebar area and select 'HTML/JavaScript' gadget from the pop-up window.

2. Add the code below inside the empty box:
<style type="text/css">
ul.featured-widget-list,ul.featured-widget-list li{margin:0;padding:0;list-style:none;position:relative }ul.featured-widget-list li{display:none}ul.featured-widget-list li:nth-child(1){display:block;line-height:0}ul.featured-widget-list img{border:0;width:100%;height:auto}ul.featured-widget-list .featuredbg{width:100%;height:100%;position:absolute;z-index:2;left:0;top:0;opacity:.6;background-image:url(https://blogger.googleusercontent.com/img/b/R29vZ2xl/AVvXsEi2ZAl7KUgtY-2QVLTTp7aLhfraR_ntvTWWaBWtENj6gfUl8wL5ZnzYdo66JiPMCZtE3laqjOXaXlC0ONMcE357af3xolb7xau0f5tp23JGeeGb1aMEzaF1i4WBMbRqKRBb9NI6Nm8pSFw/s400/overlay-bg.png);background-position:0% 100%;background-repeat:repeat-x}ul.featured-widget-list .featuredbg:hover{opacity:.1}ul.featured-widget-list h5{position:absolute;left:0;right:0;text-align:center;bottom:10px;z-index:2;color:#fff;margin:0;text-transform: capitalize;padding:10px 20px;line-height:1.9em;letter-spacing:0.3px;font: 600 16px 'Abel', sans-serif;overflow:hidden}ul.featured-widget-list li:hover h5{bottom:30px}ul.featured-widget-list .featured-meta{font: 11px 'Abel', sans-serif;letter-spacing:0.3px;position:absolute;bottom:0;left:0;right:0;text-align:center;z-index:2;color:#fff;opacity:0}ul.featured-widget-list h5, ul.featured-widget-list .featured-meta {-webkit-transition: all 0.3s;-moz-transition: all 0.3s;-o-transition: all 0.3s;transition: all 0.3s;}ul.featured-widget-list li:hover .featured-meta{bottom:20px;opacity:1}.feat-buttons{position:absolute;top:50%;left:0;z-index:5;width:100%}
.feat-buttons a{text-indent:-9999px;margin:0 7px;width:15px;height:15px;padding:5px;background:#000;-ms-filter:"progid:DXImageTransform.Microsoft.Alpha(Opacity=60)";filter: alpha(opacity=60);-moz-opacity:0.6;-khtml-opacity:0.6;opacity:0.6;position:relative;-webkit-border-radius: 50%;-moz-border-radius: 50%;border-radius: 50%;}.feat-prev{float:left;}.feat-next{float:right;}.feat-buttons a.feat-prev::before, .feat-buttons a.feat-next::before{content:"";width:0;height:0;border-width:6px 7px;border-style:solid;border-color:transparent #fff transparent transparent;position:absolute;top:50%;margin-top:-6px;margin-left:-11px;left:50%}
.feat-buttons a.feat-next::before{border-color:transparent transparent transparent #fff;margin-left:-3px}
</style>
<div id="featuredbwidget"></div>
<link href='https://fonts.googleapis.com/css?family=Abel' rel='stylesheet' type='text/css'/>
<script src="http://ajax.googleapis.com/ajax/libs/jquery/1.8.0/jquery.min.js" type="text/javascript"></script>
<script type='text/javascript'>
//<![CDATA[
featuredbwidget({
listURL:"https://helplogger.blogspot.com/",
featuredNum:9,
listbyLabel:false,
feathumbSize:350,
interval:3000,
autoplay:true,
featuredID:"#featuredbwidget"
});
function featuredbwidget(a){(function(e){var h={listURL:"",featuredNum:3,featuredID:"",feathumbSize:300,interval:5000,autoplay:false,loadingFeatured:"nextfeatured",pBlank:"https://blogger.googleusercontent.com/img/b/R29vZ2xl/AVvXsEjPpcvqIYFqSTSxN3uKnL1CrAGfh-mugoyYFhAf2pXnGDypJfRS7_eIEz0wZr9Gu7tk9TsmpkAFN5gFCp7quyqetoOkW29sw_EJpfQFkYFLv1tSxq9L8GpCN_kKgnW_D4lIcu7gPcjctyo/s500/no-image.png",byMonth:["Jan","Feb","Mar","Apr","May","Jun","Jul","Aug","Sep","Oct","Nov","Dec"],listbyLabel:false};h=e.extend({},h,a);var g=e(h.featuredID);var d=h.featuredNum*200;g.html('<div class="featslider"><ul class="featured-widget-list"></ul><div class="feat-buttons"><a href="#" class="feat-prev">Prev</a><a href="#" class="feat-next">Next</a></div></div>');var f=function(w){var q,k,m,u,x,p,t,v,r,l="",s=w.feed.entry;for(var o=0;o<s.length;o++){for(var n=0;n<s[o].link.length;n++){if(s[o].link[n].rel=="alternate"){q=s[o].link[n].href;break}}if("media$thumbnail" in s[o]){u=s[o].media$thumbnail.url.replace(/\/s[0-9]+\-c/g,"/s"+h.feathumbSize+"-c")}else{u=h.pBlank.replace(/\/s[0-9]+(\-c|\/)/,"/s"+h.feathumbSize+"$1")}k=s[o].title.$t;r=s[o].published.$t.substring(0,10);m=s[o].author[0].name.$t;x=r.substring(0,4);p=r.substring(5,7);t=r.substring(8,10);v=h.byMonth[parseInt(p,10)-1];l+='<li><a href="'+q+'"><div class="featuredbg"></div><img class="featuredthumb" src="'+u+'"/><h5>'+k+'</h5></a><div class="featured-meta"><span class="fdate"><span class="fday">'+t+'</span> <span class="fmonth">'+v+'</span> <span class="fyear">'+x+'</span></span> - <span class="fauthor">'+m+"</span></div></li>"}e("ul",g).append(l).addClass(h.loadingFeatured)};var c=function(){e(h.featuredID+" .feat-next").click()};var b=function(){e.get((h.listURL===""?window.location.protocol+"//"+window.location.host:h.listURL)+"/feeds/posts/summary"+(h.listbyLabel===false?"":"/-/"+h.listbyLabel)+"?max-results="+h.featuredNum+"&orderby=published&alt=json-in-script",f,"jsonp");setTimeout(function(){e(h.featuredID+" .feat-prev").click(function(){e(h.featuredID+" .featslider li:first").before(e(h.featuredID+" .featslider li:last"));return false});e(h.featuredID+" .feat-next").click(function(){e(h.featuredID+" .featslider li:last").after(e(h.featuredID+" .featslider li:first"));return false});if(h.autoplay){var i=h.interval;var j=setInterval(c,i);e(h.featuredID+" .featslider li:first").before(e(h.featuredID+" .featslider li:last"));e(h.featuredID+" .featslider").hover(function(){clearInterval(j)},function(){j=setInterval(c,i)})}e("ul",g).removeClass(h.loadingFeatured)},d)};e(document).ready(b)})(jQuery)};
//]]>
</script>

Automatic Featured Posts Slider Settings

  • listURL - replace "https://helplogger.blogspot.com/" with your blog URL
  • featuredNum - add the number of posts to display in the slider
  • listbyLabel - if you want to display posts by category / label, such as the tag fashion, it will be written as listbyLabel: "fashion"
  • feathumbSize - the size or dimension of the image in pixels
  • interval - time taken to change the slides position in milliseconds
  • autoplay - replace true with false if you don't want the slides to change automatically.
3. Once you are done with the settings, click the 'Save' button.

Now, this code is for a slider widget which means that instead of just a random list of Featured Posts, you get to display them with images (if they have one) and you can include effects too. You can also control how many slides should be shown because it just wouldn't be prudent to feature your entire oeuvre, right?

Plus, being a slider widget, it adds a nice little visual to your site. And we all know how visuals are important in enticing people to stay, don't we?

5 Best Popular Posts Widgets for Blogger

If you're using Blogger as the platform for your personal or business blog, you're probably looking for ways to customize it and make it your own. This way, you'll make your webpages unique and eye-catching and ensure they'll stand out from the many other pages on the internet. You'll also grab the attention of your target market, encourage them to browse through your blog and become your loyal readers and followers.

Fortunately, there are lots of ways to personalize your Blogger blog, and one of these is to customize your Popular Posts widget. Haven't installed this yet? Don't worry since putting it in your blog easy.
popular posts widget for blogger

Adding the Popular Posts Widget for Blogger

Just click on your blog title, access the "Layout" menu, click "Add a Gadget" and choose "Popular Posts". A window will appear asking you to configure the widget by choosing which posts you'll feature (e.g. those that were most viewed in the past 7 days or 30 days or from the beginning of your blog). You'll also be asked to choose how many posts you'll feature in your Popular Posts section and select if you'll show the post title only or along with the image thumbnail and/or the snippet. (Remember that each widget style has different requirements, so follow the styles and instructions carefully to find out if you need the snippet and image thumbnail or not).

Configuring Popular Posts Widget for Blogger

Once you've followed these instructions, you'll get to see the basic version of the Popular Posts Widget for Blogger in your blog. You can stick with this if it matches your blog design but, if it sticks out like a sore thumb or doesn't suit your taste, there's no need to fret since you can personalize it. You can choose from the following styles - see the demo blog:

Popular Posts Style 1 - Box within a box

This is an interesting widget style since it uses your snippet and image thumbnail in a unique way. Your snippet is written in opaque text and placed in a small transparent box. This, in turn, is placed in a bigger rectangular box, wherein your image thumbnail is used as a background. Choosing this Popular Posts Widget for Blogger can be a great option if you want to brighten up your blog and grab the attention of readers with your colorful photos.

popular posts widget for blogger

CSS code:
<style type='text/css'>
.sidebar .PopularPosts ul{margin:0;padding:0;}.sidebar .PopularPosts ul li{list-style:none !important;padding:0 !important;margin-bottom:10px;}.sidebar .PopularPosts .item-thumbnail{height:190px;margin:0;overflow:hidden;width:100%;}.sidebar .PopularPosts .item-title{position: relative;}.sidebar .PopularPosts img{height:auto;width:100%;padding:0;}.sidebar .PopularPosts .item-title a{color: #FFFFFF;font:20px Oswald;text-transform:uppercase;padding:10px;position:absolute;right:0;left:0px;margin:0px auto;text-align:center;text-decoration:none;top:40px;width:60%;height:26px;overflow:hidden;z-index:2;}
.sidebar .PopularPosts .item-snippet{background:rgba(0, 0, 0, 0.35);border-top:6px solid rgba(0, 0, 0, 0.1);border-bottom:6px solid rgba(0, 0, 0, 0.1);color:#FFFFFF;left:0px;right:0px;margin:0px auto;padding:65px 10px 10px;position:absolute;font:13px 'Times New Roman',Times,FreeSerif,serif;text-align:center;top:35px;width:60%;z-index:1;}.sidebar .PopularPosts .item-content{position:relative;}
</style>

Popular Posts Style 2 - Large thumbnails with small post titles underneath

This uses the same code as the basic Blogger Popular Posts Widget with a few tweaks. Popularized by well-known blogs, this style is eye-catching because it focuses on pictures, which don't only summarize the posts' content but also add visual drama to the entire page. This is particularly useful for blogs that focus on clothes, makeup, art and other topics that highly depend on visual presentation to better express ideas.
popular posts widget for blogger
CSS code:
<style type='text/css'>
.sidebar .PopularPosts ul{counter-reset:popularcount;margin:0;padding:0;}.sidebar .PopularPosts ul li{width:100%;list-style:none !important;padding:0 !important;margin-bottom:20px;position:relative;border:0;text-align:center;}.sidebar .PopularPosts .item-thumbnail a{clip: auto;display:block;height:auto;height:120px;}.sidebar .PopularPosts .item-thumbnail{width:100%;height:120px;overflow:hidden;position:relative;margin-bottom:15px;}.sidebar .PopularPosts .item-thumbnail::before{background:rgba(0, 0, 0, 0);border-bottom:29px solid #fff;border-left:29px solid transparent;border-right:29px solid transparent;bottom:0px;content:&quot;&quot;;height:0;width:0px;left:0px;right:0px;margin-left:auto;margin-right:auto;position:absolute;z-index:3;}.sidebar .PopularPosts .item-thumbnail:after{color:#000;content:counter(popularcount, decimal);counter-increment:popularcount;font:13px &quot;Times New Roman&quot;,Times,FreeSerif,serif;list-style-type:none;position:absolute;bottom:0;margin:0px auto;left:0px;right:0px;z-index:4;}.sidebar .PopularPosts .item-thumbnail img{position:relative;width:100%;height:auto;padding:0;}.sidebar .PopularPosts .item-title{font:15px &#39;Oswald&#39;, sans-serif;text-transform:uppercase;margin:0px auto;padding-bottom:10px;border-bottom:1px solid #000;}.sidebar .PopularPosts .item-title a{color:#000;text-decoration:none;}.sidebar .PopularPosts .item-snippet{padding:10px 15px;font:13px &quot;Times New Roman&quot;,Times,FreeSerif,serif;}
</style>

Popular Posts Style 3 - Colorful boxes

If your blog needs a pop of color, this is the right choice for you. This widget style presents your Popular Posts in several boxes that feature a thumbnail image and have bright, eye-catching shades like light green, ocher yellow and vivid orange. Each box has a different color, and you can add up to four boxes.

popular posts widget for blogger

CSS code:
<style type='text/css'>
.sidebar .PopularPosts ul{padding:0;margin:0;}.sidebar .PopularPosts .item-thumbnail a{clip:auto;display:block;height:auto;overflow:hidden;}.sidebar .PopularPosts .item-thumbnail{width:130px;height:130px;border-right:5px solid #fff;margin:0px 10px 0px 0px !important;position:relative;}.sidebar .PopularPosts .item-thumbnail img{position:relative;height:auto;width:100%;padding:0;}.sidebar .PopularPosts ul li{float:left;margin-bottom:5px;max-height:130px;min-width:250px;overflow:hidden;}.sidebar .PopularPosts ul li:first-child{background:#D9EDF7;}.sidebar .PopularPosts ul li:first-child + li{background:#F2DEDE;}.sidebar .PopularPosts ul li:first-child + li + li{background:#DFF0D8;}.sidebar .PopularPosts ul li:first-child + li + li + li{background:#FFEEBC;}.sidebar .PopularPosts ul li:first-child + li + li + li + li{background:#E0E0E0;}.sidebar .PopularPosts .item-title{font:13px &#39;Oswald&#39;, sans-serif;text-transform:uppercase;padding:10px 5px 10px;}.sidebar .PopularPosts .item-title a{color:#000;text-decoration:none;}.sidebar .PopularPosts .item-snippet{font:13px &quot;Times New Roman&quot;,Times,FreeSerif,serif;padding-right:5px;}.sidebar .PopularPosts .widget-content ul li{padding:0px 5px 0px 0px!important;}
</style>

Popular Posts Style 4 - Grid layout

Just like the large-picture widget style, the grid layout is an excellent option if you want to showcase your pictures or if your blog depends on visual information. However, the title of your posts won't be included in the layout, so readers will have to hover their mouses on the images to read the titles.

popular posts widget for blogger

CSS code:
<style type='text/css'>
.sidebar .PopularPosts ul{padding:0;}.sidebar .PopularPosts ul li:first-child{width:100%;max-height:100%;opacity:0.9;}.sidebar .PopularPosts ul li:nth-child(even){margin-right:2%;}.sidebar .PopularPosts ul li{-moz-box-sizing:border-box;-webkit-box-sizing:border-box;box-sizing:border-box;position:relative;padding:0px !important;width:49%;max-height:120px;opacity:0.4;overflow:hidden;float:left;margin-bottom:2%;-webkit-transition: all 0.5s ease 0s;-moz-transition:all 0.5s ease 0s;-ms-transition:all 0.5s ease 0s;-o-transition:all 0.5s ease 0s;transition:all 0.5s ease 0s;}.sidebar .PopularPosts ul li:hover{opacity:1;}.sidebar .PopularPosts .item-thumbnail{margin:0;width:100%;line-height:0;}.sidebar .PopularPosts ul li img {-moz-box-sizing:border-box;-webkit-box-sizing:border-box;box-sizing: border-box;width:100%;height:auto;padding:0;}.sidebar .PopularPosts .item-content:hover .item-title a,.sidebar .PopularPosts .item-thumbnail-only:hover .item-title a{visibility:visible;opacity:1;}.sidebar .PopularPosts .item-title a{color:#fff;background:rgba(0, 0, 0, 0) linear-gradient(to bottom, rgba(0, 0, 0, 0) 0%, rgba(0, 0, 0, 0.93) 100%, rgba(0, 0, 0, 0.85) 100%);text-decoration:none;position:absolute;text-align:center;font:13px &#39;Oswald&#39;, sans-serif;left:0;right:0;bottom:0%;padding:100px 10px 10px;opacity:0;visibility:hidden;}.sidebar .PopularPosts .item-snippet{display:none;}
</style>

Popular Posts Style 5 - Numbered posts

If you love numbered lists, or if you'd like to make your blog more organized, this can be the perfect option. By using the code for this widget style, your Popular Posts will be automatically numbered and will feature clean, minimalistic boxes that include your snippet and image thumbnail.

popular posts widget for blogger

CSS code:
<style type='text/css'>
.sidebar .PopularPosts ul{counter-reset:popularcount;margin:0;padding:0;}.sidebar .PopularPosts ul li{float:left;max-height:130px;min-width:250px;position:relative;}.sidebar .PopularPosts .item-thumbnail::after{color:rgba(255,255,255, 0.63);content:counter(popularcount, decimal);counter-increment: popularcount;font:70px &#39;Oswald&#39;, sans-serif;list-style-type:none;position:absolute;left:5px;top:-5px;z-index:4;}.sidebar .PopularPosts .item-thumbnail::before{background:rgba(0, 0, 0, 0.3);bottom:0px;content:&quot;&quot;;height:100px;width:100px;left:0px;right:0px;margin:0px auto;position:absolute;z-index:3;}.sidebar .PopularPosts .item-thumbnail a{clip:auto;display:block;height:auto;overflow:hidden;}.sidebar .PopularPosts .item-thumbnail{width:100px;height:100px;margin:0px 10px 0px 0px !important;position:relative;}.sidebar .PopularPosts .item-thumbnail:hover:before{display:none;}.sidebar .PopularPosts .item-thumbnail img{position:relative;padding-right:0px !important;height:auto;width:100%;}.sidebar .PopularPosts .item-title{font:13px &#39;Oswald&#39;, sans-serif;text-transform:uppercase;padding:0px 5px 10px;}.sidebar .PopularPosts .item-title a{color:#000;text-decoration:none;}.sidebar .PopularPosts .item-snippet{font:13px &quot;Times New Roman&quot;,Times,FreeSerif,serif;}.sidebar .PopularPosts .widget-content ul li{padding:0px 5px 0px 0px !important;}.sidebar .PopularPosts .item-content{padding:5px 0px;border-bottom:1px dotted #dedede;overflow:hidden;height:100px;position:relative;}
</style>
These are just some of the widget styles you can choose from. When you've picked a style you want, make sure to copy its CSS code. Once you do so, go to your blog, click "Theme" on the left side and select "Edit HTML" under the template preview.

These next codes need to be pasted above the "</head>" or "</body>" tags, so check the instruction to know exactly where you need to put the code.

Adding the CSS

When the template editor has opened, click anywhere inside the code area and hit CTRL + F or Command F to search the following tag:
</head>
Just ABOVE the </head> tag, copy-paste the CSS code of one of the styles above.


Important: If the Popular Posts widget is located in the footer of your blog, remove the .sidebar class found in the CSS code in order to make it work.

Please note that most of the styles are using the 'Oswald' font which you need to add to your template's code as well.

So, search for this tag:
<head>
... and just BELOW it, add this line:
<link href='https://fonts.googleapis.com/css?family=Oswald:400,700' rel='stylesheet' type='text/css'/>

Adding the JavaScript

These styles also require using a script in order to resize the popular posts image / thumbnail and trim the post snippet and title. To add the JavaScript code, search the </body> tag and paste the following script just above it:
<script src='//ajax.googleapis.com/ajax/libs/jquery/1.11.1/jquery.min.js'/>
<script type='text/javascript'>
//<![CDATA[
$(".popular-posts img").attr("src",function(t,s){return s.replace("/w72-h72-p-k-no-nu/","/s350-c/")}),$(".popular-posts ul li .item-snippet").each(function(){var t=$(this).text().substr(0,60),s=t.lastIndexOf(" ");s>10&&$(this).text(t.substr(0,s).replace(/[?,!\.-:;]*$/,"..."))}),$(".popular-posts ul li .item-content a").each(function(){var t=$(this).text().substr(0,60),s=t.lastIndexOf(" ");s>=6&&$(this).text(t.substr(0,s).replace(/[?,!\.-:;]*$/,"..."))});
//]]>
</script>
Note: if you have already the jQuery library in your template, remove the line in red.

After you have added all the codes in the right place, press the "Save theme" button to save the changes.

That's it!

The five Popular Posts widgets for Blogger featured today are all great solutions for adding a popular post section to your blog. They all have different appearance for determining what makes a post popular, but the end result is the same: visitors are always one click away from your best content. Try some of these styles, find your favorite, and see how it impacts the performance of your blog.

Which Hashtag Instagram Widget Should You Choose?

There are apps and widgets for almost everything, but one thing that is lacking is a widget that connects one of the most popular image-based social network to your website. Unfortunately, Instagram has yet to design an official widget that will allow you to easily and quickly embed grams on your website.

A widget is like a desk accessory that allows an end user to execute a particular function within a webpage. It fetches information from a particular source and then display it on an intended area. It can be designed to provide easy accessibility to weather, maps, sports updates, calendar and many others. Android and WordPress are two of the biggest contributors of web and mobile widgets, but Instagram still has to catch up.

While they're still trying to figure out how to make an Instagram widget, take advantage of any of the third-party widgets for Instagram. But because there are plenty of them out there, choosing the right one can be tough. Well, we did the sorting and guesswork out for you and presented you with the top 3 options:
instagram widget, instagram

Instansive

Instansive is a widget generator for Instagram that you can use for free or for a fee. Both versions practically have the same features, except for the number of times that the photos refreshes. It only happens once per day with the free version, but is always up to date with the premium version. If you want to do away with the restrictions of this Instagram widget, be ready to make a tiny investment.

instagram widget instansive


Instansive Features

  • Display photos and hashtags in grid, slideshow or column.
  • Customize the number of columns and rows
  • Add a hover effect
  • Show or hide image captions
  • Photos are linked directly to Instagram
  • Offers native support for Drupal and WordPress
For a one-time fee of $5, you can upgrade to the premium version.

Instansive, however, is not perfect compared to other third-party widgets for Instagram, because it has limited features in terms of customization, display, and refresh frequency. Even if you pay the minimal fee, only the photos will be kept up-to-date, but no other features will be added. But look on the bright side, it is responsive.


Intagme

Intagme is pretty simple and straightforward, which can be a bonus if you have to manage plenty of social media accounts and widgets. Its features also get the job done.

instagram widget intagme


Intagme Features

  • Pull photos or hashtags and display them in grid or slideshow
  • Get to customize the layout, thumbnail, size and image padding
  • Edit photos by adding borders and/or background color
On top of all these, Intagme is 100% free, which would probably put all other third-party widgets at the bottom of your list. Before you make a final decision, however, know that Intagme lacks one display feature - column, similar to what you will see on Pinterest. It is not responsive and has limited customization options. Moreover, photos are linked to a page on Intagme.com, instead of directly to Instagram.

Related: How to Add an Instagram Widget in Blogger

SnapWidget

Among Instagram widgets, snap widget is the most popular and is used by more than 100,000 websites daily. It can be used free or for a monthly fee of $6.99.

instagram widget snapwidget

SnapWidget Features

  • Pull photos or hashtags, then display them in grid, board, slideshow, map or scrolling.
  • Thumbnail size and layout can be customized
  • Background color hover effect layout and photo padding can be used to customize photos
  • Show or hide sharing buttons

Features of Premium Version

  • All of the above
  • Create up to 10 widgets
  • Filter photos by username & hashtag
  • Link photos to Instagram or any other page add custom CSS if so desired
  • Has more advanced customization options, such as pagination controls integration of Google Analytics and photo pop-up functionality
For a price of $6.99 per month, this Instagram widget is a worthy investment, especially because the free version is ad supported. This means thumbnails are linked to a SnapWidget page where photos appear alongside ads. An added bonus is that whether free or paid, there is an option available that lets you make the widget responsive for mobile use.

Which Instagram Widget Should You Choose?

Even if only 3 options were presented, making a choice is still not a walk in the park, but at least you don't need to shuffle through tons of widgets. From the information above, you can make an informed decision as to which Instagram widget to use. Or, you can narrow down your options based on your budget - whether you have one or not, the features you need, and how much customization control you want to have.

You should also think about how an Instagram widget can affect your SEO efforts. If you want it to be SEO friendly as the rest of your website, find out how it was developed or rendered, as some of the platforms used may not be visible to search engines. Consider all the factors above and your work will be easier.

Show/Hide Blogger and Google+ Comments System With Toggle

Many Blogger site owners received the new Google+ Comment System pretty negatively because it forced all commenting users to create their own Google+ account before they were able to write a comment. The Google+ Comment System on Blogger was convenient to writers, but discouraged many users from continuing to comment on blogs because they simply didn't want to use Google+. For those that did use Google+ to make a comment, Blogger would never email you and notify you that someone left a comment; you could go days or weeks without ever realizing that you never responded to a reader.

In addition to frustrating your audience, the Google+ Comment System on Blogger depended upon the URL of your blog post. By changing your URLs or moving around your blog posts internally, you run the risk of losing every one of your comments that was placed using Google+.

Previously, the only way to solve this problem was to disable the comment system through your account settings, thus giving up your ability to use their Google+ account. Now, there's an easy new way to have the best of both worlds. Allowing fans of Google+ as well as everyday blog readers to access all same features, you’ll be able to engage every visitor equally. You can respond to comments while still being able to communicate with other Google+ users outside of your site and take advantage of the Google+ Comment System on Blogger.

google plus comments, blogger

How to Integrate Blogger and Google Plus Comments

To make the installation as simple as possible, I used inline jQuery and CSS, but who wants can change this code later. Also, the most accessible place I found to add it would be just after <b:include data='post' name='post'/>. So, let's start adding it:

Step 1. Log into your Blogger account and select your blog > go to 'Template' and press the 'Edit HTML' button on the right side.


Step 2. Click anywhere inside the code area and press CTRL + F keys to open the editor's search box and search for the following code:
<b:include data='post' name='post'/>
Step 3. Just after <b:include data='post' name='post'/> add the following code:
<b:if cond='data:blog.pageType == &quot;item&quot;'>
<style>#comments, #gplus-comments-visibility {display:none;} .comments-icons {background: url(https://blogger.googleusercontent.com/img/b/R29vZ2xl/AVvXsEhKE_bh7YEax4ls07lDL2rDdmlXOxgv6AQsUfHNLPo6jxiAVOM31KYGbff9yfGW1FSzctft2iLUmjsatOZdmDSzCmv147SKTEb6G5YtrWE_vr4MB-5nG0OUFqv98gHhGSUXNRh0mBf-ilnZ/s1600/speech-bubble.png) no-repeat; font-size: 20px; font-family: &quot;Arial Narrow&quot;,Arial,sans-serif; color: #555; font-weight: bold; padding: 18px 15px 0; height: 70px; } .comments-icons a img {vertical-align: middle;}</style>
<div class='comments-icons'>
Show Comments: <a class='show-hide-comments' href='javascript:void();' onclick='$(&quot;#gplus-comments-visibility&quot;).slideToggle();$(&quot;#comments&quot;).hide();'><img class='gplus-icon' height='35' src='https://blogger.googleusercontent.com/img/b/R29vZ2xl/AVvXsEiQQ6YMGEOg5HsQvE_sO7WUhVTs1SRjksqgB2Z-2Dys76-aR_p0LLmpUFkDDqRbsTkSPg-YaMBSmLg-iD7_Eze30VhB4v_L1wP0X7RVyWhvI05f0JN7W3cgk5SUUQfdwk0fHVr3VbCio5Jm/s1600/google-plus-logo.png' width='35'/></a> OR <a class='show-hide-comments' href='javascript:void();' onclick='$(&quot;#comments&quot;).slideToggle();$(&quot;#gplus-comments-visibility&quot;).hide();'><img class='blogger-icon' height='35' src='https://blogger.googleusercontent.com/img/b/R29vZ2xl/AVvXsEiorLRPyS0BVnCqaUo8k-b7AiS7oiI322UnWWnMAzLw4k0vL8bZcsFs8tx9OB9m35FRC462vdwlnD-CtXREzj_5BHpD5X3ovYIjN-W0LIZseb1GVqOG4fVh-9U__D9KpzgCVdP1CrCbERtF/s1600/blogger-logo.png' width='35'/></a>
</div>
<div id='gplus-comments-visibility'>
<div class='g-comments' data-first_party_property='BLOGGER' data-view_type='FILTERED_POSTMOD' data-width='550' expr:data-href='data:post.url'/>
</div>      
</b:if>

Note: data-width is for setting the width of the comment box, so the number (550) indicated there can be changed according to the design of your blog.

Step 4. Press the "Save Template" button located at the top of the editor and view your blog to see if you have successfully added Google+ commenting system to Blogger.

Please note that in order to make this work, you need to make sure that you are using a version of jQuery in your site. Otherwise, add this line just above the </head> tag using the HTML template editor:
<script src='https://ajax.googleapis.com/ajax/libs/jquery/1.6.4/jquery.min.js' type='text/javascript'/>
That's it!
From now on, any reader that views your post has the option of making a comment using their Google+ account, or the native Blogger comments. Your readers will enjoy the flexibility that your site provides and you will also benefit from the inclusive services offered by Google.

Facebook Popup Like Box Widget For Blogger

Facebook has become the leading social media service on the Internet playing host to over 1.3 billion users; of those, 800 million login to their dashboard feeds at least once a day. Thanks to the vast number of active users on services like Facebook, acquiring new readers as a blogger or content provider has become easier than ever.

In order to produce an effective digital campaign, you absolutely must take advantage of social media by doing things like integrating Facebook on Blogger. Email marketing can be useful, but it comes with restrictions that could limit your blog's potential. Perhaps the most significant problem is that emails don't come with a face or personality like Facebook does.

Think of a time when you received an email in you inbox from someone you didn't know. Where you inclined to open it or did you send it right to the junk folder? If it's your first introduction to new consumer, they simply don't know who you are, what you want, and how you got their email. This sets off an initial breakdown of any type of trust that might have developed. The reputation of email marketing is further deteriorated with a study done by Kaspersky Lab, an Internet research firm. They estimate that around 70% of all the emails sent in the world are spam.

Sharing site content using a Facebook Like Box is just one of many strategies that can generate a regular flow of traffic from a diverse demographic that might have been previously inaccessible. Adding a Facebook Like Box to your site helps to reduces your individual workload, and instead distributes that ability equally among your readers.

When someone reads your content and appreciates the kind of work that you produce, they'll be willing to share that information to their followers and fans, setting off a viral reaction. The first step necessary to making this a reality is to make this change to your site. These next few steps will provide you with a quick and easy guide on how to add a 'Like Box' to your Blogger site so that you can began taking advantage of these great opportunities.


Click here for a DEMO


How to Add the Facebook Popup Like Box Widget

1. Log into your Blogger account and select your blog > go to 'Layout' & click the 'Add a Gadget' link on the right side.
2. Once the popup window is open, select the HTML/JavaScript gadget from the list:


3. Copy and paste the following code inside the empty box:
<script src='http://ajax.googleapis.com/ajax/libs/jquery/1.7.2/jquery.min.js' type='text/javascript'></script>
<style type="text/css">
#fbox-background{display:none;background:rgba(0,0,0,0.8);width:100%;height:100%;position:fixed;top:0;left:0;z-index:99999}#fbox-close{width:100%;height:100%}#fbox-display{background:#eaeaea;border:5px solid #828282;width:340px;height:230px;position:absolute;top:32%;left:37%;-webkit-border-radius:5px;-moz-border-radius:5px;border-radius:5px}#fbox-button{float:right;cursor:pointer;position:absolute;right:0;top:0}#fbox-button:before{content:"CLOSE";padding:5px 8px;background:#828282;color:#eaeaea;font-weight:700;font-size:10px;font-family:Tahoma}#fbox-link,#fbox-link a.visited,#fbox-link a,#fbox-link a:hover{color:#aaa;font-size:9px;text-decoration:none;text-align:center;padding:5px}
</style>
<script type='text/javascript'>
//<![CDATA[
jQuery.cookie=function(a,b,c){if(arguments.length>1&&"[object Object]"!==String(b)){if(c=jQuery.extend({},c),null!==b&&void 0!==b||(c.expires=-1),"number"==typeof c.expires){var d=c.expires,e=c.expires=new Date;e.setDate(e.getDate()+d)}return b=String(b),document.cookie=[encodeURIComponent(a),"=",c.raw?b:encodeURIComponent(b),c.expires?"; expires="+c.expires.toUTCString():"",c.path?"; path="+c.path:"",c.domain?"; domain="+c.domain:"",c.secure?"; secure":""].join("")}c=b||{};var f,g=c.raw?function(a){return a}:decodeURIComponent;return(f=new RegExp("(?:^|; )"+encodeURIComponent(a)+"=([^;]*)").exec(document.cookie))?g(f[1]):null};
//]]>
</script>
<script type='text/javascript'>
jQuery(document).ready(function($){
if($.cookie('popup_facebook_box') != 'yes'){
$('#fbox-background').delay(5000).fadeIn('medium');
$('#fbox-button, #fbox-close').click(function(){
$('#fbox-background').stop().fadeOut('medium');
});
}
$.cookie('popup_facebook_box', 'yes', { path: '/', expires: 7 });
});
</script>
<div id='fbox-background'>
<div id='fbox-close'>
</div>
<div id='fbox-display'>
<div id='fbox-button'>
</div>
<iframe allowtransparency='true' frameborder='0' scrolling='no' src='//www.facebook.com/plugins/likebox.php?
href=https://www.facebook.com/pages/Helplogger/120574614736021&width=339&height=255&colorscheme=light&show_faces=true&show_border=false&stream=false&header=false'
style='border: none; overflow: hidden; background: #fff; width: 339px; height: 200px;'></iframe>
<div id="fbox-link">Powered by <a style="padding-left: 0px;" href="http://helplogger.blogspot.com/2014/12/facebook-popup-like-box-blogger-widget.html" rel="nofollow">Helplogger</a></div>
</div>
</div>
4. Press the 'Save' button to add the widget to your blog. That's it!

Facebook Popup Like Box Customization

After adding the code, replace the address in blue https://www.facebook.com/pages/Helplogger/120574614736021 with your site's facebook page URL.

The widget will appear 5 seconds after the page finishes loading. If you want to change this delay, change the number 5000 to a greater or lesser number in this part:
.delay(5000)
By default, the like box only shows up the first time the user visits your page.  If you would like the Facebook box to popup every time the page loads, then remove this line of code:
$.cookie('popup_facebook_box', 'yes', { path: '/', expires: 7 });
If you want to display only when user visits your homepage, go to 'Template' > hit the 'Edit HTML' button on the right side and search by clicking anywhere inside the code area and pressing the CTRL + F keys for this tag:
</body>
Paste the facebook popup widget right above the body tag and make sure to include the conditional tags below:
<b:if cond='data:page.type == "index"'>ADD THE FACEBOOK WIDGET CODE HERE </b:if>
After saving this widget, you can test it out by returning to one of your old posts which should bring up a little popup widget asking if you'd like to join the site's Facebook page.

If you don't see the Facebook Like Box on the page, you may need to delete your cookies or check out the 'Customization' section above in order to display the widget every time a user visits your site. Once this widget is added to your site, all your hard work should start to translate into an increase in web traffic and number of Facebook fans.

5 Cool Recent Post Widgets for Blogger

For bloggers that pride themselves on always staying up-to-date with new content, a recent post widget for Blogger can be an invaluable tool. A recent posts widget for blogger is in many ways similar to a 'breaking news alert' that journalists love to use during their reports, providing the most recent and relevant posts that you have to offer.

Adding a recent post widget for Blogger helps to reduce the dependency on email marketing, because you don't have to send out an email just to let people know you made a new post. Instead, it updates automatically for everyone to see. You can then use this information to design scheduled email newsletters, and take advantage of what's often referred to as the 'Twitter effect' where audiences will regularly check back on your site for the possibility that new posts are available. Without this, you force people to do run their own search for information and content, increasing the likelihood that they'll leave the site and hurt your bounce rate.

Once you've managed to attract visitors to one of your posts using the recent post widget for Blogger, it will continue to act as an accessible secondary resource to navigate around your site. That way, you can avoid having them sifting through old content that might be outdated. If you'd rather show off some of your best posts instead of your most recent posts, you can do that instead, or add that feature to the bar with just a few alterations.

Apart from looking great and taking up minimal space, there are too many benefits for you not to have a recent post widget for Blogger. The best part about these add-ons is that they come in a wide variety of designs that will fit any theme. If you're interested in adding a widget to your site, here are 5 cool recent post widgets that might catch your eye and fit perfectly with your Blogger template:
recent posts for blogger, cool widgets

Recent Posts Style #1

rainbow widget, recent posts
<script type="text/javascript">
function showlatestpostswiththumbs(t){document.write('<ul class="recent-posts-container">');for(var e=0;e<posts_no;e++){var r,n=t.feed.entry[e],i=n.title.$t;if(e==t.feed.entry.length)break;for(var o=0;o<n.link.length;o++){if("replies"==n.link[o].rel&&"text/html"==n.link[o].type)var l=n.link[o].title,m=n.link[o].href;if("alternate"==n.link[o].rel){r=n.link[o].href;break}}var u;try{u=n.media$thumbnail.url}catch(h){s=n.content.$t,a=s.indexOf("<img"),b=s.indexOf('src="',a),c=s.indexOf('"',b+5),d=s.substr(b+5,c-b-5),u=-1!=a&&-1!=b&&-1!=c&&""!=d?d:"https://blogger.googleusercontent.com/img/b/R29vZ2xl/AVvXsEiB1uzX6q0Lp-TQpJl0ok9uPGkZ5ODCpHDwucefNXQGVxuHop4KBzUNn2xwAZavnZJYqt0v9fkcQEbR5hcP2K9yr-X_BYGwREDJfIZkX9CNvErSQR5iQmyXOXMAc6NZEEtGJl93tU9haVl3/s1600/no-thumb.png"}var p=n.published.$t,f=p.substring(0,4),g=p.substring(5,7),v=p.substring(8,10),w=new Array;if(w[1]="Jan",w[2]="Feb",w[3]="Mar",w[4]="Apr",w[5]="May",w[6]="Jun",w[7]="Jul",w[8]="Aug",w[9]="Sep",w[10]="Oct",w[11]="Nov",w[12]="Dec",document.write('<li class="recent-posts-list">'),1==showpoststhumbs&&document.write('<a href="'+r+'"><img class="recent-post-thumb" src="'+u+'"/></a>'),document.write('<div class="recent-post-title"><a href="'+r+'" target ="_top">'+i+"</a></div>"),"content"in n)var A=n.content.$t;else if("summary"in n)var A=n.summary.$t;else var A="";var k=/<\S[^>]*>/g;if(A=A.replace(k,""),1==post_summary)if(A.length<summary_chars)document.write(A);else{A=A.substring(0,summary_chars);var y=A.lastIndexOf(" ");A=A.substring(0,y),document.write(A+"...")}var _="",$=0;document.write('<br><div class="recent-posts-details">'),1==posts_date&&(_=_+w[parseInt(g,10)]+" "+v+" "+f,$=1),1==readmorelink&&(1==$&&(_+=" | "),_=_+'<a href="'+r+'" class="url" target ="_top">Read more</a>',$=1),1==showcommentslink&&(1==$&&(_+=" <br> "),"1 Comments"==l&&(l="1 Comment"),"0 Comments"==l&&(l="No Comments"),l='<a href="'+m+'" target ="_top">'+l+"</a>",_+=l,$=1),document.write(_),document.write("</div>"),document.write("</li>")}document.write("</ul>")}
</script>
<script type="text/javascript">
var posts_no = 5;
var showpoststhumbs = true;
var readmorelink = true;
var showcommentslink = false;
var posts_date = true;
var post_summary = true;
var summary_chars = 70;
</script>
<script src="/feeds/posts/default?orderby=published&alt=json-in-script&callback=showlatestpostswiththumbs"></script>
<a style="font-size: 9px; color: #CECECE; margin-top: 10px;" href="http://helplogger.blogspot.com/2014/11/5-cool-recent-post-widgets-for-blogger.html" rel="nofollow">Recent Posts Widget</a>
<noscript>Your browser does not support JavaScript!</noscript>
<link href='http://fonts.googleapis.com/css?family=Ubuntu+Condensed' rel='stylesheet' type='text/css' />
<style type="text/css">
img.recent-post-thumb{width:50px;height:50px;float:right;margin:5px -5px 0px 0px;-webkit-border-radius:50%;-moz-border-radius:50%;border-radius:50%;padding:3px;background: #fff}
ul.recent-posts-container {list-style-type: none; background: #fff;padding: 0px;font:12px 'Ubuntu Condensed', sans-serif;margin: 5px 0px 5px 0px;}
ul.recent-posts-container li:nth-child(1n+0) {background: #F49A9A; width: 100%}
ul.recent-posts-container li:nth-child(2n+0) {background: #FCD092; width: 95%}
ul.recent-posts-container li:nth-child(3n+0) {background: #FFF59E; width: 90%;}
ul.recent-posts-container li:nth-child(4n+0) {background: #E1EFA0; width: 85%;}
ul.recent-posts-container li:nth-child(5n+0) {background: #B1DAEF; width: 80%;}
ul.recent-posts-container li {padding:5px 10px;list-style-type: none; margin: 0 0 -5px; color: #777;}
.recent-posts-container a { text-decoration:none; }
.recent-posts-container a:hover { color: #222;}
.post-date {color:#e0c0c6; font-size: 11px; }
.recent-post-title a {font-size: 14px;color: #444; font-weight: bold;}
.recent-post-title {padding: 6px 0px;}
.recent-posts-details a{ color: #222;}
.recent-posts-details {padding: 5px 0px 5px; }
</style>

Recent Posts Style #2

recent posts widget for blogger
<div class="recentpoststyle">
<script type="text/javascript">
function showlatestposts(e){for(var t=0;t<posts_no;t++){var r,s=e.feed.entry[t],n=s.title.$t;if(t==e.feed.entry.length)break;for(var a=0;a<s.link.length;a++)if("alternate"==s.link[a].rel){r=s.link[a].href;break}n=n.link(r);var i="... read more";i=i.link(r);var l=s.published.$t,o=l.substring(0,4),u=l.substring(5,7),c=l.substring(8,10),m=new Array;if(m[1]="Jan",m[2]="Feb",m[3]="Mar",m[4]="Apr",m[5]="May",m[6]="Jun",m[7]="Jul",m[8]="Aug",m[9]="Sep",m[10]="Oct",m[11]="Nov",m[12]="Dec","content"in s)var d=s.content.$t;else if("summary"in s)var d=s.summary.$t;else var d="";var v=/<\S[^>]*>/g;if(d=d.replace(v,""),document.write('<li class="recent-post-title">'),document.write(n),document.write('</li><div class="recent-post-summ">'),1==post_summary)if(d.length<summary_chars)document.write(d);else{d=d.substring(0,summary_chars);var f=d.lastIndexOf(" ");d=d.substring(0,f),document.write(d+" "+i)}document.write("</div>"),1==posts_date&&document.write('<div class="post-date">'+m[parseInt(u,10)]+" "+c+" "+o+"</div>")}}
</script>
<script type="text/javascript">
var posts_no = 5;var posts_date = true;var post_summary = true;var summary_chars = 80;</script>
<script src="/feeds/posts/default?orderby=published&amp;alt=json-in-script&amp;callback=showlatestposts">
</script><a style="font-size: 9px; color: #CECECE;margin-top:10px;" href="http://helplogger.blogspot.com/2014/11/5-cool-recent-post-widgets-for-blogger.html" rel="nofollow">Recent Posts Widget</a>
<noscript>Your browser does not support JavaScript!</noscript>
<style type="text/css">
.recentpoststyle {counter-reset: countposts;list-style-type: none;}
.recentpoststyle a {text-decoration: none;color: #49A8D1;}
.recentpoststyle a:hover {color: #000;}
.recentpoststyle li:before {content: counter(countposts,decimal);counter-increment: countposts;float: left;z-index: 1;position:relative;font-size: 15px;font-weight: bold;color:#fff;background:#69B7E2; margin:13px 5px 0px -6px;line-height:30px;width:30px;height:30px;text-align:center;-webkit-border-radius:50%;-moz-border-radius:50%;border-radius:50%;}li.recent-post-title{margin-bottom: 5px;padding: 0;}
.recent-post-title a {color: #444;text-decoration: none;font: bold 13px "Avant Garde",Avantgarde,"Century Gothic",CenturyGothic,AppleGothic,sans-serif;}
.post-date {font-size: 11px;color: #999;margin:5px 0px 15px 32px;}
.recent-post-summ {border-left:1px solid #69B7E2; color: #777; padding: 0px 5px 0px 20px; margin-left: 10px; font: 15px Garamond,Baskerville,"Baskerville Old Face","Hoefler Text","Times New Roman",serif;}
</style></div>

Recent Posts Style #3

recent posts gadget

<script type="text/javascript">
function showlatestpostswiththumbs(t){document.write('<ul class="recent-posts-container">');for(var e=0;e<posts_no;e++){var r,n=t.feed.entry[e],i=n.title.$t;if(e==t.feed.entry.length)break;for(var o=0;o<n.link.length;o++){if("replies"==n.link[o].rel&&"text/html"==n.link[o].type)var l=n.link[o].title,m=n.link[o].href;if("alternate"==n.link[o].rel){r=n.link[o].href;break}}var u;try{u=n.media$thumbnail.url}catch(h){s=n.content.$t,a=s.indexOf("<img"),b=s.indexOf('src="',a),c=s.indexOf('"',b+5),d=s.substr(b+5,c-b-5),u=-1!=a&&-1!=b&&-1!=c&&""!=d?d:"https://blogger.googleusercontent.com/img/b/R29vZ2xl/AVvXsEiB1uzX6q0Lp-TQpJl0ok9uPGkZ5ODCpHDwucefNXQGVxuHop4KBzUNn2xwAZavnZJYqt0v9fkcQEbR5hcP2K9yr-X_BYGwREDJfIZkX9CNvErSQR5iQmyXOXMAc6NZEEtGJl93tU9haVl3/s1600/no-thumb.png"}var p=n.published.$t,f=p.substring(0,4),g=p.substring(5,7),v=p.substring(8,10),w=new Array;if(w[1]="Jan",w[2]="Feb",w[3]="Mar",w[4]="Apr",w[5]="May",w[6]="Jun",w[7]="Jul",w[8]="Aug",w[9]="Sep",w[10]="Oct",w[11]="Nov",w[12]="Dec",document.write('<li class="recent-posts-list">'),1==showpoststhumbs&&document.write('<a href="'+r+'"><img class="recent-post-thumb" src="'+u+'"/></a>'),document.write('<div class="recent-post-title"><a href="'+r+'" target ="_top">'+i+"</a></div>"),"content"in n)var A=n.content.$t;else if("summary"in n)var A=n.summary.$t;else var A="";var k=/<\S[^>]*>/g;if(A=A.replace(k,""),1==post_summary)if(A.length<summary_chars)document.write(A);else{A=A.substring(0,summary_chars);var y=A.lastIndexOf(" ");A=A.substring(0,y),document.write(A+"...")}var _="",$=0;document.write('<br><div class="recent-posts-details">'),1==posts_date&&(_=_+w[parseInt(g,10)]+" "+v+" "+f,$=1),1==readmorelink&&(1==$&&(_+=" | "),_=_+'<a href="'+r+'" class="url" target ="_top">Read more</a>',$=1),1==showcommentslink&&(1==$&&(_+=" <br> "),"1 Comments"==l&&(l="1 Comment"),"0 Comments"==l&&(l="No Comments"),l='<a href="'+m+'" target ="_top">'+l+"</a>",_+=l,$=1),document.write(_),document.write("</div>"),document.write("</li>")}document.write("</ul>")}
</script>
<script type="text/javascript">
var posts_no = 5;
var showpoststhumbs = true;
var readmorelink = true;
var showcommentslink = true;
var posts_date = true;
var post_summary = true;
var summary_chars = 40;</script>
<script src="/feeds/posts/default?orderby=published&alt=json-in-script&callback=showlatestpostswiththumbs"></script>
<a style="font-size: 9px; color: #CECECE; margin-top: 10px;" href="http://helplogger.blogspot.com/2014/11/5-cool-recent-post-widgets-for-blogger.html" rel="nofollow">Recent Posts Widget</a>
<noscript>Your browser does not support JavaScript!</noscript>
<link href='http://fonts.googleapis.com/css?family=Oswald' rel='stylesheet' type='text/css'/>
<style type="text/css">
img.recent-post-thumb{padding:2px;width:65px;height:65px;float:left;margin:0px 10px 10px;border: 1px solid #69B7E2;}
.recent-posts-container {font-family:'Oswald', sans-serif;font-size:12px;}
ul.recent-posts-container li{list-style-type: none; margin-bottom: 10px;font-size:12px;float:left;width:100%}
ul.recent-posts-container {counter-reset: countposts;list-style-type:none;padding:0;}
ul.recent-posts-container li:before {content: counter(countposts,decimal);counter-increment: countposts;z-index: 1;position:absolute; left: 0px; font-size: 13px;font-weight: bold;color: #fff;background: #69B7E2;line-height:25px;height:25px;width:25px;text-align:center;-webkit-border-radius: 50%;-moz-border-radius: 50%;border-radius: 50%;}
.recent-posts-container a{text-decoration:none;}
.recent-post-title {margin-bottom:5px;}
.recent-post-title a {font-size:12px; text-transform: uppercase; color: #2aace3;}
.recent-posts-details {margin: 5px 0px 0px 92px;font-size:11px;}
.recent-posts-details a{color: #777;}
</style>

Recent Posts Style #4

recent posts for blogger, cool widgets
<script type="text/javascript">
function showlatestpostswiththumbs(t){document.write('<ul class="recent-posts-container">');for(var e=0;e<posts_no;e++){var r,n=t.feed.entry[e],i=n.title.$t;if(e==t.feed.entry.length)break;for(var o=0;o<n.link.length;o++){if("replies"==n.link[o].rel&&"text/html"==n.link[o].type)var l=n.link[o].title,m=n.link[o].href;if("alternate"==n.link[o].rel){r=n.link[o].href;break}}var u;try{u=n.media$thumbnail.url}catch(p){s=n.content.$t,a=s.indexOf("<img"),b=s.indexOf('src="',a),c=s.indexOf('"',b+5),d=s.substr(b+5,c-b-5),u=-1!=a&&-1!=b&&-1!=c&&""!=d?d:"https://blogger.googleusercontent.com/img/b/R29vZ2xl/AVvXsEiB1uzX6q0Lp-TQpJl0ok9uPGkZ5ODCpHDwucefNXQGVxuHop4KBzUNn2xwAZavnZJYqt0v9fkcQEbR5hcP2K9yr-X_BYGwREDJfIZkX9CNvErSQR5iQmyXOXMAc6NZEEtGJl93tU9haVl3/s1600/no-thumb.png"}var h=n.published.$t,f=h.substring(0,4),w=h.substring(5,7),v=h.substring(8,10),A=new Array;A[1]="Jan",A[2]="Feb",A[3]="Mar",A[4]="Apr",A[5]="May",A[6]="Jun",A[7]="Jul",A[8]="Aug",A[9]="Sep",A[10]="Oct",A[11]="Nov",A[12]="Dec",document.write('<li class="recent-posts-list">'),1==posts_date&&document.write('<div class="post-date">'+A[parseInt(w,10)]+" "+v+" "+f+"</div>"),1==showpoststhumbs&&document.write('<a href="'+r+'"><img class="recent-post-thumb" src="'+u+'"/></a>'),document.write('<div class="recent-post-title"><a href="'+r+'" target ="_top">'+i+"</a></div>");var g="",k=0;document.write('<div class="recent-posts-details">'),1==showcommentslink&&(1==k&&(g+=" <br> "),"1 Comments"==l&&(l="1 Comment"),"0 Comments"==l&&(l="No Comments"),l='<a href="'+m+'" target ="_top">'+l+"</a>",g+=l,k=1),1==readmorelink&&(1==k&&(g+=" | "),g=g+'<a class="readmorelink" href="'+r+'" class="url" target ="_top">Read more</a>',k=1),document.write(g),document.write("</div>"),document.write("</li>")}document.write("</ul>")}
</script>
<script type="text/javascript">
var posts_no = 5;
var showpoststhumbs = false;
var readmorelink = true;
var showcommentslink = true;
var posts_date = true;
</script>
<script src="/feeds/posts/default?orderby=published&alt=json-in-script&callback=showlatestpostswiththumbs"></script>
<a style="font-size: 9px; color: #CECECE; float: right; margin-top: 5px;" href="http://helplogger.blogspot.com/2014/11/5-cool-recent-post-widgets-for-blogger.html">Recent Posts Widget</a>
<noscript>Your browser does not support JavaScript!</noscript>
<link href='http://fonts.googleapis.com/css?family=Oswald' rel='stylesheet' type='text/css'/>
<style type="text/css">
img.recent-post-thumb {padding: 2px; width:35px;height:35px;float:right;margin: -14px 0px 0px 5px; border: 1px solid #cea5ac; border-radius: 10%;}
.recent-posts-container {font-family: 'Oswald', sans-serif;  float: left;width: 100%;min-height: 70px;margin: 5px 0px 5px 0px;padding: 0;font-size:12px;}
ul.recent-posts-container li {padding:5px 0px;min-height:65px; list-style-type: none; margin: 0px 10px 5px 35px;}
ul.recent-posts-container {counter-reset: countposts;list-style-type: none;}
ul.recent-posts-container li:before {content: counter(countposts,decimal);counter-increment: countposts;z-index: 2;position:absolute; left: 5px; font-size: 16px;color: #4D4D4D;background: #F7F7F7;padding: 9px 14px; border: 1px solid #efefef;}
.recent-posts-container a { text-decoration:none; }
.recent-posts-container a:hover{color: #4DACE3;}
.post-date {color:#e0c0c6; font-size: 11px; }
.recent-post-title a {font-size: 13px; text-transform: uppercase; color: #5C4D4D;}
.recent-post-title { margin: 5px 0px; }
.recent-posts-details {border-top: 4px solid #AC707A; margin-top: 5px; padding-top: 5px;}
.recent-posts-details a{ color: #888;}
a.readmorelink {color: #4DACE3;}
</style>

Recent Post Style #5

recent posts, blogger gadget
<script type="text/javascript">
function showlatestpostswiththumbs(t){document.write('<ul class="recent-posts-container">');for(var e=0;e<posts_no;e++){var r,n=t.feed.entry[e],i=n.title.$t;if(e==t.feed.entry.length)break;for(var o=0;o<n.link.length;o++){if("replies"==n.link[o].rel&&"text/html"==n.link[o].type)var l=n.link[o].title,m=n.link[o].href;if("alternate"==n.link[o].rel){r=n.link[o].href;break}}var u;try{u=n.media$thumbnail.url}catch(p){s=n.content.$t,a=s.indexOf("<img"),b=s.indexOf('src="',a),c=s.indexOf('"',b+5),d=s.substr(b+5,c-b-5),u=-1!=a&&-1!=b&&-1!=c&&""!=d?d:"https://blogger.googleusercontent.com/img/b/R29vZ2xl/AVvXsEiB1uzX6q0Lp-TQpJl0ok9uPGkZ5ODCpHDwucefNXQGVxuHop4KBzUNn2xwAZavnZJYqt0v9fkcQEbR5hcP2K9yr-X_BYGwREDJfIZkX9CNvErSQR5iQmyXOXMAc6NZEEtGJl93tU9haVl3/s1600/no-thumb.png"}var h=n.published.$t,f=h.substring(0,4),w=h.substring(5,7),v=h.substring(8,10),A=new Array;A[1]="Jan",A[2]="Feb",A[3]="Mar",A[4]="Apr",A[5]="May",A[6]="Jun",A[7]="Jul",A[8]="Aug",A[9]="Sep",A[10]="Oct",A[11]="Nov",A[12]="Dec",document.write('<li class="recent-posts-list">'),1==posts_date&&document.write('<div class="post-date">'+A[parseInt(w,10)]+" "+v+" "+f+"</div>"),1==showpoststhumbs&&document.write('<a href="'+r+'"><img class="recent-post-thumb" src="'+u+'"/></a>'),document.write('<div class="recent-post-title"><a href="'+r+'" target ="_top">'+i+"</a></div>");var g="",k=0;document.write('<div class="recent-posts-details">'),1==showcommentslink&&(1==k&&(g+=" <br> "),"1 Comments"==l&&(l="1 Comment"),"0 Comments"==l&&(l="No Comments"),l='<a href="'+m+'" target ="_top">'+l+"</a>",g+=l,k=1),1==readmorelink&&(1==k&&(g+=" | "),g=g+'<a class="readmorelink" href="'+r+'" class="url" target ="_top">Read more</a>',k=1),document.write(g),document.write("</div>"),document.write("</li>")}document.write("</ul>")}
</script>
<script type="text/javascript">
var posts_no = 5;
var showpoststhumbs = true;
var readmorelink = true;
var showcommentslink = true;
var posts_date = true;
</script>
<script src="/feeds/posts/default?orderby=published&alt=json-in-script&callback=showlatestpostswiththumbs" rel="nofollow"></script>
<a style="font-size: 9px; color: #CECECE; float: right; margin-top: 5px;" href="http://helplogger.blogspot.com/2014/11/5-cool-recent-post-widgets-for-blogger.html" rel="nofollow">Recent Posts Widget</a>
<noscript>Your browser does not support JavaScript!</noscript>
<link href='http://fonts.googleapis.com/css?family=Lobster|Gloria+Hallelujah' rel='stylesheet' type='text/css' />
<style type="text/css">
img.recent-post-thumb {width:50px;height:50px;float:right;margin: -4px -35px 0px 0px; border: 4px solid #FCD6CB; border-radius: 100%;}
.recent-posts-container {font-family: 'Gloria Hallelujah', cursive;  float: left;width: 100%;min-height: 55px;margin: 5px 0px 5px 0px;padding: 0;font-size:12px;}
ul.recent-posts-container {counter-reset: countposts;list-style-type: none; background: #fff; }
ul.recent-posts-container li:before {content: counter(countposts,decimal);counter-increment: countposts;z-index: 2;position:absolute; left: -20px; font-size: 16px;color: #616662;background: #FCD6CB;padding: 9px 14px; border-radius: 100%; margin-top: 15px;}
ul.recent-posts-container li {padding:5px 0px;min-height:50px; list-style-type: none; margin: -2px 5px 5px 5px;  border-top: 2px solid #FCD6CB;}
ul.recent-posts-container {border: 2px solid #FCD6CB; }
.recent-posts-container a { text-decoration:none; }
.recent-posts-container a:hover { color: #222;}
.post-date {color:#e0c0c6; font-size: 11px; }
.recent-post-title a {font-size: 14px;color: #616662;}
.recent-post-title {padding: 6px 0px;}
.recent-posts-details a{ color: #888;}
.recent-posts-details {padding-bottom: 5px;}
a.readmorelink {color: #4DACE3;}
</style>

How to Add Recent Posts Widget on Blogger

Want to add one of the styles above? Just follow the following steps below:

Step 1. Log into your Blogger dashboard and click on your blog
Step 2. Go to "Layout" and click the "Add a gadget" link on the right side
Step 3. From the pop-up window, scroll down and select the "HTML/JavaScript" gadget:


Step 4. Paste the code of the chosen widget found below it.
Step 5. Hit the "Save" button... and you're done!

Keep Your Blog Updated

Using a recent post widget for Blogger can truly benefit you and improve your skill as a blogger. As you can see, these designs can look great on Blogger sites, but they do act a little bit like a progress report for the author. If you start to fall behind, the dates on your recent post widget will definitely give you away.

Set a schedule and make sure that you are making regular posts on the blog. These posts will be automatically updated on your widget and readers can view this information whenever they want. Add your recent post widget for Blogger on the every page of the blog or in your template so that these posts can encourage others to continue reading, thus increasing the total time spent on your site.