Showing posts with label how to. Show all posts

How to Create a Static Home Page in Blogger

When it comes to home pages, most websites can be divided into two: static and non-static. As their name implies, static home pages stay permanent no matter how many times the website is updated, while non-static home pages reflect the changes that are made to the site and show the latest posts first.

The latter has become well-known nowadays due to the rising popularity of personal and even corporate blogs. However, there are still many people who prefer static home pages because it makes their websites look more organized and professional. It also gives them more control over the readers' experience on their site and helps them create stronger brand awareness through the uniform message that their home page presents.

Fortunately, if you own a Blogger site and want to make your home page static, you'll find that creating one isn't as difficult as it seems. You can create a static home page in Blogger by taking these steps:
static pages in Blogger

1. Create your static home page

The first thing you should do is to create a new page for your blog. This will serve as your static home page but, for now, it will look and act like any other page in your site.

To make this page, you'll need to go to the main menu of the Blogger dashboard and click on the "Pages" option on the left side on the screen. Doing this will lead you to the "All Pages" menu window. Here, click on the "New Page" button and you'll enter an editor that looks similar to the Blogger Post editor that you use when publishing a new blog post.
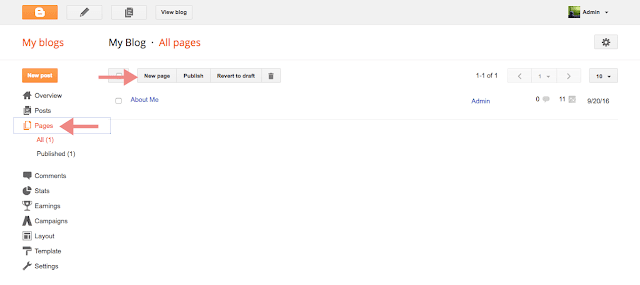
static home page

At the top box, enter the title that you want for this page - in this case, let's call it the "Welcome" page. In the larger text box, type the content that you want to appear on your home page; this can be a paragraph, or two about yourself or your business and what your site is all about.


Once you're done, click "Publish". The window will return to the main "All Pages" menu, and you'll see the new "Welcome" page you've created. Copy the URL of the "Welcome" page since you'll need it later on. To do this, right click on the 'View' link and select 'Copy Link Location' from the menu.
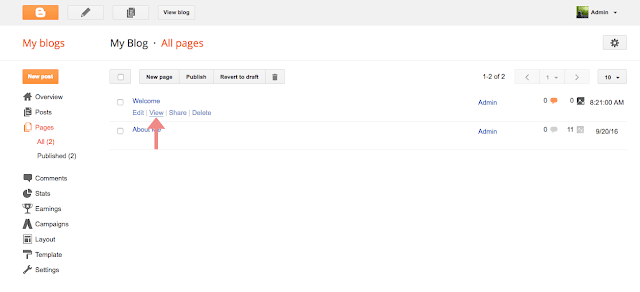


2. Redirect the default home page to the static one

Once your "Welcome" page is up, the next thing you should do is to change Blogger's default homepage. This involves redirecting from your site's original home page to the static homepage that you've created so it would be the first thing that people see when they visit your website.

Related: How to Set Custom Redirects in Blogger

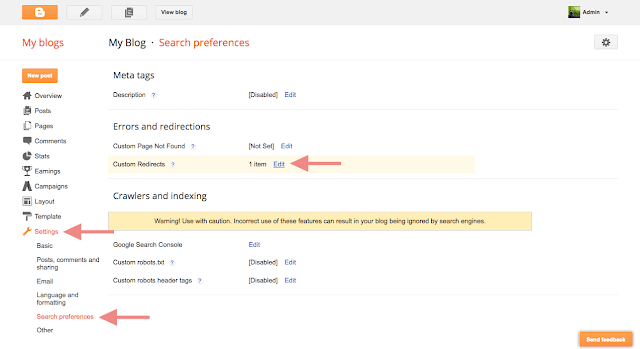
To do this, you'll need to go to main Blogger editor menu, click on "Settings" on the left side of the screen, and choose "Search Preferences". Under the "Errors and redirections" section, you'll see the "Custom Redirects" option with an "Edit" link beside it. Click on the "Edit" link to open another window, where you'll see two boxes named "From" (with your blog's URL beside it) and "To".

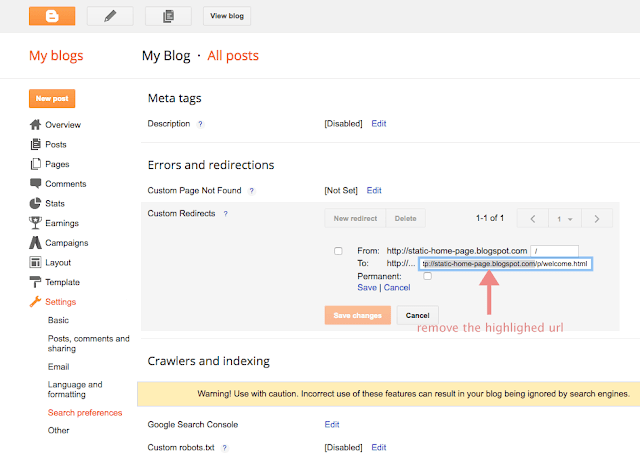
In the "From" box, enter only a forward slash symbol "/". In the "To" box, paste the URL that you copied earlier and add the latter part of the URL of the "Welcome" page. For instance, the page's URL of our demo blog is static-home-page.blogspot.com/welcome.html, so we'll remove the "http://static-home-page.blogspot.com" address and add only "/p/welcome.html" in the "To:" box. The "/p" signifies that it's a static page.

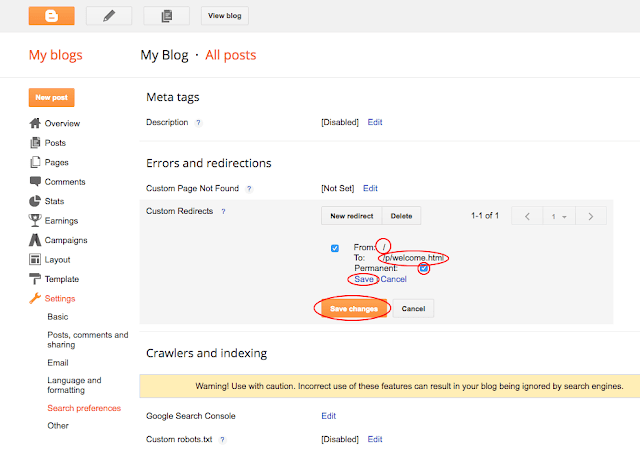
Next, check the little box beside "Permanent", click on the "Save" text link, and press the "Save changes" button. Doing these will redirect your site's main URL to its new static home page. Access your blog on a separate browser to see if it works.

3. Make tabs for your site

If you're not planning to make tabs visible in your blog, you can stop at Step #2. But, if you want your site to have tabs that indicate the home page, the main blog page, and other pages you may have (such as the FAQs and Contact Us pages), you'll need to take another step.

Why is this important? Basically, when visible tabs are enabled in your site, they will show that you have two existing pages: the default home page and the new "Welcome" page you've created - both of which redirect to the same static page. This can be confusing for your readers and may even affect your search engine rankings.

To fix this, you first need to enable tabs by going to the "Layout" menu item and click on the "Add a Gadget" link. You can choose to add it below your blog header or sidebar. In many cases, it's advisable to add it below blog's header since they're more visible and give your website a sleek, professional look.
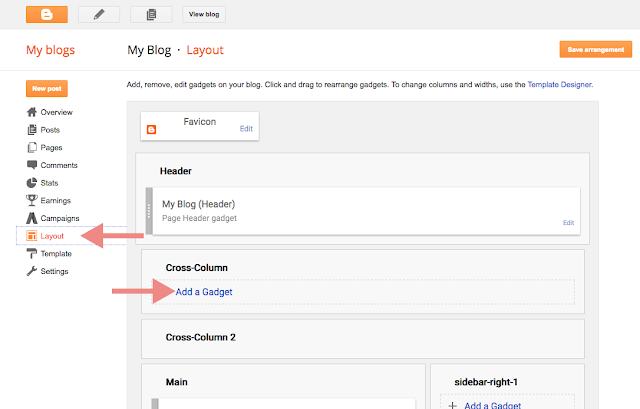

Once the pop-up window opens, scroll down and click on the 'Pages' link:
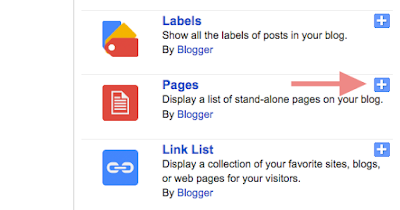

This will open another window named "Configure Page List". Here, under the "Pages to show" section, you'll see the default home page and your new static homepage with small boxes beside them. Uncheck the box beside the default home page to hide it from view, check the pages that you want to display in the menu and then click on the "Save" button to save the changes.
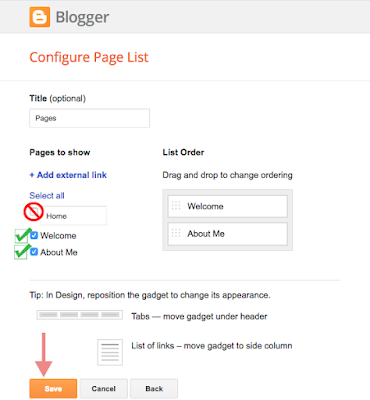

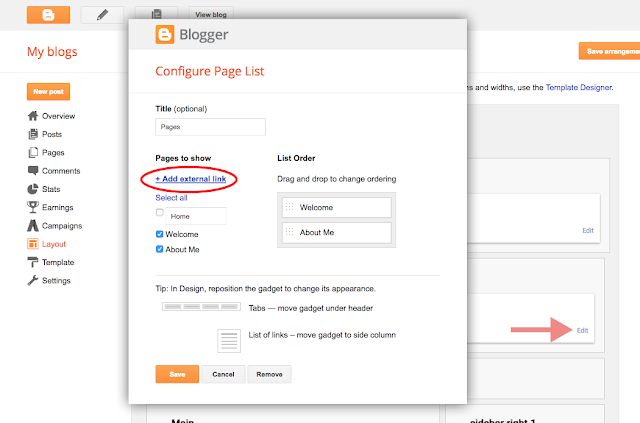
You can stop at this point but, if you want, you can also create a specific tab that will lead to your main blog post page. To do this, edit the "Pages" gadget that you just saved and click "+ Add external link".

On the new window that would open, enter the title you'd like for the page (such as "Blog") along with /index.html web address, then hit "Save Link" and click the "Save" button on the "Configure Page List" window.
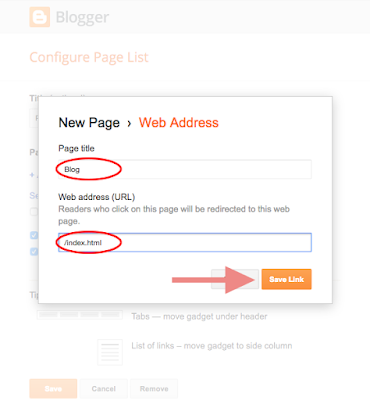

Now, view your site and you will see the pages menu containing the "Welcome" page and "Blog" tabs. To see how this works, you can also visit our demo blog. Enjoy!

Final Note

Having a static home page can be beneficial for your blog. Follow the steps above now to create a static home page in Blogger!
How to Hide Posts from Blogger Homepage

The point of blogging is to make your blog posts visible to your target audience as well as to search engines. However, there are times when you need to hide certain blog posts from homepage. For instance, one post may contain outdated information, so you don't want it to be seen by your audience but you also want to keep it on your site for records purposes. Or perhaps you want a certain post to still be seen on your blog, but you don't want it to show in the home page.

Either way, you have to find ways to hide certain blog posts. Fortunately, if you're using Blogger, you can easily do so by taking a few simple steps. You can use this guide to get started.

hide post from home page

Backdate Blogger Posts

Let's discuss this technique first since it's simple and doesn't require you to deal with any lines of code. Basically, the only thing you need to do is to change the publishing date of the post you want to hide; specifically, you need to backdate it to the oldest possible date. Doing this is effective if your Blogger site is configured to show the latest posts first (as most blogs are); once a post is backdated, it will no longer be shown in the home page.

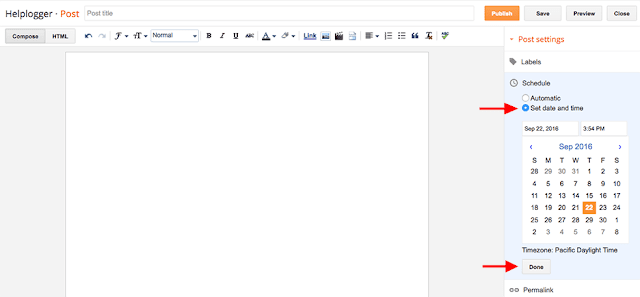
How do you do this? If you're publishing a new post and want to hide it, look for the "Schedule" option on the right side of the post editor and click on "Set date and time". Choose a previous date on the calendar, click 'Done' and Save the post, then go back to your blog's home page to check if the post has disappeared.

backdate post, schedule blogger post

The same process applies if you want to hide an older post; the only difference is that you need to click on the post's title in the dashboard to open it in the editor. Backdate the post using the steps above and save it, then open your blog to verify that the post is indeed hidden from view.

Please note that this process will only hide your posts from the homepage. People will still be able to see them if they'd take the time to go through your blog posts from the previous years. This is also the case for those who'd come across your hidden blog post through search engines.

Hide Blog Posts in Blogger Using Code

Another thing you can do to hide a blog post is to edit its code. This is a bit complicated since one small mistake can affect the post structure and make it unreadable. This, in turn, can affect your readers' experience as they browse through your site and even have a negative effect on your search engine optimization techniques. With this in mind, it's important to be careful when dealing with code.

Method 1: Hide Blogger Post Using the Post's label

There are two techniques to choose from, and one of them involves the label of the blog post you want to hide. If you're ready to go ahead with this method, you'll first need to make a backup of your template. Having a backup is important since it ensures you'll have a copy to fall back on in case something goes wrong.

Once you've backed up the template, go to "Templates", click on "Edit HTML" and then click anywhere inside the code area -> press CTRL + F keys and search for this line:
<b:include data='post' name='post'/>
Once you've found it, replace it with this code:
<b:if cond='data:blog.url == data:blog.homepageUrl'>
<b:loop values='data:post.labels' var='label'>
        <b:if cond='data:label.isLast == "true"'>
            <b:if cond='data:label.name != "add label here"'>
                <b:include data='post' name='post' />
            </b:if>
        </b:if>
    </b:loop>
<b:else/>
    <b:include data='post' name='post' />
</b:if>
Note: replace the text "add label here" with the label (case sensitive) of the blog post that you want to hide in Blogger homepage. Keep in mind that above code won't work if you have multiple labels on that post, so please make sure the post has only 1 label.

Important: every post that you want to show on the homepage should have at least one label otherwise they will not be visible because the b:loop statement won't be executed for them.

Finally, Save the changes by pressing the 'Save template' button on the upper left side of the editor, then view your blog to check if the blog post has been hidden.

Method 2: Hide Blogger Post Using the Post's ID Number

Aside from the method above, you can use another technique that involves the post ID number of the blog post you'd like to hide. To know the ID number, you must go to the dashboard area, find the title of the post you want to hide, and click the "Edit" text link below it. Doing this will open the post in the Blogger editor.

Once you're in the editor, click on the address bar above and go to the end part of the URL. Here, you'll see a line of text that looks like this: postID==, followed by a long string of numbers. This is your post's ID number. The ID number usually contains 19 numbers, so it will look somehow like this: postID==1234567890123456789. Copy this ID since you'll need it for the next step.

hide blogger post using id

When you have your blog post's ID, open the Blogger dashboard, go to Template, and click "Edit HTML". Search for this line:
<div class='post hentry uncustomized-post-template' itemscope='itemscope' itemtype='http://schema.org/BlogPosting'>
Replace it with this one:
<div class='post hentry uncustomized-post-template' expr:id='&quot;post-&quot; + data:post.id' itemprop='blogPost' itemscope='itemscope' itemtype='http://schema.org/BlogPosting'>
Note: if you found two occurrences of it, replace both of them.

Now search for this tag:
</head>

Once you find it, paste the following code above it:
<b:if cond='data:blog.url == data:blog.homepageUrl'>
<style type='text/css'>
#post-1234567890123456789{display:none;}
</style>
</b:if>

Don't forget to replace "1234567890123456789" with the 19-digit ID number of the blog post you'd like to hide. Once you're done, make sure to save the template. You can open your blog in another tab or browser to check if the post has indeed been hidden.

That's it!

Whether you backdate your post or opt for the post ID method, you have to remember that the blog post you've hidden is still on your website. This means that it will still be indexed by search engines, show up on search engine results, and get found by people who are searching for the keywords that are present in the post. If you really want this blog post to be seen by no one, you'll need to use robots.txt (for Google) to remove it from search results. Better yet, completely delete the post from your Blogger dashboard and just keep a soft copy of it in your computer.

Stop Blogger from Redirecting Blogspot to Country Specific URLs

Let's say you're from France and have set up - just for examples sake - a blog called frenchlitgeek.blogspot.com where you share your thoughts and insights on French literature. Now, with Google's country specific redirection in Blogger, you might be redirected to frenchlitgeek.blogspot.fr when you try to access your site. The thing is, you perfectly liked the .com and didn't sign up for the .fr but you find yourself being directed there. Sure, your blog works and all but you also wonder why.
blogger country specific redirection

Why Did Google Do This?

Google has always supported the expression of views, and they stated as much on their official blog. In the post Free expression and controversial content on the web, which was published in 2007, it said "Our world would be a very boring place if we all agreed all the time. So, while people may strongly disagree with what someone says, or think that a particular newspaper is total nonsense, we recognize that each of us have the right to an opinion."

The post continued, "We also know that letting people express their views freely has real practical benefits. Allowing individuals to voice unpopular, inconvenient or controversial opinions is important. Not only might they be right (think Galileo) but debating difficult issues in the open often helps people come to better decisions".

blogspot country redirection

While the company is clearly on the side of people freely expressing their opinions, they also believe that a line has to be drawn somewhere. Then again, for a company providing services in over 100 countries around the world and each with their own national laws and cultural norms, it's surely difficult for a company like Google to decide where to draw boundaries.

However, there are cases like child pornography which is illegal in just about any country where decisions are clear cut.

For a company whose products are "specifically designed to help people create and communicate, to find and share information and opinions across the world", how does Google deal with this challenge?

One of the most challenging areas where Google deals with issues regarding free expression is in Blogger, their content generation platform. Since Google can't check what you've written before you publish, they rely on active vocal users who are diligent in alerting the proper if a post borders on offensive. Then again, that in itself is a tricky issue as well because what one person may view as offensive, another might not.

In other words, it's always a work in progress with Google.

Fast forward to January 9, 2012 when Google announced it was making changes to the Blogger platform with regards to censorship. That said change would make use of a country specific domain to the Blogger platform. Doing this would allow Google to censor and remove content specific to a certain country.

In their announcement, Google said: "Migrating to localized domains will allow us to continue promoting free expression and responsible publishing while providing greater flexibility in complying with valid removal requests pursuant to local law. By utilizing ccTLDs, content removals can be managed on a per country basis, which will limit their impact to the smallest number of readers."

The move by Google come after pressure from countries like India that are working on hunting down content on social media sites which are considered inappropriate. Also, the move followed closely on the heels of Twitter's new censorship policies.

Since Google aims to "help people create and communicate, to find and share information and opinions across the world", it would be strange to take down a post that was just banned in a certain area. In essence, with country specific redirection, a piece of content can still be accessible by the world save for the country where it was blocked.

How Would Country Specific Redirection Affect Your Site?

Of course, not all site owners greeted the country specific URL change with open arms. A few of the issues brought up in regard to the change include:

1. A reduction in social stats. These are your Facebook Likes, Google +1s and so on from your blog posts. They might be reduced because the URLs from one blog post will be different depending on where your readers are from.

2. A problem with external commenting platforms. If you use Disqus - for example - for your comments section, then you might run into trouble because blog URLs will be different even if essentially the page being accessed is just the same.

3. A slight problem with AdSense earnings. Some users have complained about seeing a dip in their earnings when their pages are served through country specific domains.

4. An issue with link juice. You want external sites to link to you and not your country specific URL. But the issue here is that you can't control how others link to your page. They might use the top level domain or they might use the country code top-level domain.

Stop Blogger from Redirecting to Country-Specific Domains

If country specific redirection affects important factors such as traffic and link juice, and you need those in order to rank well, what can you possibly do? Well, thankfully, Google has provided a way to get around this. All you have to do is add an ncr/ to the end of the URL - ncr here stands for No Country Redirect. So basically, it goes frenchlitgeek.blogspot.com/ncr/.

That solution is great but do you want your users to always have to do that every time they visit your blog? To eliminate that hassle, and for the good of your site statistics, a simple redirection script will do the trick. Here's how:

1. Log in to your Blogger account.

2. Click on Template → Edit HTML.

3. Find the <head> tag in the HTML editor by opening the search box using Ctrl + F.

blogger country redirection

4. Copy the redirection code seen below after the <head> tag.
<script type="text/javascript">
var blog = document.location.href.toLowerCase();
if (!blog.match(/\.blogspot\.com/)) {
blog = blog.replace(/\.blogspot\..*?\//, ".blogspot.com/ncr/");
window.location.replace(blog);
}
</script>

5. Click on "Save Template".

Credit: labnol.com

And that's it! Whenever someone accesses your Blogger, they'll be taken to the top level domain rather than the country specific one.

7 Search Engine Optimization Tips for Bloggers

SEO, as you might have already know, is an acronym for search engine optimization. In the simplest of words, it's the way search engines like Google.com, Yahoo.com, Bing.com and others present your page in users' search results on their sites.

Cool, how do they that?

Well, they do that via sophisticated software tools, called spiders. Consider the whole internet as an empty room, with air particles as websites. Now sneak a spider into that room. Each tiny step that this spider would take now is essentially crawling a website (as the room is dark and full of websites). This is how search engines crawl through the web picking up site after site, studying them and ranking them. This ranking is important, really important. A higher ranked website by Google will always be on the first page of Google's search results for a related query compared to a lower ranked one.


So, in order to get ranked higher, you and I need SEO. SEO is like black pepper without which fried egg might not taste 'that' tastier. In simple words, in order for search engines to find your site and rank it higher than others in your field, you need to optimize it. Let's see how with these 7 simple tips.

Ways to SEO Optimize your Blog

Before starting with our 7 simple tips for a quality SEO, it's important to broadly classify those tips into two basic areas, on the basis of origin:

On-page Optimization

Refers to optimization of your actual web content including your HTML code, your text, as well as graphic content.

Off-page optimization

Off-page optimization, however, deals with things like backlinks (hyperlinks pointing to you site from other websites, apps and networks).

1. Create SEO Friendly Blog Post Titles

Post titles are important for SEO. They really are since they are deal makers or breakers. Whenever you write something, make sure you give proper attention to the post's title. Make your titles simple, intriguing, descriptive and gullible so that people may know what is this all about and what to expect. An even better approach is to wear searchers shoes while giving a title and think how would you Google it if you were looking for content like this.

google search results, seo title

Also, don't forget to include keywords in your title and keep it under 70 characters (or search engines would crop it before looking).

2. Improve the quality of your content

If you think 'content' isn't important for SEO, think again! Your content is the most important part of your site. While writing, don't copy-paste from elsewhere, don't stuff it with keywords alone, don't bombard it with images and multimedia files and don't write any lesser than 300 words. These all would affect your ratings quite poorly.

So, write original, use keywords in scenarios instead of straying them around (like I didn't use SEO here, SEO there in every next line), use images where they suffice and make sure you name them properly to appear in image search results, i.e. an image with the "img009.jpg" name would never appear in the image search results but "tips_to_success.jpg" would. The best would be to use text content and wrap them proper in HTML tags like <H2></H2> etc. (search engines likes content this way). Also, make sure your blog post's length is somewhere between 300-500 words - crossing over is fine but lesser isn't.

seo title headings

3. Keywords are keys

Keywords are terms that others may use to search for your content. While keywords are important for SEO, don't go on and stuff your site with keywords. This would make your content appear like a spam to spiders, who would neglect it henceforth.

Ideal is that once you have chosen your title (and included your keyword in it, as I have added keyword SEO in title above), use it in page URL, in your starting and ending paragraphs, as well as in article body where required without sounding awkward. Additionally, you may link it using anchor text to relevant resources in and out of site.

Adding keyword in the post URL using Custom Permalink

4. Meta-tags are important, but not 'that' much

If we had been living in early part of 21st century, meta tags might have done all the SEO for your site. Unluckily, we aren't. Google and other search engines have long left using meta-tags for finding site information. Hence, if someone tells you meta-tagging is all you need for your sites SEO, tell them it isn't.

Nevertheless, it's important that you use your keywords in your meta-data. Some themes already do that for you, if they don't (you can check that using page source or using view source code from browser), don't sweat. You can use 3rd party plugins like All in One SEO Pack and Scribe.

5. Socialize!

Make others talk about your site and share your content on social media sites or their blogs. It gets even better if somehow sites with high ratings link back to your site. This makes spiders think that you are someone important that everyone these days is talking about, resulting in enhancing your ratings dramatically.

Guest posting is another good approach for that. Comment on other sites, make friends with bloggers (best in business) and make them comment at yours. These tiny little things do matter a lot, resulting in enhanced SEO of your site.

6. Link in and Link-Out

Hyperlinks or Links are important from SEO perspective. You can use them to:

Link out to other sites, networks and posts, or even to your previous posts (also called inbound or backlinks) using anchor element with keyword.

anchor element with keyword

Or even better, make others to link in to you, via sharing your content on their sites or social media networks.

As mentioned, an even outstanding strategy for building links is guest posting.

7. Write Often

Sites with new content every day, or twice thrice a week have still far better ratings than those who post every fortnight. A better incoming content frequency makes spider come to your site regularly, resulting in better ratings and enhanced SEO.

Are we done then? Well, trust me - your sites rating is in your hands, not in Google or Yahoo. SEO is just about doing things neatly and in a sophisticated manner. Walk your site these 7 steps for a quality SEO and you will witness the difference yourself at Google, if no place else.

Remember, code clean, write original, socialize... this is what SEO is all about!

Where To Find Free Blogger Backgrounds and Textures

Blogger is a fantastic tool for amateur and professional writers that have a passion for publishing online content. Unlike WordPress or hosting companies that require you to design your site before ever getting started, Blogger is a ready to go service right out of the box that will allow you to start writing for yourself or others on day one. The effort required to sign up for an account is minimal, and you can really get as creative as you want, whenever you want.

Even if you aren't familiar with web development or design, that's okay. Blogger is a place for everyone. Thanks to the overwhelming support of the Blogger and creative communities, there are plenty of free to use resources out there to make your site look great and keep you focused on what you love best. Here are some of the top sites for acquiring blogger backgrounds that won't cost you a dime and will look incredible.

free blogger backgrounds and textures

Shabby Blogs

Shabby blogs offers some unique texture and graphic rendered Blogger backgrounds to choose from. All of the designs that they have are created to be standard width so you don't get a lot of flexibility to choose from; however, there are guides out there that can teach you how to extend the sidebars, header, and footer of your screen if you find one you love and this is something important to you. In addition to offering Blogger backgrounds Shabby blogs also has a section for cute little buttons that you can add to your site to give it an extra special touch.

shabby blogs backgroundshttp://www.shabbyblogs.com/backgrounds.htmlhttp://www.shabbyblogs.com/backgrounds.htmlhttp://www.shabbyblogs.com/backgrounds.html

Hot Bliggity Blog

Aside from having one of the coolest and creative names to say out loud, Hot Bliggity Blog has a wide selection of patterned-based blogs for your site. You can choose between different color schemes, and they also offer three different sizes to pick from, standard, widened, and full width. Best of all, they are really easy to install. All you have to do is click on the install link underneath the image. From there it will copy the code for you into your clipboard and give you instructions on where to paste it.

hot bliggity blog backgroundshttp://hotbliggityblog.com/http://hotbliggityblog.com/

Dotty Dot Dot

Dotty Dot is the place to go if you like geometric type backgrounds that are heavy on squares, plaid, circles, and of course dots. The website is a little bit hard to navigate, but they have a sidebar with a bunch of tags to help you sort through all the available templates and find something you like. Just about every color you can imagine is available if you plan on matching your Blogger backgrounds to your favorite color or font style. The widths of the most of the templates vary so some have heavy padded sidebars, whereas some are very skinny.

http://dottydotdotdesign1.blogspot.com/http://dottydotdotdesign1.blogspot.com/http://dottydotdotdesign1.blogspot.com/http://dottydotdotdesign1.blogspot.com/

LeeLou Blogs

Lee Lou Blogs offers Blogger backgrounds that look a lot like you would find in a scrapbook with a heavy dependency on small pictures and vector graphics. These free templates would go great with any home improvement blog or DIY arts and crafts writer. Most of the free backgrounds are standard size with the high padded sides, but like anything you can get access to more templates if you want to take advantage of any of his premium designs.

http://leelou-blogs.com/

CgTextures

If you just want something basic real basic that won't distract customers from your content, you can head over to CgTextures. Their site is full of photos and textures that could be added as a background image with a reduced transparency. The blog would still look great and you wouldn't have to worry as much about trying to match your font style and color so that it fits in with the background. Instead you can draw more focus on what's important and less on the site's bells and whistles.

cg textures for blogger backgrounds

Every Stock Photo

Bloggers that want less of an 'artsy' look to their site and instead more of a serious appeal can get a picture from Every Stock Photo to use as the background image. You can also benefit by using some of the pictures offered through this site within your blog posts so that you aren't stuck buying things from premium image providers. There search bar and navigation panel makes it easy to find exactly what you are looking for to see a unique feel to every page.

every stock photo background image

Shizoo-Design

Shizoo-Design is a German based design firm with about 554 different patterns to choose from. You can find everything from conservative shapes to abstract rainbows and splashes of color. All of the textures are provided in a range of size, anywhere from 1000x700 pixels to 1300x600 pixels so that they will comfortably fit your entire site's background and work with most browsers and computer screen sizes. Brushes and custom icons are also available from the site, free of charge.

shizoo design textures,blogger backgrounds

Patterns of Change

Patterns of Changes offers Blogger backgrounds that are cartoon oriented and that can best be tiled across the screen. The site is perhaps one of the easiest to use compared to all the others on the screen, providing a simple navigation bar where you can choose what color you'd like the pattern to be. When you select one of the colors provided, it will come up with a bunch of different patterns usually associated with that color. For instance, when the color brown is selected, one of the choices ia brown cake. Blogger backgrounds for this site might not be the best choice for business professionals, but they certainly are fun.

patterns of change blogger backgrounds

How to Add a Background Image using the Blogger Template Designer

If you have a background image that you want to upload, then follow these steps:

1. Log into your Blogger account and go to "Template", press the "Customize" button on the right side. Once the Blogger template designer has opened, you'll see the Background option on the left - click on it:

change blogger background

2. Now click on the box below the Background image title and it will open a window from where we can select a default background image. On the upper left side of this window, click Upload Image and select the image you would like to use from a location on your computer.

upload background image

Note that you should use a JPG, GIF, or PNG image that is no more than 300k in size. If your image is too large, then you can use the Kraken.io image optimizer to make the image file smaller.

3. After you've uploaded your image, click 'Done' and you'll be taken back to the background menu. Here you will see additional options like: "Alignment", "Tile" and "Scroll with page":
  • Alignment: change the position of the background image to start either horizontal (left, center, right) or vertical (top and bottom);
  • Tile (Repeat): if you want a small background image to fill the page, choose to repeat (tile) horizontally and/or vertically.
  • Scroll with page: the box is checked by default, this means that the background scroll along with the page contents. If you want the background picture to not move as the page is scrolled and stay exactly where it is, uncheck this box.
background image position

4. For a background image with plain color in the middle for content, you might want to remove the main and header background. Navigate to "Advanced" > "Backgrounds" and type the word "transparent" inside the "Main Background" and "Header Background" box:

change background color

5. If the background is smaller than the content area, we can fix this using CSS. Scroll down and click on the Add CSS option, then paste this CSS code inside the box:
body {
background-size: 200%;
}

.body-fauxcolumn-outer .cap-top {
background: none;
}
Note: to change the size of the background, modify the 200% value in red.

change background size

Once you're happy with the results, press the 'Apply to blog' button and enjoy the new background for your site.

How to Change Background in a Custom Blogger Template

Sometimes the above options might not appear in some custom Blogger templates if the body.background variable hasn't been defined. In this case, we will need to access the HTML of the template:

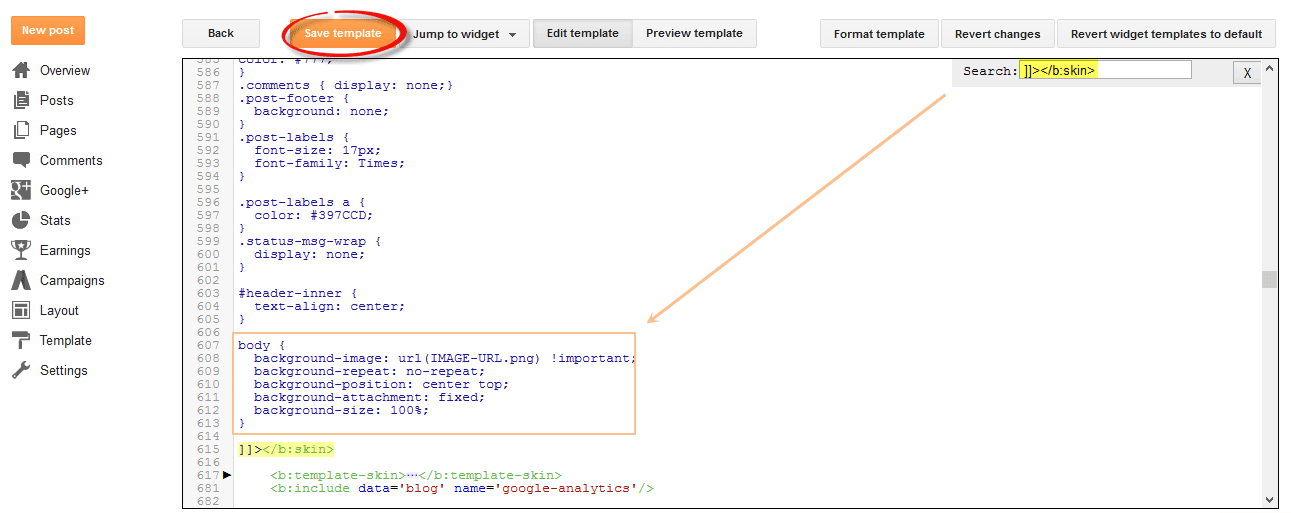
1. Go to "Template" and click the "Edit HTML" button, then click anywhere inside the code area. Press the CTRL + F keys to open the Blogger search box:

blogger template html

2. Paste or type the following tag inside the search box and hit Enter to find it:
]]></b:skin>
3. Immediately before the ]]></b:skin> tag, paste one of the following code snippets:

For a large background image:
body {
background-image: url(IMAGE-URL.png) !important;
background-repeat: no-repeat;
background-position: center top;
background-attachment: fixed;
background-size: 100%;
}
Note: the no-repeat value prevents the image from repeating either vertically or horizontally. Use background-repeat: repeat-y if you'd like the image to repeat vertically, or background-repeat: repeat-x if you want it to repeat only horizontally. To increase the size of the background, change the 100% value.

adding background in blogger

If using a repeating pattern, add this CSS code instead:
body {
background-image: url(IMAGE-URL.png) !important;
background-repeat: repeat;
background-position: center top;
background-attachment: fixed;
}
4. Open a new tab and upload your background image to Blogger or an image hosting site, and copy the URL of your hosted image to your clipboard. If you don't know how to do it, please take a look at this tutorial.

After you copied it, replace the text highlighted in blue from above with your image url.

5. Finally, Preview the template to ensure that the background image appears as you want, and press the "Save template" button to save your changes. That's it!

Using the 8 sites listed above, you have a wide range to choose from when creating a site that really represents you. Given the right tools, designing you blog can be a fun hobby to enjoy that can spark your creativity and improve the quality of your writing. With such a large selection, the hardest part of setting up your new theme will be finding which one you like best.

How To Host Blogger CSS and JavaScript Files in Google Drive

Anyone that has ever worked on a web design or development can tell you that where you decide to store your files is important. Every time someone visits your site, the server or host will access this location and bring up the relevant files that need to be displayed. Wherever you decide to store your files, this will have an impact on some important aspects like the speed that your site loads, your overall SEO ranking and your ability to make necessary adjustments to the site.

Things To Think About

When you are designing your online structure and where to store your important CSS and JavaScript files, here is a run down on how this decision might impact your site later on:

Site Loading Speed

By combining some of the style sheets and website files, the Blogger server only has to collect information from a single location. When you split up your files or decentralize the file system, it takes a longer time for all the data to come together to make your site possible.

Slow loading speeds can negatively impact your SEO ratings because the slower the site is, the less likely that visitors are going to wait around for it to load. If someone visits your site and immediately clicks the 'back' button because it's taking too long to load, that is going to increase your bounce rate and provide Google with statistics that show your site is either low quality or irrelevant to the search keywords.

File Storage Affects SEO

In addition to increasing your bounce rate, storing your files in a central location and managing the name of your files can affect SEO site wide. Web crawlers enlisted by Google, or some of the other search engines, index both the code on your site, and the name and directory of your files. If file names are random or not placed in the proper categories, the web crawlers aren't going to know what to do with the information.

Clear file structure and a central location provide you with incentive to organize everything and name them appropriately. All the content that is relevant to the subject of your website or blog will be in the same location for web crawlers to review.

Storage Locations Affect Editing Abilities

Shuffling through files and folders or opening up FTP connections just to make some simple edits can be a hassle, and take up a lot of time that could have otherwise have been spent writing new content.

If you're a Blogger site owner, this is something you need to think about. When you need to make alterations to things like social media sharing buttons, popular posts, recent posts and related posts widgets, you have to know where everything is intended to go, or risk losing both available content and money.

Some of the larger sites that produce hundreds of unique articles each month can't afford to have content in different locations. When articles start to get lost out of order, they run the risk of duplicating content on their site, or forgetting to post it altogether. Things should be right at your fingertips to minimize mistakes and reduce the amount of time spent editing the site while it's still live.

Storing Javascript/CSS Files With Google Drive

Storing Blogger CSS and JavaScript files with Google Drive will help to eliminate any of the problems mentioned above and reduce the clutter among your services. Taking this method can increase your site speed, increase the opportunities for a successful SEO campaign, and make your life so much easier.

Google Drive provides ample amount of space to store large files, and offers collaboration services so that you can work among different team members on the same project. Some of the files that you upload into the cloud services can remain unpublished and stay within the private site, whereas other files like blog posts can be published or stored to the public site.

Another beneficial feature of storing all your Blogger files on Google Drive is that it is highly secure. Google comes with the backing of one of the leading companies in the technical world so that you can be sure your content is safe from hackers and those looking to compromise your site.

This guide will provide you with step-by-step instructions on how to setup your Blogger site using Google Drive. It's completely free to take advantage of this strategy, and will provide you with a solid platform from which to build your blog.
host blogger css javascript files

Step 1. Prepare the CSS/JavaScript Files

  • First, we need to create the file that we need to host. To host a CSS file, open the Notepad and paste the CSS code (if it is enclosed within the <style> and </style> tags, remove them). 
  • In the Notepad menu, select 'File' > 'Save as' and type the file name with the .css extension just like I did with mycssfile.css - see the screenshot below.
create a css file
  • In the same window, choose "All files" in the "Save as type" option and set the Character Encoding to UTF-8.
  • If you want to host a JavaScript file, add the .js extension (instead of .css) at the end of your file name (remove the <script>...</script> tags if you see them). Click "Save" and navigate to the location where you want to save the file.

Step 2. Upload Your File on Google Drive

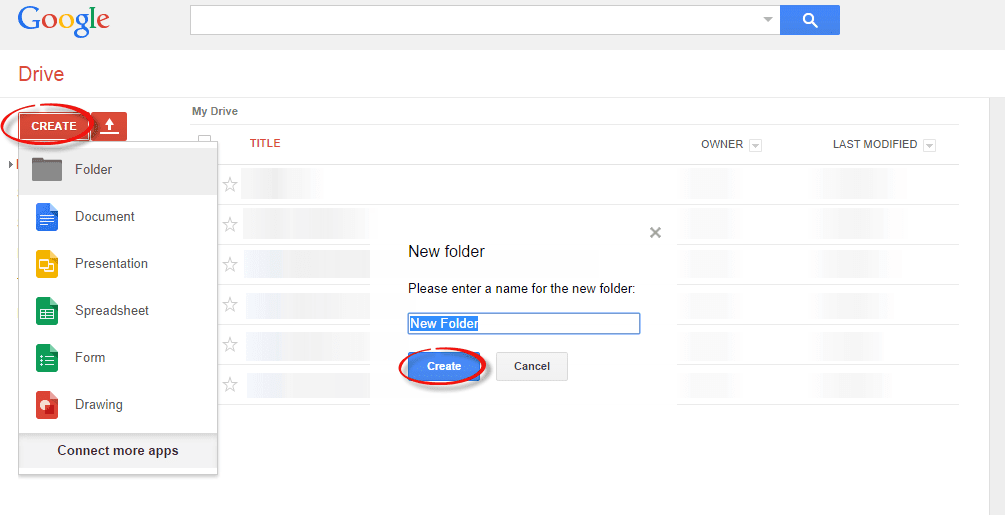
  • Access https://drive.google.com and log in with your Gmail account. After you logged in, click on the 'Create' button and add a new separate folder to upload your JavaScript and CSS files.
create folder in Google drive
  • Open the newly created folder, and click on the Upload button with the upward arrow to choose the files that you need to upload.
upload files using google drive
  • Now, navigate to the location where you saved the files, select them (to select multiple files, press and hold down the Ctrl key on your keyboard and then click on them) and press the Open button.
  • After the files have been successfully uploaded, right click on the file names (to select all your files in the folder, click on the checkbox) and select 'Share':
share google drive files
  • In the 'Sharing settings' window, click on the 'Change' link and choose the 'Public on the web' option. Press 'Save' and copy the link(s) of your uploaded file(s) from the 'Links to share' box highlighted in blue, then paste it into a Notepad to use it later.
javascript css file sharing

Step 3. How to Add an External CSS/JavaScript file to Blogger

Before you can use the links, you must replace 'https://drive.google.com/file/d' to 'https://googledrive.com/host' and remove '/edit?usp=sharing' in the link.

For example, the link to mycssfile.css that I copied looks like this:
https://drive.google.com/file/d/0B4n9GL3eVuV-TkphMkc3SFR2Slk/edit?usp=sharing
Notice the part in blue after the "/file/d/" part. That is the file ID which is used to access it via the new hosting service. It should start with the following URL:
https://googledrive.com/host/
Add the file ID like this (remove the '/edit?usp=sharing' part):
https://googledrive.com/host/0B4n9GL3eVuV-TkphMkc3SFR2Slk
Now log into your Blogger account, select your blog and go to Template > Edit HTML. Click anywhere inside the code area and press the CTRL + F keys to open the search box:

open blogger search box

If you want to add a CSS file, type the following tag inside the search box and hit Enter to find it:
<head>
Just BELOW the <head> tag, add this line:
<link rel="stylesheet" type="text/css" href="https://googledrive.com/host/0B4n9GL3eVuV-TkphMkc3SFR2Slk" />
And replace https://googledrive.com/host/0B4n9GL3eVuV-TkphMkc3SFR2Slk with the link of your CSS file:

add external css to blogger

If you want to add a Javascript file, search for the following tag:
</body>
And add this line just ABOVE it:
<script src='https://googledrive.com/host/0B4n9GL3eVuV-eVYwLXBrTlZrVDg' type='text/javascript'></script>
Replace the line in blue with your URL:

add external javascript js to blogger

Finally, press the 'Save template' button to save the changes. And you're done!

In Conclusion

Once you have saved all your file folders and closed out of the drive, open your site in a browser and make sure that all the changes have completed successfully.

Next time you want to edit any of the information or move internal files, all you have to do is open up the Google Drive folder on your account and make the modifications from that location. Those files will then automatically sync to the online folder and make updates to your site. This works the same if you want to change the appearance by modifying the CSS code to extend the header, footer, or make customizations.

As you can see, changing your file storage out so that is CSS and JavaScript is stored on your Google Drive account is easy to do and only takes a few minutes. After you make the change, you can begin benefiting from faster loading speeds, higher SEO rankings, and overall a more convenient platform to work from to increase the efficiency of your work.