Showing posts with label blogger pages. Show all posts

How to Create a Static Home Page in Blogger

When it comes to home pages, most websites can be divided into two: static and non-static. As their name implies, static home pages stay permanent no matter how many times the website is updated, while non-static home pages reflect the changes that are made to the site and show the latest posts first.

The latter has become well-known nowadays due to the rising popularity of personal and even corporate blogs. However, there are still many people who prefer static home pages because it makes their websites look more organized and professional. It also gives them more control over the readers' experience on their site and helps them create stronger brand awareness through the uniform message that their home page presents.

Fortunately, if you own a Blogger site and want to make your home page static, you'll find that creating one isn't as difficult as it seems. You can create a static home page in Blogger by taking these steps:
static pages in Blogger

1. Create your static home page

The first thing you should do is to create a new page for your blog. This will serve as your static home page but, for now, it will look and act like any other page in your site.

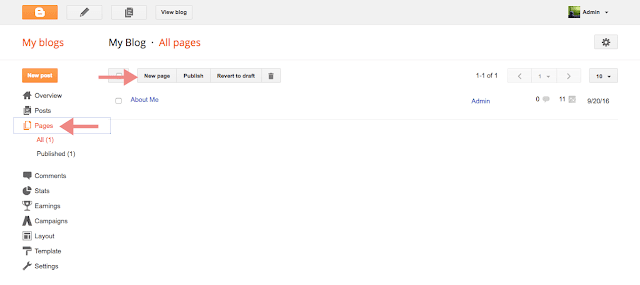
To make this page, you'll need to go to the main menu of the Blogger dashboard and click on the "Pages" option on the left side on the screen. Doing this will lead you to the "All Pages" menu window. Here, click on the "New Page" button and you'll enter an editor that looks similar to the Blogger Post editor that you use when publishing a new blog post.
static home page

At the top box, enter the title that you want for this page - in this case, let's call it the "Welcome" page. In the larger text box, type the content that you want to appear on your home page; this can be a paragraph, or two about yourself or your business and what your site is all about.


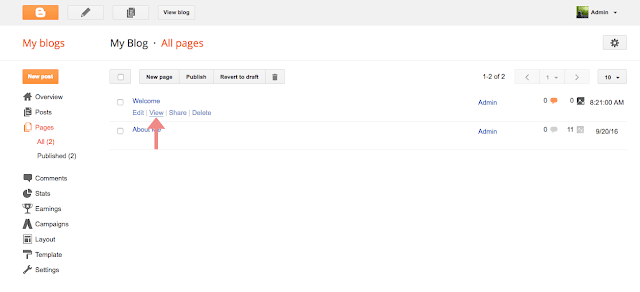
Once you're done, click "Publish". The window will return to the main "All Pages" menu, and you'll see the new "Welcome" page you've created. Copy the URL of the "Welcome" page since you'll need it later on. To do this, right click on the 'View' link and select 'Copy Link Location' from the menu.


2. Redirect the default home page to the static one

Once your "Welcome" page is up, the next thing you should do is to change Blogger's default homepage. This involves redirecting from your site's original home page to the static homepage that you've created so it would be the first thing that people see when they visit your website.

Related: How to Set Custom Redirects in Blogger

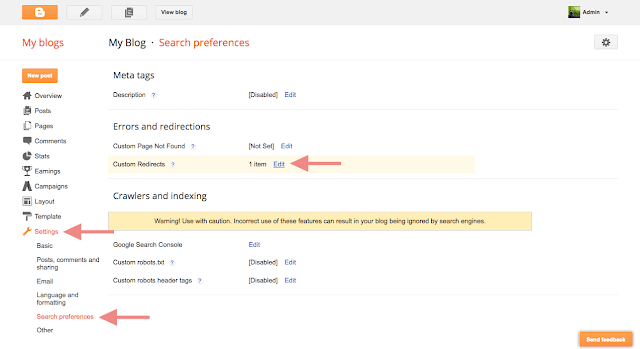
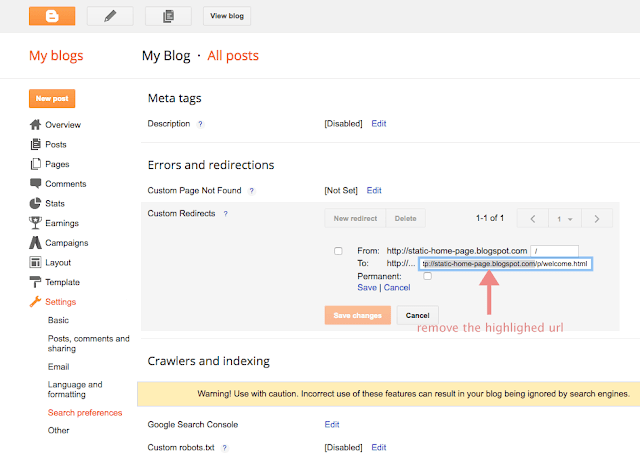
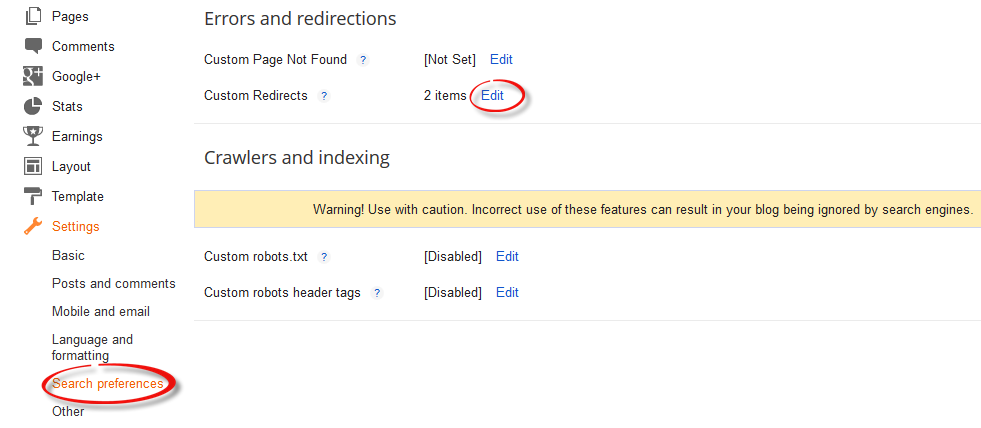
To do this, you'll need to go to main Blogger editor menu, click on "Settings" on the left side of the screen, and choose "Search Preferences". Under the "Errors and redirections" section, you'll see the "Custom Redirects" option with an "Edit" link beside it. Click on the "Edit" link to open another window, where you'll see two boxes named "From" (with your blog's URL beside it) and "To".

In the "From" box, enter only a forward slash symbol "/". In the "To" box, paste the URL that you copied earlier and add the latter part of the URL of the "Welcome" page. For instance, the page's URL of our demo blog is static-home-page.blogspot.com/welcome.html, so we'll remove the "http://static-home-page.blogspot.com" address and add only "/p/welcome.html" in the "To:" box. The "/p" signifies that it's a static page.

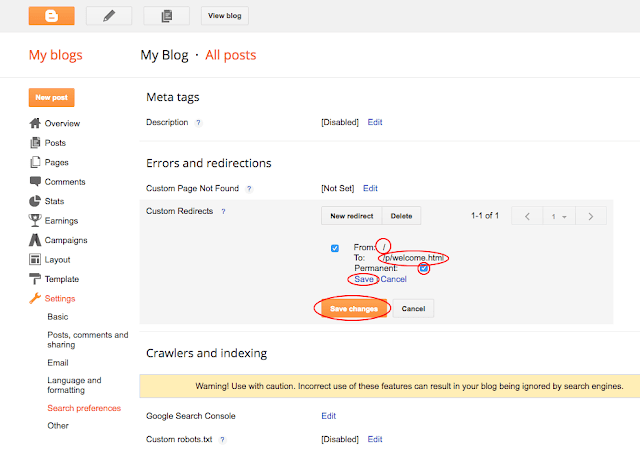
Next, check the little box beside "Permanent", click on the "Save" text link, and press the "Save changes" button. Doing these will redirect your site's main URL to its new static home page. Access your blog on a separate browser to see if it works.

3. Make tabs for your site

If you're not planning to make tabs visible in your blog, you can stop at Step #2. But, if you want your site to have tabs that indicate the home page, the main blog page, and other pages you may have (such as the FAQs and Contact Us pages), you'll need to take another step.

Why is this important? Basically, when visible tabs are enabled in your site, they will show that you have two existing pages: the default home page and the new "Welcome" page you've created - both of which redirect to the same static page. This can be confusing for your readers and may even affect your search engine rankings.

To fix this, you first need to enable tabs by going to the "Layout" menu item and click on the "Add a Gadget" link. You can choose to add it below your blog header or sidebar. In many cases, it's advisable to add it below blog's header since they're more visible and give your website a sleek, professional look.
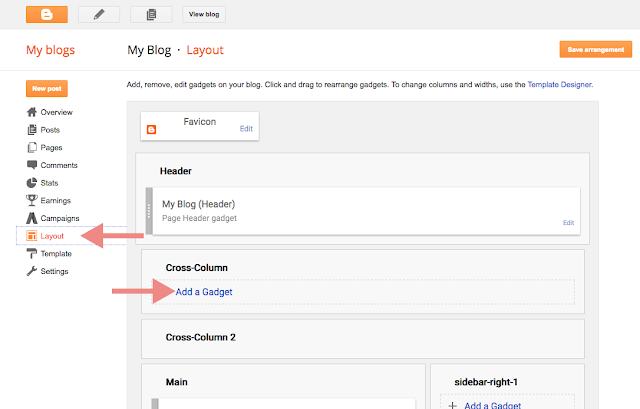

Once the pop-up window opens, scroll down and click on the 'Pages' link:
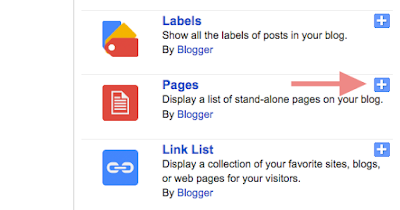

This will open another window named "Configure Page List". Here, under the "Pages to show" section, you'll see the default home page and your new static homepage with small boxes beside them. Uncheck the box beside the default home page to hide it from view, check the pages that you want to display in the menu and then click on the "Save" button to save the changes.
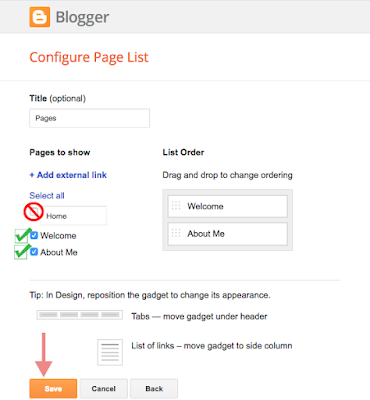

You can stop at this point but, if you want, you can also create a specific tab that will lead to your main blog post page. To do this, edit the "Pages" gadget that you just saved and click "+ Add external link".
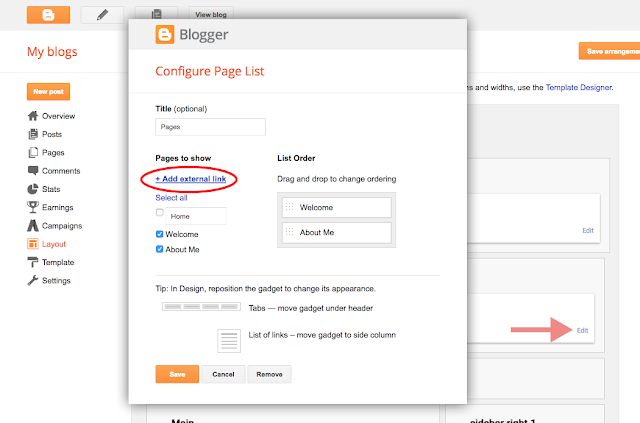

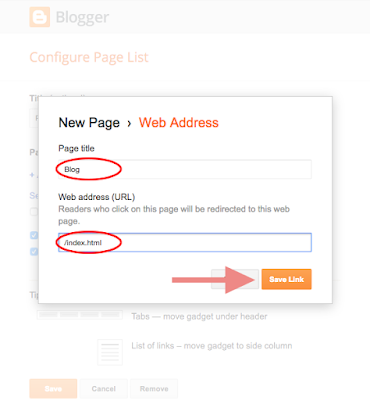
On the new window that would open, enter the title you'd like for the page (such as "Blog") along with /index.html web address, then hit "Save Link" and click the "Save" button on the "Configure Page List" window.

Now, view your site and you will see the pages menu containing the "Welcome" page and "Blog" tabs. To see how this works, you can also visit our demo blog. Enjoy!

Final Note

Having a static home page can be beneficial for your blog. Follow the steps above now to create a static home page in Blogger!

How To Set Custom Redirects in Blogger

Over time, most blogs may go through many changes, like posts being added or deleted. In some occasions, you don't want people to get 404 messages when they navigate to posts or pages that don't exist on your blog and instead, make all requests to a specific link to be redirected to another page. One of the best way to avoid broken links and keep your traffic flowing in the right direction is setting custom redirects via the Blogger Custom Redirects tool.

This tutorial will show you how to set custom redirects for Blogger posts and redirect an old URL to a new URL. But before redirecting any URL, you must know that there are two types of redirects:
  • A 302 redirect means that the page has moved temporarily. This redirect doesn't pass the URL value to the new location and instead, it will take the visitors to an appropriate location so that you aren't showing them a 404 page not found, or an error page. You can use a 302 redirect for coming soon pages or maintenance pages.
  • A 301 redirect means that a page has moved permanently to a new location. Use the 301 redirect when you deleted or changed the URL of your post. In most instances, the 301 redirects are always recommended for SEO because they will pass link juice (ranking power) to the redirected page and visitors will also benefit from this. However, 301s aren't suitable when you change your custom-domain, because it only supports redirection within the same blog, not to an external URL.
Now that we've established which is which, let's see how to set custom redirects for Blogger posts.

How to redirect old URL to new URL in Blogger

Step 1. Login to you Blogger account with email and password.

Step 2. Click on your blog > go to Settings \ Search Preferences and click "Edit" next to "Custom Redirects."

search preferences, custom redirects, 301, 302 redirect

Step 3. Enter the old URL in the "From" field, and the new URL in the "To" field including the forward slash "/" (see the screenshot below)

custom redirects, redirect old url to new url

Note: Do not enter the full URL in these fields. Just omit the address of your blog and type only the rest of the link. Again, this works only if you wish to redirect within your blogger blog and not to any external links.

Step 4. Click the "Save" link (1) and the "Save changes" button (2), and you're done!

blogger custom redirects
blogger custom redirect

If you want to redirect more pages, just click the "New redirect" button. Also, you can check out this tutorial to learn how to create a static homepage in Blogger using custom redirects.

How to add Static Pages to a Blogger Blog (UPDATED)

A few months ago, Blogger has completely redesigned the section of the Pages, which now, looks very similar to that of the Blogger Posts. Now we will be able to manage the pages with more flexibility. For example, we can publish, delete or change many of them to draft at the same time - which has just the same function as the old Don't show option.

Related: How to Create a Static Home Page in Blogger

Among the options that we can find by hovering over a page and which we can see in the screenshot below are:
  • Edit: To access the editing panel and to edit its contents.
  • View: Open a new tab with the actual page.
  • Share: Share it on Google+ (which was not possible before).
  • Delete: remove a page.
add static pages on blogger
static pages, blogger

In order to create a page, we need to open the pages editor from the button that says New Page. Almost every option tells us its function.

How to add a Web Address in the Pages widget

Many Blogger users wanted to know how can we add other web addresses, so that they display in the list of the Pages widget, since this option no longer appears in the "Pages" tab?

This can be done by opening the settings of the Pages widget by going to "Layout", then click on the "Edit" link in the widget / gadget for Pages (if you don't have the Pages gadget, just click on the "Add a gadget" link and select "Pages" from the pop-up window). And from there, we will find the option that says: "Add link page" - here, we will have to type the Web Address in the second field every time we want to add a new page from a specific address or URL.

add web address, blogger tutorial

Another cool feature that has been built is that now it will be possible to add a search description, and in that field to add the text that we want to appear in search results. Until now, this option has been available only for blog posts.

search description for pages

This option will appear once you enable the "Enable search description?" option by choosing "Yes". This will show up on "Meta Tags" by accessing the preferences for the search engines: "Settings" > "Search preferences" > "Meta Tags" > "Enable search description"?

New Blogger Widget: Contact form - Change Style & Install in a Static Page

Just a few days ago, Blogger introduced a new contact form widget that you can add to your blog easily. At the moment, it is very basic because, at least for now, does not allow sending files or anything other than plain text.

The contact form for Blogger has the following features:
  • Field for the user name
  • Field for email
  • Field for the message (textarea)
  • Submit Button
contact form, blogger gadgets, static page
The design is simple and the text colors inherit the section where you add it. At the moment, this widget has no configuration options and is not available for dynamic views.

How to Add Contact Form to Blogger

To add it to your blog, just select the Layout tab, then click on "Add a gadget" in the section you want to show - for example, in the sidebar. Then, select the More gadgets tab and add the Contact Form gadget.


blogger gadgets, blogger widgets, contact form

Styling Contact Form

Since the background is transparent, the form will blend well aesthetically speaking, but nevertheless it is easy to modify using Style Sheets (CSS) to the appropriate selectors. Here's an example:

/* Contact Form Container */
.contact-form-widget {
width: 500px;
max-width: 100%;
margin: 0 auto;
padding: 10px;
background: #F8F8F8;
color: #000;
border: 1px solid #C1C1C1;
box-shadow: 0 1px 4px rgba(0, 0, 0, 0.25);
border-radius: 10px;
}

/* Fields and submit button */
.contact-form-name, .contact-form-email, .contact-form-email-message {
width: 100%;
max-width: 100%;
margin-bottom: 10px;
}

/* Submit button style */
.contact-form-button-submit {
border-color: #C1C1C1;
background: #E3E3E3;
color: #585858;
width: 20%;
max-width: 20%;
margin-bottom: 10px;
}

/* Submit button on mouseover */
.contact-form-button-submit:hover{
background: #4C8EF9;
color: #ffffff;
border: 1px solid #FAFAFA;
}

This is how it will look like after applying the style:
contact form, blogger gadgets, contact form for blogger

To add this style, go to Template > Edit HTML, click on the sideways arrow next to <b:skin>...</b:skin> and paste the code just above ]]></b:skin> (press CTRL + F to find it):


How To Add Contact Form In A Static Page


First step is to add the Contact Form gadget (Layout) and second, to edit the template (Template > Edit HTML) to remove most of the gadget. You have to search for the id "ContactForm", expand the widget by clicking on the black arrow on the left (same with the includable) and then delete the part that I have colored in red (see below):

Part to be removed:

  <b:widget id='ContactForm1' locked='false' title='Contact Form' type='ContactForm'>
    <b:includable id='main'>
  <b:if cond='data:title != &quot;&quot;'>
    <h2 class='title'><data:title/></h2>
  </b:if>
  <div class='contact-form-widget'>
    <div class='form'>
      <form name='contact-form'>
        <p/>
        <data:contactFormNameMsg/>
        <br/>
        <input class='contact-form-name' expr:id='data:widget.instanceId + &quot;_contact-form-name&quot;' name='name' size='30' type='text' value=''/>
        <p/>
        <data:contactFormEmailMsg/> <span style='font-weight: bolder;'>*</span>
        <br/>
        <input class='contact-form-email' expr:id='data:widget.instanceId + &quot;_contact-form-email&quot;' name='email' size='30' type='text' value=''/>
        <p/>
        <data:contactFormMessageMsg/> <span style='font-weight: bolder;'>*</span>
        <br/>
        <textarea class='contact-form-email-message' cols='25' expr:id='data:widget.instanceId + &quot;_contact-form-email-message&quot;' name='email-message' rows='5'/>
        <p/>
        <input class='contact-form-button contact-form-button-submit' expr:id='data:widget.instanceId + &quot;_contact-form-submit&quot;' expr:value='data:contactFormSendMsg' type='button'/>
        <p/>
        <div style='text-align: center; max-width: 222px; width: 100%'>
          <p class='contact-form-error-message' expr:id='data:widget.instanceId + &quot;_contact-form-error-message&quot;'/>
          <p class='contact-form-success-message' expr:id='data:widget.instanceId + &quot;_contact-form-success-message&quot;'/>
        </div>
      </form>
    </div>
  </div>
  <b:include name='quickedit'/>

</b:includable>
  </b:widget>

After you have saved the template, go to Pages and paste the following code into a new blank page with the title you want:

 <div class='widget ContactForm' id='ContactForm1'>
  <div class='contact-form-widget'>
    <div class='form'>
      <form name='contact-form'>
        <p>Name</p>
        <input class='contact-form-name' id='ContactForm1_contact-form-name' name='name' size='30' type='text' value=''/>
        <p>E-mail *</p>
        <input class='contact-form-email' id='ContactForm1_contact-form-email' name='email' size='30' type='text' value=''/>
        <p>Message *</p>
        <textarea class='contact-form-email-message' cols='25' id='ContactForm1_contact-form-email-message' name='email-message' rows='5'></textarea>
        <input class='contact-form-button contact-form-button-submit' id='ContactForm1_contact-form-submit' type='button' value='Submit'/>
        <p class='contact-form-error-message' id='ContactForm1_contact-form-error-message'></p>
        <p class='contact-form-success-message' id='ContactForm1_contact-form-success-message'></p>
      </form>
    </div>
  </div>
</div>

Messages will be sent to the same email that you have registered in Blogger.

Here is the demo page where you can test it (this is an account for demo purposes only, so don't expect any reply).

That's it! If you have any questions or comments, leave them below.